How To: Make Your Own Rear O2 Simulator for $5

Does this work for 4th gen?

I'm reading through this and made an attempt for my 2003 4th gen. Texas is eliminating the need for inspections in about a year and I want to get rid of this code for my rig. I followed these instructions precisely, used solder and glue-tubed heat shrink but both sides are throwing codes (P0136 and P0156). I've grabbed a slightly different capacitor (35v instead of the 50v specified here) to see if it'll work (I'll solder it in later this week) but I'm not holding out hope.

$6.00 DIY O<sub>2</sub> Sensor MIL Eliminators

This guy seems to indicate that steady read feedback from the rear (which is what I assume this simulator will provide) will cause the errors I'm seeing.

So, before I put in the defoulers, is there any way to do this for a slightly newer rig?

Thanks y'all.
 
I'm reading through this and made an attempt for my 2003 4th gen. Texas is eliminating the need for inspections in about a year and I want to get rid of this code for my rig. I followed these instructions precisely, used solder and glue-tubed heat shrink but both sides are throwing codes (P0136 and P0156). I've grabbed a slightly different capacitor (35v instead of the 50v specified here) to see if it'll work (I'll solder it in later this week) but I'm not holding out hope.

$6.00 DIY O<sub>2</sub> Sensor MIL Eliminators

This guy seems to indicate that steady read feedback from the rear (which is what I assume this simulator will provide) will cause the errors I'm seeing.

So, before I put in the defoulers, is there any way to do this for a slightly newer rig?

Thanks y'all.

Do you have a scan tool? Can you post a graph of what your B1S2 O2 sensor is reporting as you drive down the highway?
 
Do you have a scan tool? Can you post a graph of what your B1S2 O2 sensor is reporting as you drive down the highway?

Last night I put the passenger side sensor back to factory (removed the simulator) and put 2 foulers on it (Dorman 42002 and 42009). So my setup now is your simulator on driver side and anti-foulers on passenger side. Here is a pic of Torque in my driveway after running for about 10 minutes. First pic of me revving the engine, 2nd pic is just letting it idle. Bank 2 is much more dynamic (at least in the driveway). Also pics of the simulator and the anti-foulers. I appreciate any thoughts? I can also do a screen recording later today when I go pick up the kids from school.

fdI1UJn.jpg

zNJS280.jpg

LfV44JD.jpg

dqxNoYQ.jpg
 
Last edited:
Here's a vid of OBDII readouts on the frontage road. https://i.imgur.com/z1CDFZk.mp4

The non-fouler method you used is a better option. I would go with that. You've got the O2 sensor that screws into the exhaust pipe. Some of the earlier 3rd gens ('96-2000 I think) have the O2 sensors that bolts to an exhaust pipe flange, so we can't use that non-fouler method. I recommend ditching the circuit method and going with the non-foulers.

Again, I want to reiterate that I didn't come up with this mod on my own. I took how-to's from other sites, applied them to my 4Runner, then posted what worked for me. Eventually my rear O2 sensor died, and I never bothered to swap the resistor/capacitor over to my new O2 sensor. For now, I'm just living with the P0420 CEL because my 4Runner isn't my daily driver, and they finally did away with emissions testing in my area.

I took some basic circuits classes in college years ago, and since I don't use it in my day-to-day job, I remember little of it. I am not an electrical engineer. I do understand that this is a RC Low Pass filter that passes low frequency voltage changes, and blocks high frequency changes. The explanation below is the best one I've found as far as how the RC Low Pass filter works in this application:

"The time also called the transient response, required for the capacitor to fully charge is equivalent to about 5 time constants or 5T. This transient response time T, is measured in terms of τ = R x C, in seconds, where R is the value of the resistor in ohms and C is the value of the capacitor in Farads"

So to boil that down, increasing either the impedance (ohms) of the resistor or the capacitance (Farads) of the capacitor results in longer response time of the circuit. Conversely, decreasing either the impedance or the capacitance decreases the response time. The trick is finding what response time the ECU is looking for. If you want to keep going with the circuit method in lieu of the non-fouler, I would suggest replacing the 1MΩ resistor with a 510KΩ one, and see if the ECU likes that better. That should provide roughly half the response time as the original circuit. If that doesn't work, then I would try leaving the 510KΩ resistor in place, and replacing the 1μF capacitor with a 4.7μF one, and see how the ECU likes that. If the ECU is still upset, leave the 4.7μF capacitor in place, and put the original 1MΩ back in to see if that satisfies the ECU. If none of those work, then chuck the whole thing in the trash.

It's going to be a trial and error of swapping out resistors and capacitors to see what finally makes the ECU happy. I would recommend putting spade connectors on the blue and white O2 wires, and spade connectors on the resistors and capacitors so that you can easily and quickly swap them out.
 
Last edited:
Here's a vid of OBDII readouts on the frontage road. https://i.imgur.com/z1CDFZk.mp4

What would be interesting to see would be to take the non-fouler out of your passenger side rear O2, and run that sensor in it's normal place. Keep the RC Low Pass circuit on your driver side in place, and take another run down the highway at a steady speed. Would love to see how much the circuit is actually smoothing out the voltage changes.
 
I took some basic circuits classes in college years ago, and since I don't use it in my day-to-day job, I remember little of it. I am not an electrical engineer. I do understand that this is a RC Low Pass filter that passes low frequency voltage changes, and blocks high frequency changes.
All good/correct information. I'd like to add that working cats 'smooth' the signal chemically (additional storage/release/reaction of combustion products) and the non-foulers do it mechanically (slowing/mixing exhaust flow in the volume inside the non-fouler). From a systems engineering perspective, they all do the same thing.

-Charlie
 
Hi, I know its an old post. I followed the instructions closely. Making sure the negative side of capacitor is to white wire and resistor towards sensor side on blue wire. I am somehow getting the p0136 and p0156 code, passenger and driver side respectively. Should the resistor be farther away?

1M ohm resistor, 1uF 50V capacitor. I decided to make the connections closer to plug side to be away from heat of catalyst.

Tried uploading a picture, but having issues.

At least the money light is out lol still need p0136 and p0156 to go away to pass emissions.
 
I used the 1M resistor and 50V capacitor, I have the same p0136 p0156 on my 2004 4runner. Let me know if you have found a solution.

At least my check engine light is off but the p0136 and p0156 will probably make me fail emissions.

I'm reading through this and made an attempt for my 2003 4th gen. Texas is eliminating the need for inspections in about a year and I want to get rid of this code for my rig. I followed these instructions precisely, used solder and glue-tubed heat shrink but both sides are throwing codes (P0136 and P0156). I've grabbed a slightly different capacitor (35v instead of the 50v specified here) to see if it'll work (I'll solder it in later this week) but I'm not holding out hope.

$6.00 DIY O<sub>2</sub> Sensor MIL Eliminators

This guy seems to indicate that steady read feedback from the rear (which is what I assume this simulator will provide) will cause the errors I'm seeing.

So, before I put in the defoulers, is there any way to do this for a slightly newer rig?

Thanks y'all.
 
This is definitely illegal if you live in a smog state.

Reminds me of the O2 sensor spacers people were using in the early 2000s to move the sensor away from the exhaust so it would read legal levels of emissions.

It's probably an easier cheat to hide from smog since it can be anywhere along the wiring.
 
This is definitely illegal if you live in a smog state.

Reminds me of the O2 sensor spacers people were using in the early 2000s to move the sensor away from the exhaust so it would read legal levels of emissions.

It's probably an easier cheat to hide from smog since it can be anywhere along the wiring.

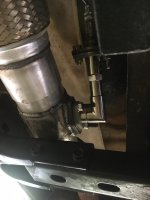
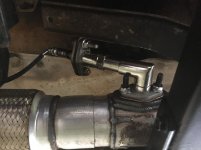
So I actually ended up going with a sensor spacer, and one that works with the Toyota 2-bolt flange type. The RC low pass filter worked well for me, but I never got around to reinstalling it on my new downstream O2 sensor. I deleted my cat entirely when I installed the turbo, had to make a custom pipe that connected the CX Racing mid pipe (after the downpipe) with the stock muffler inlet flange. So far, with no catalytic converter, the CEL has stayed away with this spacer.
 

Attachments

  • Sensor Spacer 1.jpg
    Sensor Spacer 1.jpg
    127.8 KB · Views: 539
  • Sensor Spacer 2.jpg
    Sensor Spacer 2.jpg
    131.3 KB · Views: 538
I know this is an old post but I’m hoping someone will see this…Im doing something wrong because this will not work on my 01. I keep getting the o2 circuit code after doing the mod.

From the way i interpret the diagram, one leg of the capacitor splices into the blue wire and other leg splices white. Then i cut the blue wire in between the sensor and the capacitor leg and put the resistor. Is this correct??
 
I know this is an old post but I’m hoping someone will see this…Im doing something wrong because this will not work on my 01. I keep getting the o2 circuit code after doing the mod.

From the way i interpret the diagram, one leg of the capacitor splices into the blue wire and other leg splices white. Then i cut the blue wire in between the sensor and the capacitor leg and put the resistor. Is this correct??

Sounds correct. Which code number are you getting?
 
First off thank you for the insight on wiring and specs. Worked like a charm. Ended up making a patch harness with oem connectors and wired it up at work. I think the hardest part of the whole thing is finding a good orientation for the capacitor so it doesn’t get damaged when installing the harness or by vibrations when driving.
 

Members online

Forum statistics

Threads
278,316
Messages
3,554,120
Members
248,016
Latest member
Advally Service

Trending content

Back
Top