Icon Stage 1 installed, but...

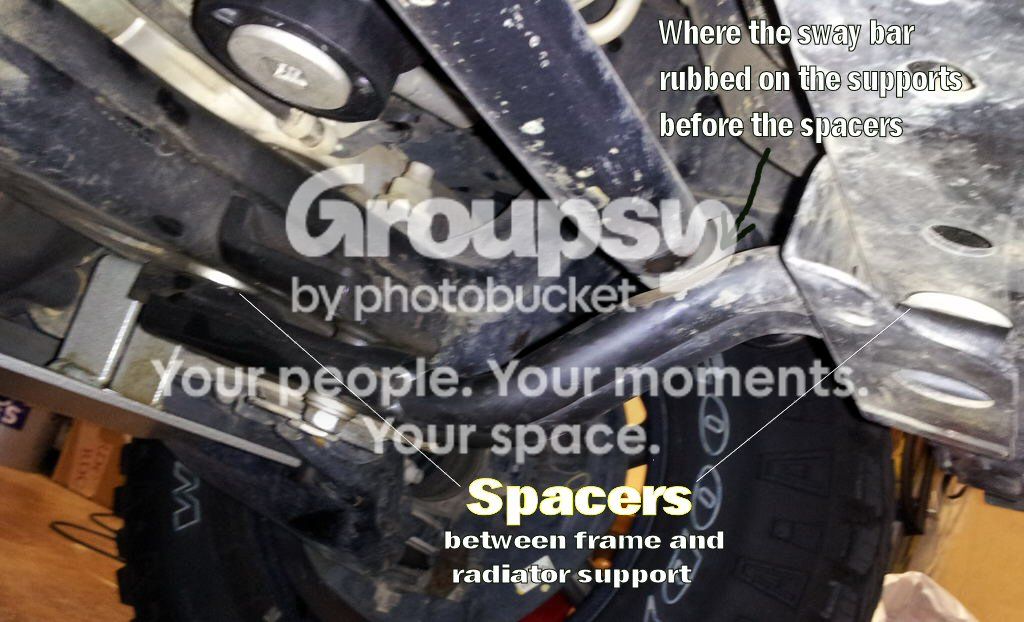
I guess next is to see if they have the spacers so the sway bar doesn't hit/rub the drivers side support making noise. Mine made some awful grinding type noise when it rubbed before I figured it out. Ran without my sway bar on for the longest time before I put spacers on.
20120328_010251.jpg~original


Also check to see if the LR UCA's are on the 0(zero) setting and in the right amount or they can contact the springs and make awful noises if set wrong.
DriversUCA.jpg~original

Initial setting at Zero and in about 1/4"
LRNUT.jpg~original

You are the man, harper! I see now what you were talking about with the pencil. I'll check it a bit later tonight and report back.
 
Here are some pictures of the LR UCA settings. Looks like both of them are set around -2.

dsuS0l.jpg


As you can see, a pencil fits in the adjustment gap which means they're much further back than the 0 setting.

ChbAGl.jpg
 
Unfortunetly it looks like they installed your balljoints backwards...hence why they are back so far in the arm

Here are some pictures of the LR UCA settings. Looks like both of them are set around -2.

dsuS0l.jpg


As you can see, a pencil fits in the adjustment gap which means they're much further back than the 0 setting.

ChbAGl.jpg
 
Last edited:
Very interesting

Excellent pics harper.

Harper can you explain why your SPC logo ended up facing forward vs. These overland warehouse instructions that have it facing directly out?

http://stores.overlandwarehouse.com/images/LR-UCA-Tips.pdf

I am sitting here looking at my LR UCA and positioning them around to mimic yours. It appears to me that in your pictures yours is not set at the Position D on the instruction sheet, ball joint setting 0 degrees, total arm 2.0 degrees.

It appears that your drivers side is set with the indexing star plate rotated one position

Also, the overland instructions say for the 2.5" kit to have the ball joint all the way out, for the 2.0 kit to have it in the 1/4" for the additional space to the sway bar.

I was assuming since the Icon was 2.5" I should be set all the way out. Think there would be any difference with KDSS vs standar sway bar?

Also, I am feeling more confident all the time I won't screw up my install this much.... ; )

I have all my parts except one of the rear shocks was bad and I'm waiting for a replacement. Probably have to wait until next weekend.

I can't tell where the logo is on Limamike's truck. Oh, I can now. It is backwards.

Here is a you tube video on LR UCA installation:

25470 -25480- 25490 -Toyota Tacoma/Tundra Adjustable Upper Control Arms - Specialty Products Company - YouTube
 
Last edited:
Sorry for being obtuse, but can you clarify "backwards"?

No probs bud,

See the pics in the link...the flat edge of the balljoint upper plate (edge with SPC logo on it) should be towards the tire, on yours they installed them with the rounded (curved) edge towards the tire.

http://stores.overlandwarehouse.com/images/LR-UCA-Tips.pdf

First pic is looking down at the top of the balljoint only, second is balljoint mounted in the A-arm
 
Last edited:
No probs bud,

See the pics in the link...the flat edge of the balljoint upper plate (edge with SPC logo on it) should be towards the tire, on yours they installed them with the rounded (curved) edge towards the tire.

http://stores.overlandwarehouse.com/images/LR-UCA-Tips.pdf

First pic is looking down at the top of the balljoint only, second is balljoint mounted in the A-arm

Gotcha - I see precisely what you're talking about now. Answers Mick's question about where my logo is, too! Somehow this doesn't surprise me...

Hopefully Bobby can straighten it all out tomorrow!
 
Last edited:
Gotcha - I see precisely what you're talking about now. Answer's Mick's question about where my logo is, too! Somehow this doesn't surprise me...

Hopefully Bobby can straighten it all out tomorrow!

Yes I read back a few post you were going to see him tomorrow. I'm sure he will fix you up in no time, but keep an eye on him anyways.... :jk:

Looking forward to seeing the finished product and all these little setbacks behind you!! Good luck at Duc's tomorrow! :thumb3:
 
I smell a credit card chargeback coming down the line...save all the pics Limamike...

These seem like mistakes *I* might make if I was doing the install - not a shop that did your install and probably countless others. I don't understand it at all. Seems there was no attention to detail when they were putting things together. I really don't have the patience (or time) to drive all the way back down there tomorrow to deal with them in person, so I'll be calling first thing in the morning to explain the further issues I'm having and tell them that they'll be paying a shop (Bobby) to fix everything they screwed-up - or at the very least, paying me to pay Bobby.

I forgot to mention this earlier: as I was waiting for my truck this morning at their shop, another guy came-in with what looked like an early 00's Land Cruiser and was dropping it off to "fix the issue". Didn't catch all the details since they were speaking out of context, but I garnered that it was an electrical issue with a dual battery install they did for him. He also said, "Oh, by the way, can you guys check the washer fluid pump? I don't think it was hooked-up properly last time because it runs, but no fluid comes-out." :redbrick:
 
Here are some pictures of the LR UCA settings. Looks like both of them are set around -2.

As you can see, a pencil fits in the adjustment gap which means they're much further back than the 0 setting.
That would be the problem.To get the camber right they had
to pull it way in and thus is rubbing/hitting the spring.
Set the plate at the zero setting and about 1/4" in, and then realign and you'll be really happy!

but......Did they put spacers on the support brackets or that will be your next place for rubbing and noise.

Good Luck and I'm sure Ducmonsta will get it fixed.

Very interesting

Excellent pics harper.

Can you explain why your SPC logo ended up facing forward vs. These overland warehouse instructions that have it facing directly out?

http://stores.overlandwarehouse.com/images/LR-UCA-Tips.pdf

Also, the overland instructions say for the 2.5" kit to have the ball joint all the way out, for the 2.0 kit to have it in the 1/4" for the additional space to the sway bar.

I was assuming since the Icon was 2.5" I should be set all the way out. Think there would be any difference with KDSS

Also, I am feeling more confident all the time I won't screw up my install this much.... ; )

I have all my parts except one of the rear shocks was bad and I'm waiting for a replacement. Probably have to wait until next weekend.

I can't tell where the logo is on Limamike's truck.

My pics are kind of at a little bit of angle as well as the UCA's on the truck are angled a liitle and facing forward so technically the logo on the drivers side is facing outward and is just angled forward . But they are at zero.lol

When you have it in your hand you should be able to rotate that top gold plate per the instructions and see what the 3 settings are and envision how each setting moves the ball joint forward(+2) or aft(-2) . You want the one in the middle or zero.

I havn't worked on or researched OW's but if I were to guess the 2.5 spring is a little stiffer and thus a little bigger diameter.(750 instead of 650 of the Icons I think?) That's probably why they suggest to start it all the way out so the spring doesn't rub.I read and learned how to install the LR's and Icons by reading over on the FJ forum where they have some experienced peeps.

UCA's are the same for KDSS or non KDSS.
The difference with KDSS is you won't need/use the sway bar relocation kit or the spacers for the supports.

It's really not as hard as all this sounds and this thread should be useful for those that want to DIY and see what not to do.

The only thing that was hard about the Toytec CO install I did on a KDSS and TE was hooking back up the front sway bar to the LCA . I had to use 2 jacks and a couple of long 1/4" punches to line up the holes to get it back on.It wasn't that hard ,just took an 15 minutes or so of struggling with it to figure out what tools were needed.

I've read of strapping the front bar up before taking it loose so the actuator can't extend making it easier to hook it back up but I hav'nt tried it. The rear bar was pretty straight forward jacking it back up into place..

Embedded the vid for easy viewing
Very good youtube video. First time I've seen it but anybody should be able to do it per that!

 
They are "supposed" to be Toyota guys. I don't know them personally. They are pretty far south from me (50-80mi?). We don't see much of their issues. There are, however, many shops close to home that we "fix". Seems that we're the ones that get all the "leftovers" after some shop has been incompetent and someone needs the installation or repair to be done again, properly.

I will never personally "bash/attack" another shop. And I train my employees to do the same. It doesn't do any good, and it makes you look like a 6 yr old. I tell my team to take the high road and SHOW our clients why we're better. Not TELL them.

But either way, experts or not, one should ALWAYS read instructions.

Agreed and apologies, not my intent to bash or attack this shop, sorry if it came across that way. Your ending comment hit the nail on the head! Had the tech taken the few extra minutes to read, and most importantly, understand the install instructions we probably wouldn't be having this conversation and we'd just be posting accolades on the new lift and look of Limamike's ride.
 
Harper did you have both ends of the truck in the air when you struggled with the KDSS sway bar replacement? Or was it just the front in the air / rear on the ground.
 
tumblr_lojul1hoB91qgzuxc.jpg


Good luck limamike. I'm glad I went to Bobby first with my lift.

I've noticed my alignment's a little off when i'm in 4x4. Will need to bring it back to you for some adjustments and some new gear.
 
Harper did you have both ends of the truck in the air when you struggled with the KDSS sway bar replacement? Or was it just the front in the air / rear on the ground.
Both, I had it up on jack stands and did the rear first.
 
Agreed and apologies, not my intent to bash or attack this shop, sorry if it came across that way. Your ending comment hit the nail on the head! Had the tech taken the few extra minutes to read, and most importantly, understand the install instructions we probably wouldn't be having this conversation and we'd just be posting accolades on the new lift and look of Limamike's ride.

No need for apologies. I did not think you were bashing them at all. In fact, I took your choice of words as poking fun at them. Of course, not at the expense of Lima.

We (High Tech) are deemed 4x4 experts. And while we are specialists and are more familiar with ALL 4x4 systems than the average shop (or dealer for that matter), it is very difficult to know EVERYTHING about ALL makes and models 4x4. Take the aftermarket industry into account and now you've got more things to know about.

Regardless, any technician, any shop, any skill level, should be able to read! If you're not familiar with something, ASK. Whether it's one of your peers, your boss, or the internet. There is too much information available for you not to do your job well.

Lima-we'll do our best to get you back on track!
 

Members online

Forum statistics

Threads
278,312
Messages
3,554,089
Members
248,016
Latest member
Advally Service

Trending content

Back
Top