

Nashvegas34
New member
I am kicking myself for not having done this long long ago, but I finally installed new Hella MicroDE fog lights for my 2000 SR5. There has been a lot of discussion here on the internets about how easy/difficult this is and the extent of the wiring already present on the SR5. As many of you know, if you look under the bumper behind the fog light knockouts there is an open connector just waiting to fulfill its purpose in life.
I bought this light kit:
TOYOTA SR5 4RUNNER FOG/DRIVING LIGHTS HELLA LAMP KIT | eBay
It comes with the lights, bulbs, relay, switch, and wiring, plus instructions for mounting the lights and wiring the switch to the dash. I didn't really want a dash switch, though. I wanted the switch on the turn signal stalk, like it would have come from the motherland had it been so equipped, so I bought this:
Part Detail
Part number 84140-14120 for my 2000.
The instructions say to mount the lights, then wire the switch. I did it in reverse because I wanted to make sure the new turn signal stalk would operate the lights before dealing with the actual mounting and alignment (more on this in a bit).
Photo 1:
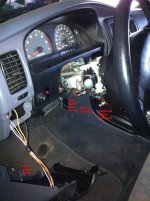
I started by taking off the panel beneath the steering column, held on by 4 10mm bolts. Make sure you have a 10mm socket. This just so happened to be the one I lost back in the day changing the mother-in-law's Buick headlight. Needlenose pliers worked here, but would not work in a later step. In the pic above, the panel is resting on the floor but still hanging by the hood and fuel door release cables, You can disconnect these to get the panel completely off, but not necessary. Then, remove 3 screws from the bottom half of the steering column cover. One screw is right below the steering wheel. The other two are behind the wheel, so turn the wheel to get to them. The top and bottom of the steering column cover are clipped together, so I had to push, pull, and squeeze to get them to separate. Also in the pic, there are two small Phillips screws holding the turn signal stalk in place, and a wiring harness plugged into the bottom of the stalk. On the harness, push in the clip and the harness pulls right out. On the stalk, remove the two screws and the stalk pulls right out. Slide the new stalk in and insert screws, insert the harness, then put the steering column cover and lower panel back on with the screws and bolts. I then confirmed that the new stalk worked the headlights and blinkers. I also went ahead and put the relay into the empty slot in the fuse box in the engine bay and plugged up one fog under the bumper and confirmed that it worked. This is literally all there is to the wiring if you're not doing the dash switch.
Photo 2:
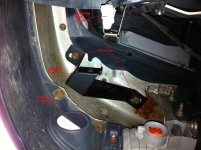
I then went under the bumper and attached one of the mounting brackets. This is where I really needed the 10mm socket, so I made a trip to the neighbor's. Once the bracket is attached, space is really tight around the nuts, so have a small ratcheting wrench or driver available. The nuts are only slightly larger than the hole in the mounting bracket, so I added some washers (shown in photo 3 below) to make sure the old rusty nuts wouldn't break and slip through and cause disaster at 75mph.
Photo 3:
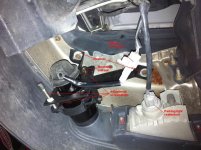
This is where it got fun. And by fun I mean complicated. And by complicated I mean :wtf: The light is attached to the bracket by a single bolt, although the attachment feels solid. This mounting bolt, along with the other bolts/screws marked in the photo, are all used to position and align the light with the hole. In fact, even the 2 10mm nuts holding the bracket to the bumper can be loosened to help with this. The tricky part is that the front of the light with the lens does not slide into the hole, it only rests against the back rim of the hole. This means all of the alignment screws have to be used to properly seat the light against the back of the hole. At one point I swore the light was existing in 4-dimensional space because every adjustment I made seemed to screw up another one. It would be helpful to have a friend with whom you're comfortable in close quarters hold the light steady while you adjust and tighten. Even then, though, I still had to make several adjustments by turning the lights on and seeing where they were aimed.
I rinsed and repeated photos 2 and 3 for the light on the other side.
The next photos are how my truck looked before and after:
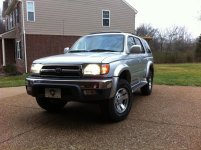
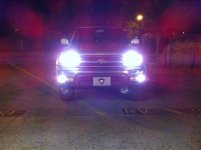
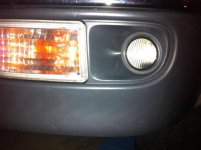
The install was way easier than I expected for the part around the steering column and dash, and harder than I expected actually mounting the lights. Overall I am extremely happy with the result. Having the switch on the stalk is great. I did some driving on rural interstate earlier tonight after finishing and the lights make a huge difference. I'm not sure I can drive with just my low beams anymore. The fogs don't project as far out straight ahead as the high beams, but spread light low and way out wide, making it much easier to see things like deer or road debris at night. I'll probably check the mounting every couple of days for a while to make sure nothing is coming loose, but I think I have everything pretty tight.
I would definitely recommend this seller on eBay. The lights were packaged very well, with plenty of padding, and communication was excellent. He also included a pair of 2"x5" rectangular driving lights, along with a wiring kit, that I plan to use for rear-facing auxillary lights. Overall, very pleased.
I bought this light kit:
TOYOTA SR5 4RUNNER FOG/DRIVING LIGHTS HELLA LAMP KIT | eBay
It comes with the lights, bulbs, relay, switch, and wiring, plus instructions for mounting the lights and wiring the switch to the dash. I didn't really want a dash switch, though. I wanted the switch on the turn signal stalk, like it would have come from the motherland had it been so equipped, so I bought this:
Part Detail
Part number 84140-14120 for my 2000.
The instructions say to mount the lights, then wire the switch. I did it in reverse because I wanted to make sure the new turn signal stalk would operate the lights before dealing with the actual mounting and alignment (more on this in a bit).
Photo 1:
I started by taking off the panel beneath the steering column, held on by 4 10mm bolts. Make sure you have a 10mm socket. This just so happened to be the one I lost back in the day changing the mother-in-law's Buick headlight. Needlenose pliers worked here, but would not work in a later step. In the pic above, the panel is resting on the floor but still hanging by the hood and fuel door release cables, You can disconnect these to get the panel completely off, but not necessary. Then, remove 3 screws from the bottom half of the steering column cover. One screw is right below the steering wheel. The other two are behind the wheel, so turn the wheel to get to them. The top and bottom of the steering column cover are clipped together, so I had to push, pull, and squeeze to get them to separate. Also in the pic, there are two small Phillips screws holding the turn signal stalk in place, and a wiring harness plugged into the bottom of the stalk. On the harness, push in the clip and the harness pulls right out. On the stalk, remove the two screws and the stalk pulls right out. Slide the new stalk in and insert screws, insert the harness, then put the steering column cover and lower panel back on with the screws and bolts. I then confirmed that the new stalk worked the headlights and blinkers. I also went ahead and put the relay into the empty slot in the fuse box in the engine bay and plugged up one fog under the bumper and confirmed that it worked. This is literally all there is to the wiring if you're not doing the dash switch.
Photo 2:
I then went under the bumper and attached one of the mounting brackets. This is where I really needed the 10mm socket, so I made a trip to the neighbor's. Once the bracket is attached, space is really tight around the nuts, so have a small ratcheting wrench or driver available. The nuts are only slightly larger than the hole in the mounting bracket, so I added some washers (shown in photo 3 below) to make sure the old rusty nuts wouldn't break and slip through and cause disaster at 75mph.
Photo 3:
This is where it got fun. And by fun I mean complicated. And by complicated I mean :wtf: The light is attached to the bracket by a single bolt, although the attachment feels solid. This mounting bolt, along with the other bolts/screws marked in the photo, are all used to position and align the light with the hole. In fact, even the 2 10mm nuts holding the bracket to the bumper can be loosened to help with this. The tricky part is that the front of the light with the lens does not slide into the hole, it only rests against the back rim of the hole. This means all of the alignment screws have to be used to properly seat the light against the back of the hole. At one point I swore the light was existing in 4-dimensional space because every adjustment I made seemed to screw up another one. It would be helpful to have a friend with whom you're comfortable in close quarters hold the light steady while you adjust and tighten. Even then, though, I still had to make several adjustments by turning the lights on and seeing where they were aimed.
I rinsed and repeated photos 2 and 3 for the light on the other side.
The next photos are how my truck looked before and after:
The install was way easier than I expected for the part around the steering column and dash, and harder than I expected actually mounting the lights. Overall I am extremely happy with the result. Having the switch on the stalk is great. I did some driving on rural interstate earlier tonight after finishing and the lights make a huge difference. I'm not sure I can drive with just my low beams anymore. The fogs don't project as far out straight ahead as the high beams, but spread light low and way out wide, making it much easier to see things like deer or road debris at night. I'll probably check the mounting every couple of days for a while to make sure nothing is coming loose, but I think I have everything pretty tight.
I would definitely recommend this seller on eBay. The lights were packaged very well, with plenty of padding, and communication was excellent. He also included a pair of 2"x5" rectangular driving lights, along with a wiring kit, that I plan to use for rear-facing auxillary lights. Overall, very pleased.








