New Light Setup - Thoughts Please

I wouldn't even attempt such a thing, I am still working up the courage to shave down my existing switches so I cam just move them around in the existing holes. Well done sir.:frog::frog:
 
one of the pitfalls of being a perfectionist is rework, it doesn't look bad, run it like that, if it bugs you too much ... redo it.

I am still inspired! I will be stealing this idea for sure!

In fact Toyota should just use those switches, they look so much better than the factory ones!
 
Last edited:
I thought I'd add a link and some info here since it may assist others who research the switch bank installation:

6004062310_7f146a315f.jpg

Switch Bank Install

I did not make the smartest decision when installing my compressor switch:
6004061512_2b9709af76_z.jpg

You can see the small "Oops" area above and read all about how to not create this issue on your install here:
Switch Bank Issues

I thought I had a pic of the notch that you have to make in the bracket, but this is the best one I had:
5985789651_30418ff00a_z.jpg


It's not a big deal to make, but it does take some time and make sure you add some electrical tape to reduce the risk of it running against wires and creating a short.

Okki
 
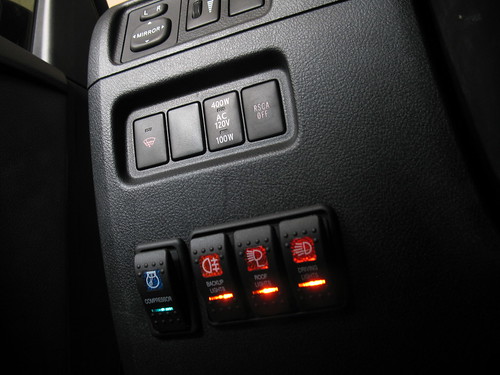
Uggghhh... pretty disappointed with how things went yesterday. Chose to install the switch bank to the right of the single blank switch (left side of the steering wheel). I applied some tape to the dash and traced out the hole with a sharpie. Now I knew there was a metal brace behind the dash but I thought I had enough clearance. Especially since I have seen other pic with the switches there. So away I go with the cutting. In the position I was in the dremel got away from me and the hole came out crooked. On top of that when I finished the hole that damn bracket was there right in the way. I ended up notching out the bracket for clearance and the switches popped right in.

After I was done I knew it looked bad. Then I take a pic of the switches straight on and it looks even worse. My girlfriend sat in the truck and said she didnt notice. I think it's due to the angle you looking at them while entering and exiting the vehicle. Anyway I know its there and it will drive me nuts. Eventually I plan on replacing the lower dash and recutting the hole before I install it. I'll chalk this one up as learning experience.

47ea3ae8-9d7c-23e8.jpg

Well the GREAT news is, its a pretty easy part to replace at a low cost. I'm having to do the same because of where I drilled the hole for my AUX LED Battery indicator. I dont know about you, but sometimes i get just a little trigger happy with my dremel! :flamethrwoer2:

Just for the record those switch's are MONEY! :trophy:
 
So I guess yuo wouldn't consider cutting it out a little bit bigger then caulk it up a good recommendation?

... that's how they built my house!
 
That wouldn't be hard to repair to a perfectly level state. It would require a little bit of work, but not hard. You can fuse plastic with solvents (weld on 16 will do nicely - it's an acrylic solvent, kinda gooey, or you can go with 4, almost a watery consistency). Or you can use a piece of metal (like a paperclip) and heat it with a lighter (hold it with pliers) then mush it into the plastic pieces. I would suggest taking off the lower dash to do this, but it's really not hard at all.

Short answer: take the lower dash off and you can level that panel with minor effort. I'm still loving those switches and panel.
 
I just want to thank everyone one here for the help and positive reinforcement. This is the best 4 Runner forum hands down. I am going to take pics of the two possible placements I have come up with for the aux relay box to get everyone's feed back before I start hacking away. Also I'm glad people are checking out Erik at wired wagon as he provides a great product with great service .
 
Maybe you forgot the magic word???

My email went something like this:

Yo yo Erik!

That aux fuse panel is dope son! Let me ax you sum q's:

1) How much HP will it add? LOLWUT?
2) Does it come wit lifetime warrantay?
3) I gots no extra electrons but those switches I gots to have! Will it power my subwoofer?

Holla back,

4$$$horeRunner


...not a peep from Erik! What gives??


But seriously - maybe I should ask you guys. I think I want option 3 but don't know how to read the diagrams he has posted up on that thread. I basically plan on running my CB (no switch), Aux Lights (switched), ARB Fridge (No switch, Always On?) ........ I like the idea of the panel only being hot when the key is in the ACC position; however, I don't know if thats possible to do when adding a fridge that I want always having power. I also have a 2 channel and 4 channel amp but I have a feeling those won't be able to be powered through this fuse panel.

Additionally - a dual battery setup will eventually be in my future, is there any special consideration that needs to be made with the fuse panel in that instance?

Thanks guys!
 
I think, based on what you posted, you want option B. This allows you to have ignition sourced relays(lights) and battery direct sourced power (CB and fridge), and you will still have some room to add stuff.

Your amps will need to go directly to the battery for power, BTW. :)

I may spring for one of these- but the amount of rewiring I would have to do would be depressing...
 
I think, based on what you posted, you want option B. This allows you to have ignition sourced relays(lights) and battery direct sourced power (CB and fridge), and you will still have some room to add stuff.

Your amps will need to go directly to the battery for power, BTW. :)

I may spring for one of these- but the amount of rewiring I would have to do would be depressing...

Thanks Antman - after reading through those again I thought maybe option B would be the winner as well. I may put together a list of things I plan on running through it and give that list exactly to Erik with how I want them to operate and make sure I am on the same page with him when he puts it together.

With your electrical engineering skills I'm sure you could have that thing re-wired in an afternoon!
 
it's a start

I got the second one stuck in there:

firstpass.jpg

I will start a new thread, maybe, in a couple of weeks.
 

Attachments

  • firstpass.jpg
    firstpass.jpg
    39.3 KB · Views: 907
Last edited:
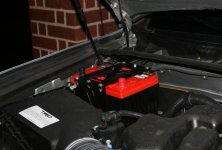
It's done!!!!!!! Ok I know it's never done, but done for now. The aux relay box is mounted next to the OEM one. I know I was going to post pictures but after looking around under the hood, it seemed like the only place that was going to work for me. So the box is mounted, switches work, and aux backup lights are mounted and wired. Its wired so that lights can only be switched on when the key is in the on position. Also the switches light up once the when the key is in the on position. I could have wired the switches so that they would have lit up when the headlights were turned on but I preferred to just have have them on. Once my camera gets some juice in it, I will snap away tonight.
 

Members online

Forum statistics

Threads
278,307
Messages
3,554,049
Members
248,016
Latest member
Advally Service

Trending content

Back
Top