Nightmare lift install

Dealer was able to fix everything! Seems to be driving just fine. I filed a dispute with Amex and uploaded the documents from Toyota stating the work they did and what they had to fix. Hopefully, that is enough too not have to pay the original shop.
 
Dealer was able to fix everything! Seems to be driving just fine. I filed a dispute with Amex and uploaded the documents from Toyota stating the work they did and what they had to fix. Hopefully, that is enough too not have to pay the original shop.

I hope you get back every penny back. That shop are nothing but a bunch of hacks.
 
The saga continues. I noticed where the shock bolts into the lower control arm. I believe Toyota originally has it going from back to front. I think mine are going front to back. Does this matter?
 
You're correct, the bolt is factory installed from back to front. The nut should be torqued to spec after vehicle has been lowered to the ground and bounced. The nut cannot be accurately torqued by placing a torque wrench on the head of a reversed bolt with weight on the wheels. Installing the bolt from back to front allows one better access to use a torque wrench on the nut when vehicle has weight on the wheels. It's much easier to accurately use a torque wrench on the nut when the bolt is installed back to front because otherwise, one has to blindly reach around the tire for access to the nut, which would put a lot of stress on the mechanic's shoulder, arm and elbow. There is one way the nut could have been properly torqued. Hand tighten the reversed lower shock bolt, lower vehicle to ground and drive it to an alignment rack and let that mechanic torque the nut while lying on a creeper. I doubt it was done this way; too much risk the alignment guy would forget to torque the nut on a reversed bolt unless perhaps only one guy fixed the missing washers and performed an alignment. But why do it that way when it's easier to see and torque the nut with the bolt installed back to front?

I would look to see if the lower shock bushing is under stress, indicating the bolt was tightened with the vehicle off the ground. Unfortunately, most of the bushing is hidden, so it will be difficult to conclusively determine if the bolt was tightened before the vehicle was lowered to the ground. If I had to make a guess, I suspect the bolt was tightened with the vehicle up on a hoist, which would stress the bushing when the vehicle is lowered to the ground, specifically, the bushing would be "wound up" in one direction with weight on the wheels. This causes the bushing to "overwind" when the wheel assembly rises over a high bump. Does it matter? Does it shorten life of the bushing? The extra torsional stress may eventually shear the hard rubber leading to a squeak between rubber and metal such as I have on a bushing in my 2000 Nissan Maxima. The lower shock mount might displace axially after a long period of time, creating metal to metal contact, but I haven't seen anyone report this.

 
Last edited:
I don't know the average, but I'm going on 3 years no issues with a couple shots of grease in each zerk every 10,000 miles!

Sent from my SM-G950U using Tapatalk


When you grease your bushings do you do it until it pushes grease out? My passenger side grease pushes out after a few shots. Nothing comes out on the drivers side after the recommended 3-5 shots.


Sent from my iPhone using Tapatalk
 
When you grease your bushings do you do it until it pushes grease out? My passenger side grease pushes out after a few shots. Nothing comes out on the drivers side after the recommended 3-5 shots.


Sent from my iPhone using Tapatalk
The very first time I greased the bushings I did it until the grease pushed put. After the initial time, I just add 3-5 shots in each zerk each time I grease and dont worry about the grease pushing out. Never had a problem doing it that way. You should always loosen the UCA bolt (the super long one) before you grease each side, then torque it back down to spec! This let's the grease squeeze out when the bushing is full and it wont make the bushing swell and damage it. Make sure you always tighten the bolt with the weight of the truck on it (with your truck on the ground). Just thought I would mention that if you ever had it in the air and felt like doing the UCA greasing.

Sent from my SM-G950U using Tapatalk
 
Last edited:
The very first time I greased the bushings I did it until the grease pushed put. After the initial time, I just add 3-5 shots in each zerk each time I grease and dont worry about the grease pushing out. Never had a problem doing it that way. You should always loosen the UCA bolt (the super long one) before you grease each side, then torque it back down to spec! This let's the grease squeeze out when the bushing is full and it wont make the bushing swell and damage it. Make sure you always tighten the bolt with the weight of the truck on it (with your truck on the ground). Just thought I would mention that if you ever had it in the air and felt like doing the UCA greasing.

Sent from my SM-G950U using Tapatalk


Yeah I figured it should be on the ground. Thanks for the info!


Sent from my iPhone using Tapatalk
 
lousy workmanship

It's amazing how shops like the one 'The JokingExplorer' found exist. There're plenty of them out there. I always thought the real crooks were service shops at dealerships, but they've drastically improved from the days I worked at there. Some of these backdoor shops dare you to complain. A coworker friend of mine had to get the police to grab his car because they charged the moon on his project. When he went to get it, in a hostile visit they locked their doors. Everytime he said he would come buy, either the shop was closed, nobody answered or all employee cars were gone. What a sleeze ball operation that was.
JokingExplorer, stay in touch with your bank and call them once ev ery two weeks, talk to same operator. The more you converse with them the more they tend to lean in your direction. Stay on'm
 
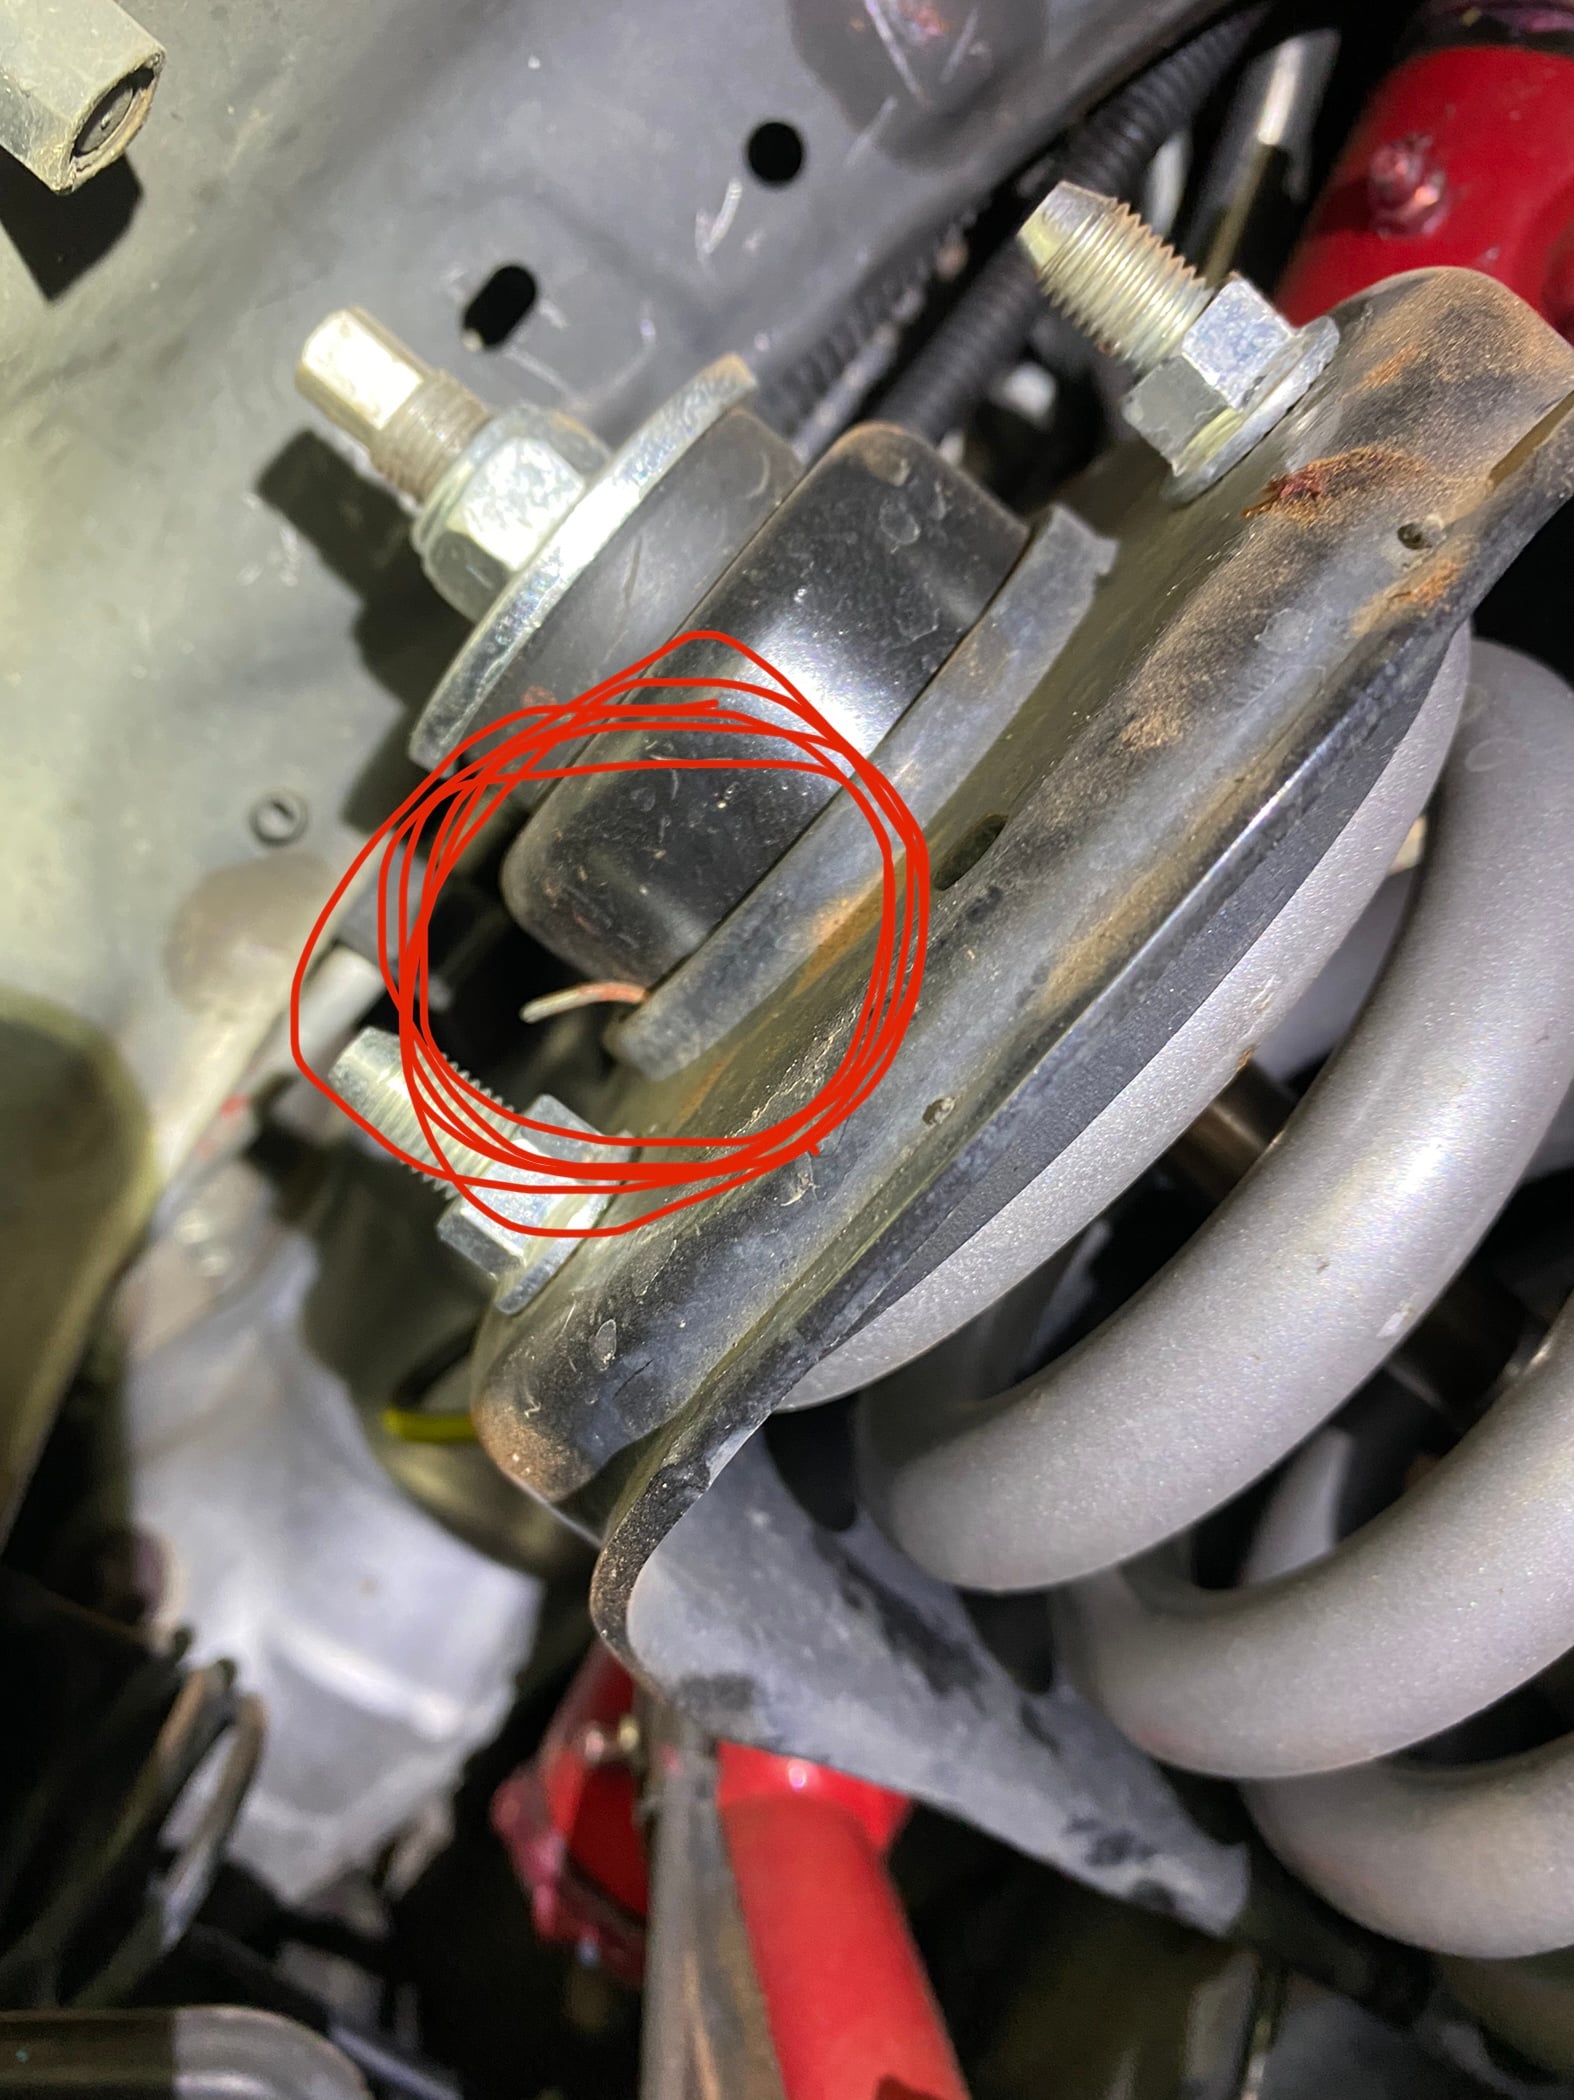
Can anybody tell me what this wire is? I just got back from Sedona the vehicle was fine. I went to visually check everything out and noticed this wire sticking out? It’s hard metal? Is this from improper install?
3c7a5493dfa4e29b14db7aef14f975ac.jpg


Sent from my iPhone using Tapatalk
 
Have you tried pulling the wire out? Hopefully, it's just a loose piece of wire kicked up by the tire that some how happened to land in that spot. If so, that's great, otherwise ...

I'm guessing the installer used a length of wire to help hold up (or in) the coil over assembly, and forgot to remove it when he tightened up the bolts and decided to just clip off the ends. Your photo shows the upper end of the wire. Can you see the other end of the wire? Is it wrapped around something? The answer to these questions will help determine if this is an issue that must be resolved as soon as possible.

It appears to me the wire is embedded between two hard surfaces where the lower surface is the top hat and the upper surface is the frame mount. Verify the three bolts are still properly tightened. I'm strongly leaning towards having the shop remove the wire because the fit between housing and top hat is not what it should be with the wire between them.

If you decide to have the shop fix this, then I think they should loosen and re-torque the lower shock mount bolts with your vehicle lowered onto the ground or driven onto an alignment rack (so they can easily get under it). I think they torqued those bolts with the vehicle on a lift and the wheel assemblies were unweighted as described in a previous post.
 
Last edited:
Have you tried pulling the wire out? Hopefully, it's just a loose piece of wire kicked up by the tire that some how happened to land in that spot. If so, that's great, otherwise ...

I'm guessing the installer used a length of wire to help hold up (or in) the coil over assembly, and forgot to remove it when he tightened up the bolts and decided to just clip off the ends. Your photo shows the upper end of the wire. Can you see the other end of the wire? Is it wrapped around something? The answer to these questions will help determine if this is an issue that must be resolved as soon as possible.

It appears to me the wire is embedded between two hard surfaces where the lower surface is the top hat and the upper surface is the frame mount. Verify the three bolts are still properly tightened. I'm strongly leaning towards having the shop remove the wire because the fit between housing and top hat is not what it should be with the wire between them.

If you decide to have the shop fix this, then I think they should loosen and re-torque the lower shock mount bolts with your vehicle lowered onto the ground or driven onto an alignment rack (so they can easily get under it). I think they torqued those bolts with the vehicle on a lift and the wheel assemblies were unweighted as described in a previous post.


I attempted to remove the wire but it doesn't want to go anywhere. I can't imagine its interfering with anything and I have no clue what its doing there. As bad as it sounds I might just leave it until I absolutely have to do something about it.
 
I attempted to remove the wire but it doesn't want to go anywhere. I can't imagine its interfering with anything and I have no clue what its doing there. As bad as it sounds I might just leave it until I absolutely have to do something about it.

You will prob be ight. I wouldn't sweat it.
 
I attempted to remove the wire but it doesn't want to go anywhere. I can't imagine its interfering with anything and I have no clue what its doing there. As bad as it sounds I might just leave it until I absolutely have to do something about it.

Yeah agreed. That said, given the nightmare you've been through, not surprised there's some paranoia about it.
 

Members online

Forum statistics

Threads
278,312
Messages
3,554,085
Members
248,016
Latest member
Advally Service

Trending content

Back
Top