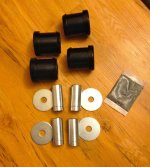
Official SPC(light racing) Product update!!!

That's cool that they're providing parts for free, but what about the $580 the dealer just quoted me to do the work. :frusty:

Mine happened on the fly so I had to pay for towing and then the labor. $90 for towing and $40 for labor (but this was through a friend). Either way, it didn't look that hard as long as you have the right tools. Truck was lifted up and they used a second lift to lift the wheel base (only slightly to have no/minimal weight on the arm).
 
It would be cheaper for you to drive to me and have me do it. And im only halfway across the county....

I go elsewhere for that work. Nowhere even close to that cost quote.

I'll have to ask around. I'm getting pretty frustrated and thinking about just going OEM in the hopes I won't have to routinely do this.....only have about a 2" lift anyway.

Unfortunely I don't know any good independent shops. I've done all the mods myself or with friends in the garage and never had to use one. But now I've got two young kids and the wife doesn't tolerate me being out in the garage like she used to. I don't have any way to press the bushings in anyway. :shrug:
 
I'll have to ask around. I'm getting pretty frustrated and thinking about just going OEM in the hopes I won't have to routinely do this.....only have about a 2" lift anyway.

Unfortunely I don't know any good independent shops. I've done all the mods myself or with friends in the garage and never had to use one. But now I've got two young kids and the wife doesn't tolerate me being out in the garage like she used to. I don't have any way to press the bushings in anyway. :shrug:

You know, I was thinking the same thing about these UCA's. I was asking myself if I should just buy different ones seeing as how there's been multiple issues with the SPC's. At least I didn't have to pay for anything.
 
Is this just a 4runner recall or it applies to Tundra too? I have these on my Tundra for a year now.
Call SPC and ask them directly, i have not seen this issue on tundras or tacomas but the arms are very similar


I'll have to ask around. I'm getting pretty frustrated and thinking about just going OEM in the hopes I won't have to routinely do this.....only have about a 2" lift anyway.

Unfortunely I don't know any good independent shops. I've done all the mods myself or with friends in the garage and never had to use one. But now I've got two young kids and the wife doesn't tolerate me being out in the garage like she used to. I don't have any way to press the bushings in anyway. :shrug:
honestly this should take no more than a few hours in a garage. its rather simple, you dont have to disconnect the upper balljoint, just remove the long bolt(follow the FSM) and pivot the arm around. if you have the new style bushings there is no need for a press, they should come out with minimal force once the sleeve is removed.

This is not a how to by any means i left out a lot of steps just to give you a general idea of the way i do it.
 
honestly this should take no more than a few hours in a garage. its rather simple, you dont have to disconnect the upper balljoint, just remove the long bolt(follow the FSM) and pivot the arm around. if you have the new style bushings there is no need for a press, they should come out with minimal force once the sleeve is removed.

This is not a how to by any means i left out a lot of steps just to give you a general idea of the way i do it.

100% agree, if you can change a tire...you can swap the bushings yourself IMO. The only "hard" steps Scott left out is unbolting a few small brackets here and there inside the engine bay (in order to have room to pull out the loooooooong UCA bolt); and removing the splash shield in the wheel well and unbolting the brake line bracket (so you have room to squeeze a torque wrench in there for final torquing.

Removing the old "spec-ride" bushing is also a piece of cake if you are discarding them...just slice off one end with a razor, lol.
[MENTION=99235]Scott@Hightech[/MENTION], I dunno what to say man, I just got done checking my ball joints per your instructions and it feels solid as a rock (zero play), only ~2-3k miles on them though and zero off-roading. Yet I am still tempted to ditch them just based on paranoia alone...thoughts? Kind of too lazy to pull off the ball joints and inspect under the boots. If I go that far might as well just put in new UCAs :tape:
 
[MENTION=99235]Scott@Hightech[/MENTION], I dunno what to say man, I just got done checking my ball joints per your instructions and it feels solid as a rock (zero play), only ~2-3k miles on them though and zero off-roading. Yet I am still tempted to ditch them just based on paranoia alone...thoughts? Kind of too lazy to pull off the ball joints and inspect under the boots. If I go that far might as well just put in new UCAs :tape:

GOOD!! These control arms are far from junk, I still sell and install them and honestly less than 5% have issues. [MENTION=68685]Ducmonsta[/MENTION] had like 2-3 years on his UCA balljoints before he replaced them. With regular inspections i dont think there would be any surprises. Also keep in mind Uniballs will require the exact same care, and in most cases are not designed to last as long as those BJ are.
 
I was close to buying these UCAs but between this thread and the ball joints thread....I may just wing it with the OEM UCAs for now and see how they do.
 
Last edited:
That's cool that they're providing parts for free, but what about the $580 the dealer just quoted me to do the work. :frusty:

Please do yourself a favor and do this yourself. I just did the update on my own in less than two hours. I am familiar with the suspension, but even if you are not it should take you 3 hours max.

Here is how I did it:

1. Jack up and place a jack stand under the frame rail behind the front wheel.
2. Remove wheel.
3. Remove cotter pin from ball joint stud and remove castle nut.
4. I use a puller tool like this to break the ball joint stud loose from the spindle: OEM/Pitman arm puller (27016) | Pitman Arm Puller | AutoZone.com
5. I used a small jack stand to support the loose spindle by the bottom of the brake caliper. Make sure the brake lines don't stretch.
6. Remove bolt holding the ABS wire to the top of the UCA.
7. Remove nut/washer on the end of the long sheer bolt.
8. Begin pulling out the sheer bolt. It is easiest from inside the engine bay. On the passenger side, you may have to pull the AC line out of its clip in holder. You may also have to remove the bolt holding the AC line bracket. This will allow the AC line to move out of the way so you can pull the bolt all the way out. If this does not make sense, begin pulling the bolt out to see what needs to be moved out of the way. Make sure you do not remove the nuts connected to the AC line or it may bleed freon. The drivers side is not obstructed so you can pull it all the way out without any issues.
9. Remove the UCA from the vehicle.
10. Tap out the old bushing sleeves.
11. If you have to replace your bushings, remove/replace them now.
12. Use the provided grease to lube the inside of the bushings before you insert the new, longer bushing sleeves. Also place some grease on the outside of the bushings where the outside large washers will contact them.
13. Insert new, longer sleeves. I made sure the protruding end was on the inside edges of the bushings.
14. Hold UCA in place and insert long sheer bolt from the front of the vehicle towards the back. The proper orientation should go: Long bolt, large washer, bushing/bushing sleeve, UCA tube mounted to the chassis, other side bushing/bushing sleeve, large washer, and nut.
15. Remove top plastic clip on mud guard so you can get a torque wrench on the nut. Remove the bolt holding the brake hard line to the frame.
16. Push the hard line out of the way to allow the torque wrench in. Torque nut to 85ft-lbs.
17. Put ball joint stud through the spindle and finger tighten the nut. Torque nut to 45ft-lbs.
18. Replace cotter pin.
19. Re-attach ABS wire on top of UCA.
20. Re-attach brake line bolt to frame.
21. Re-attach mud guard clip.
22. Mount wheel and torque lug nuts.
23. Lower vehicle off of jack stand.
24. Repeat for other side.

Of course this should be performed at your own risk. I may have missed a step somewhere but you get the idea. PM me if you have any questions.

 
Thanks for the breakdown. I installed the UCAs myself the 1st time around and your instructions sound pretty close to that process. Even easier, if you follow Scott's advice and just lossen the top bolt and pivot them around. guess I was confused at the beginning of the thread because I read the instructions for the bushing replacement kit and not just the update kit......so the old bushings stay in place and it's just replacing the sleeves and washers? How can I tell if I have the new-style bushings and just need new sleeve or if I need both?

It would be tempting to try considering the ridiculous cost of labor at the dealer. Now there's just the issue of the general paranoia I now have concerning these UCAs.
 
Thanks for the breakdown. I installed the UCAs myself the 1st time around and your instructions sound pretty close to that process. Even easier, if you follow Scott's advice and just lossen the top bolt and pivot them around. guess I was confused at the beginning of the thread because I read the instructions for the bushing replacement kit and not just the update kit......so the old bushings stay in place and it's just replacing the sleeves and washers? How can I tell if I have the new-style bushings and just need new sleeve or if I need both?

It would be tempting to try considering the ridiculous cost of labor at the dealer. Now there's just the issue of the general paranoia I now have concerning these UCAs.

All the poly bushings are the same, er for the most part, the bushings themselves don't need to be replaced. but if you have them now would be the time to put them in, Just make sure to use ample amounts of the supplied grease ONLY. If you have the original bushings(rubber) then you have to press them out, however you wouldn't have an update kit if that were the case.
 
Thanks for the breakdown. I installed the UCAs myself the 1st time around and your instructions sound pretty close to that process. Even easier, if you follow Scott's advice and just lossen the top bolt and pivot them around. guess I was confused at the beginning of the thread because I read the instructions for the bushing replacement kit and not just the update kit......so the old bushings stay in place and it's just replacing the sleeves and washers? How can I tell if I have the new-style bushings and just need new sleeve or if I need both?

It would be tempting to try considering the ridiculous cost of labor at the dealer. Now there's just the issue of the general paranoia I now have concerning these UCAs.

I know that feeling, lol.

I looked at your picture from back in the beginning of this thread...it looks like you have the spec ride bushings, so removing them would be easy peasy. I would grab a picture for you, but there's really nothing to see...it's just litterally the inner metal sleeve is a tiny bit longer and sticks out past the inner bushing to connect with the shock tower. That little bit of extra material on the sleeve basically replaces the gap the inner washer you have on is filling.

If I was in your shoes, I would ask for new sleeves and bushings just in case the extra pressure from the inner washer made your current bushing wear out prematurely. Might as well start fresh since you have it all taken apart already :)
 
Guys and [MENTION=99235]Scott@Hightech[/MENTION]. Just received my rebuild kit. It looks exactly like what I received before the winter when I replaced the old bushings with the new bushings. I'm wondering if I am ok. I know I read that we are only to use one washer on each side now with the new kit but could I just remove the washer with what I have on there already? Probably not? I'll probably just replace it all again.
 

Attachments

  • IMG_2329.jpg
    IMG_2329.jpg
    134.3 KB · Views: 833
Guys and [MENTION=99235]Scott@Hightech[/MENTION]. Just received my rebuild kit. It looks exactly like what I received before the winter when I replaced the old bushings with the new bushings. I'm wondering if I am ok. I know I read that we are only to use one washer on each side now with the new kit but could I just remove the washer with what I have on there already? Probably not? I'll probably just replace it all again.

That is the correct kit. the update came out last summer, so you should have recieved the update kit then. but those 4 washers only go on the outside, you will not reuse any parts from the old bushings aside from the bolt and nut. the sleeves are longer to take up the room on the inside.
 
That is the correct kit. the update came out last summer, so you should have recieved the update kit then. but those 4 washers only go on the outside, you will not reuse any parts from the old bushings aside from the bolt and nut. the sleeves are longer to take up the room on the inside.

I did get the correct upgrade kit months back then. I'm now thinking the shop that replaced them still used the extra washers to total four on both sides.
 
GOOD!! These control arms are far from junk, I still sell and install them and honestly less than 5% have issues. [MENTION=68685]Ducmonsta[/MENTION] had like 2-3 years on his UCA balljoints before he replaced them. With regular inspections i dont think there would be any surprises. Also keep in mind Uniballs will require the exact same care, and in most cases are not designed to last as long as those BJ are.

Hey Scott - this thread has me curious as to how my balljoints looked after you remove(d) them this week. Never knew of an issue with those, just the damn welds.

To others - I'm sure its a quality product but it seems I fall into the less than 5% when its come to the LR UCAs...I'm on my third set just from the whole washer/bushing fiasco alone where my welds failed. After spending the money on labor to get them swapped out I opted for ICON Uniballs for this go around.
 
Hey Scott - this thread has me curious as to how my balljoints looked after you remove(d) them this week. Never knew of an issue with those, just the damn welds.

To others - I'm sure its a quality product but it seems I fall into the less than 5% when its come to the LR UCAs...I'm on my third set just from the whole washer/bushing fiasco alone where my welds failed. After spending the money on labor to get them swapped out I opted for ICON Uniballs for this go around.
to be honest, we didn't check them since they were getting replaced. Shes coming together very nicely!!
 
Just looked and mine only came with two washers per side and my sleeve don't have the ring around them like the ones above. I did have the spec ride bushings that have the diamond shaped nubs on the interior of the bushings though.

p185861424-5.jpg
 
Just looked and mine only came with two washers per side and my sleeve don't have the ring around them like the ones above. I did have the spec ride bushings that have the diamond shaped nubs on the interior of the bushings though.

p185861424-5.jpg

Don't worry about the little ring grooves in the sleeves, just make sure that the sleeve is long enough to stick out past the inner face of the bushing when it's all torqued down. The sleeve should stick out past the bushing surface by about the thickness of one washer.
 
goodluck with the new bushings guys....
i cant believe spc has introduced another set of bushings
must be on the fifth design change in as many years....
i would never buy these arms again
and yes their bj's suck too
and there have been numerous reports of the arm cracking.....
save your money and buy something decent
these arms have cost me so much $$$ and time and a set of tires, i just threw them out.....
F SPC products......
save an extra $200 and get some tc, camburg, icon, ect
 
Last edited:

Members online

Forum statistics

Threads
278,316
Messages
3,554,113
Members
248,016
Latest member
Advally Service

Trending content

Back
Top