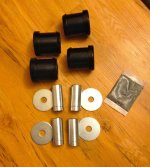
That's cool that they're providing parts for free, but what about the $580 the dealer just quoted me to do the work. :frusty:
Please do yourself a favor and do this yourself. I just did the update on my own in less than two hours. I am familiar with the suspension, but even if you are not it should take you 3 hours max.
Here is how I did it:
1. Jack up and place a jack stand under the frame rail behind the front wheel.
2. Remove wheel.
3. Remove cotter pin from ball joint stud and remove castle nut.
4. I use a puller tool like this to break the ball joint stud loose from the spindle:
OEM/Pitman arm puller (27016) | Pitman Arm Puller | AutoZone.com
5. I used a small jack stand to support the loose spindle by the bottom of the brake caliper. Make sure the brake lines don't stretch.
6. Remove bolt holding the ABS wire to the top of the UCA.
7. Remove nut/washer on the end of the long sheer bolt.
8. Begin pulling out the sheer bolt. It is easiest from inside the engine bay. On the passenger side, you may have to pull the AC line out of its clip in holder. You may also have to remove the bolt holding the AC line bracket. This will allow the AC line to move out of the way so you can pull the bolt all the way out. If this does not make sense, begin pulling the bolt out to see what needs to be moved out of the way. Make sure you do not remove the nuts connected to the AC line or it may bleed freon. The drivers side is not obstructed so you can pull it all the way out without any issues.
9. Remove the UCA from the vehicle.
10. Tap out the old bushing sleeves.
11. If you have to replace your bushings, remove/replace them now.
12. Use the provided grease to lube the inside of the bushings before you insert the new, longer bushing sleeves. Also place some grease on the outside of the bushings where the outside large washers will contact them.
13. Insert new, longer sleeves. I made sure the protruding end was on the inside edges of the bushings.
14. Hold UCA in place and insert long sheer bolt from the front of the vehicle towards the back. The proper orientation should go: Long bolt, large washer, bushing/bushing sleeve, UCA tube mounted to the chassis, other side bushing/bushing sleeve, large washer, and nut.
15. Remove top plastic clip on mud guard so you can get a torque wrench on the nut. Remove the bolt holding the brake hard line to the frame.
16. Push the hard line out of the way to allow the torque wrench in. Torque nut to 85ft-lbs.
17. Put ball joint stud through the spindle and finger tighten the nut. Torque nut to 45ft-lbs.
18. Replace cotter pin.
19. Re-attach ABS wire on top of UCA.
20. Re-attach brake line bolt to frame.
21. Re-attach mud guard clip.
22. Mount wheel and torque lug nuts.
23. Lower vehicle off of jack stand.
24. Repeat for other side.
Of course this should be performed at your own risk. I may have missed a step somewhere but you get the idea. PM me if you have any questions.