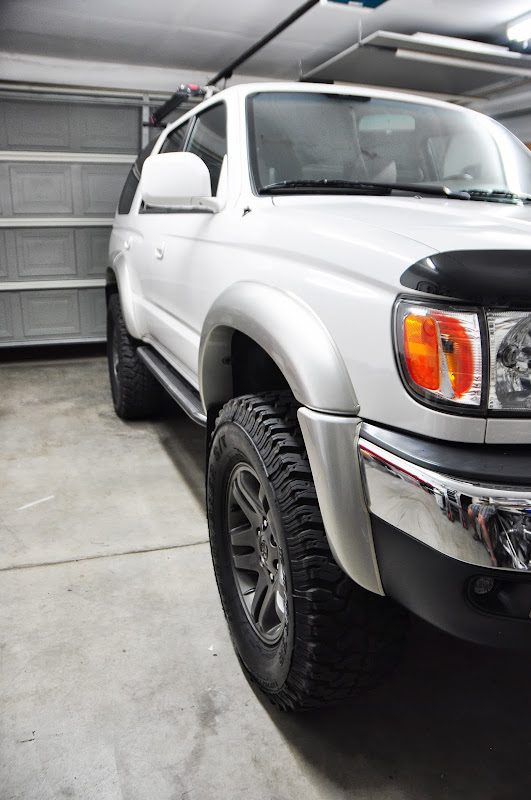
paddlenbike's Build Thread

Then I built some LED footwell lights to illuminate the front and rear footwells when you open the door(s). This is particularly nice for camping as I store a lot of stuff in the rear floor areas.
footwell_lights_unit3.JPG


footwell_lights_unit2.jpg


footwell_lights2.jpg


And to address the lack in the rear cargo compartment I gutted the cargo light and replaced it with LEDs mounted to a heatsink with a current regulated circuit.
20130610_183843.jpg


And for a touch of overkill, added an Acura Legend door light and switch with current regulated Cree LEDs to create a hatch light.
With the lens removed:
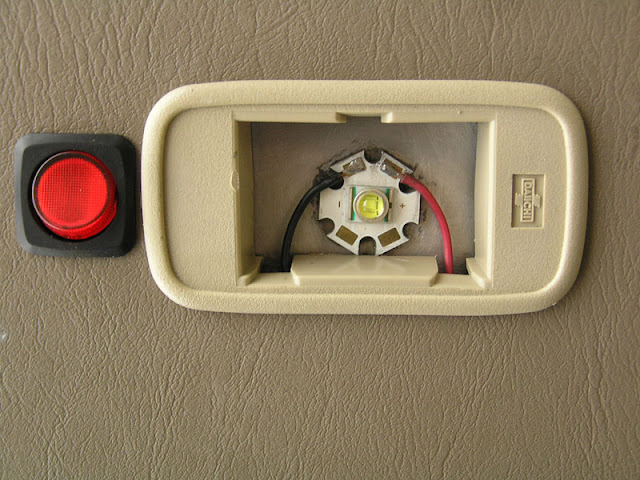
hatchlight2.jpg


It's location on the rear hatch:
hatchlight1.jpg


Does it work? See if you tell a difference compared to the stock 4Runner on the right.
DSC_0292.JPG


My friends notice all of the lighting and ask me "are you afraid of the dark man?" haha.

Where did you pick up this LEDs and the circuit board. Those look like they will work for a project I am working on
 
I was expecting to be criticized for not painting the wheels black...

smkd13--I buy most of my led stuff through ledsupply.com. These LEDs are 5 to 6 years old and are Cree XR-Es, but the modern equivalent would be Cree XP-G or XM-L.
 
I was expecting to be criticized for not painting the wheels black...

smkd13--I buy most of my led stuff through ledsupply.com. These LEDs are 5 to 6 years old and are Cree XR-Es, but the modern equivalent would be Cree XP-G or XM-L.

Ok sweet, they have XR-Es on superbright. And last question. In your floorboard light boxes what you used a regulator on your CREEs. Just wondering why you used one in that situation?
 
Ok sweet, they have XR-Es on superbright. And last question. In your floorboard light boxes what you used a regulator on your CREEs. Just wondering why you used one in that situation?

Just to clear up any potential confusion, you need a driver to run the Cree LED or another other LED for that matter. If you don't want to build your own you can buy the luxdrive drivers from ledsupply.

Back to your question...normally I would recommend Cree LEDs for most automotive purposes, but in the case of the floor lights, they would be too bright. I ended up using superflux LEDs because they use less power and put out an appropriate brightness for the floor. I built the driver using a transistor and resistors, so there's some maths (as Jeremy Clarkson would say) involved. Most people just buy pre-built drivers, but they can cost as much as $15 each.
 
Just to clear up any potential confusion, you need a driver to run the Cree LED or another other LED for that matter. If you don't want to build your own you can buy the luxdrive drivers from ledsupply.

Back to your question...normally I would recommend Cree LEDs for most automotive purposes, but in the case of the floor lights, they would be too bright. I ended up using superflux LEDs because they use less power and put out an appropriate brightness for the floor. I built the driver using a transistor and resistors, so there's some maths (as Jeremy Clarkson would say) involved. Most people just buy pre-built drivers, but they can cost as much as $15 each.

Oops yeah transistor. That is what that was. I took 2 years of electronics but that was about two years ago so I am rusty. I am looking into the Cree floods for domes (possibly red). The floor light I just used a simple single SMD neutral white pre-wired lights. Two per side and the results came out great.

null_zps2ef13ce1.jpg~original


The overheads are what I am working on now. Mainly cargo area, basically led supply has a nice and bright Red CREE setup 136 lm. When you hooked your over heads, the question I have is can you draw a schematic for the transistor/resistor schematic?
 
Hey man I like you t4r and I was wondering how you like your floor mats I need some for the beach since sand gets everywhere and I like the look of yours way more then weather tech I was wondering how they hold up and if they are good at catching the sand and stuff. Also I want to do that white interior lighting so bad now that I see how clean you did yours.
 
Hey man I like you t4r and I was wondering how you like your floor mats I need some for the beach since sand gets everywhere and I like the look of yours way more then weather tech I was wondering how they hold up and if they are good at catching the sand and stuff. Also I want to do that white interior lighting so bad now that I see how clean you did yours.

Thanks everyone.

foxrider56--the floormats are great. I've had them since 2005 and they still clean up like new. They have saved my interior more times than I could count, particularly the one in the cargo area. They have some pretty good sides on them and do a good job of capturing mud and sand.
 
I just went and looked it up and it is pretty damned easy to set up as a driver. I am gonna order up my LEDs soon and I will post up some pics for you of my project
 
Installed some 3/4" wheel spacers today. The Sequoia wheels are 1/2" wider than the factory 4Runner wheels and stick out 1/4" more, but they still looked tucked-in to the wheel wells.

Before:
DSC_0541r.jpg


After:
DSC_0546.JPG


DSC_0543.JPG


I really like the stance now.
DSC_0547.JPG
 
3/4" spacers. Did the bolts clear without needing to be modified? What brand are they too as they look to be hub centric. Im asking as I have 1.25" on 2012 runner wheels that I'd like to move .5" in so I can get more clearance at the pinch weld.
 
Last edited:
3/4" spacers. Did the bolts clear without needing to be modified? What brand are they too as they look to be hub centric. Im asking as I have 1.25" on 2012 runner wheels that I'd like to move .5" in so I can get more clearance at the pinch weld.

The front fit just fine. The rear Toyota studs are slightly longer and required I grind about 1/4" off the ends of the studs. There's a chance a 1" spacer will fit with no modifications, but the 3/4" ones required the grinding. Now the Toyota studs are the same length front and rear.

It also depends on what wheels you are using as some have little pockets on the face of the inside of the wheel that give longer studs a place to go. My Sequoia/Tundra wheels have those pockets, but they only allow about a 1/4" of stud to fit inside.

I used Motorsport Technology and got them on a tacomaworld group buy.
 
For the past couple of years I have had a reoccurring problem resulting in a check engine light after following other trucks on dusty roads. I have removed the mass airflow sensor (MAF) for cleaning enough times that the o-ring gasket that goes around the MAF was stretched-out and not sealing. Engine vacuum was drawing dirty, unfiltered air from between the MAF and the intake tube, as evidenced by the amount of dirt around and downstream of the MAF. Eventually the MAF would get dirty enough to build up on the sensor and trigger the check engine light. I always knew before the light even came on that it was happening--engine idle would be fine and low throttle input was also fine, but medium to hard throttle would cause the engine to bog.

Last year I got a check engine light on the trail, so I pulled the MAF out and found the o-ring so stretched, I had to cut it in two, remove a section and use antibiotic ointment from my first aid kit to hold the gasket in place while I reinstalled the MAF. (Hey, it was all I had other than toothpaste!) I later found that Toyota does not sell the 3rd gen 4Runner o-ring gasket separate from a new MAF, which costs somewhere around $150.

I did, however, recently learn that Toyota sells the o-ring separately for the 4.0L V6 4Runners and Tacomas and 4.7L V8 4th gen 4Runners. I did a google image search and found that the MAF for the 4th gens looked the same as the one for 3rd gens. I headed to the Toyota dealership and they were nice enough to try the 4th gen MAF o-ring on a new 3rd gen MAF sensor. It fit perfectly.

The MAF can be removed and reinstalled in well under 10 minutes. The trick is to remove the 3 10mm bolts that hold the cruise control actuator to the passenger fender and fender wheel well and move it aside without disconnecting anything. This provides easy access to the MAF screws, which can easily be buggered up if you're trying to squeeze a tiny screwdriver or 90-degree driver in place. Next, unplug the MAF and remove the two philips head screws that secure the MAF in place. While the MAF is out, spray it down with electrical contact cleaner to remove dirt off the sensor bulb.

The cruise control is the aluminum and white box--in the photo I have already moved it aside:
DSC_0648.jpg


Broken o-ring with new one:
DSC_0646.jpg


O-ring installed, fits like a glove:
DSC_0647.jpg


DSC_0650.jpg


The MAF o-ring costs $2 and is part number 90099-14141.
 

Members online

Forum statistics

Threads
278,307
Messages
3,554,053
Members
248,016
Latest member
Advally Service

Trending content

Back
Top