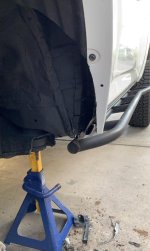
Pinch Welds... Cut or Bend?

Unfortunately no can do, I have a chopped up mud flap covering the area to keep debris out between the body n plastic lower trim piece

you performed a pinch weld flattening for clearance then took away clearance by adding the mudflap back? :shrug:

im intrigued now :snacker:

lol i kid
 
Last edited:
you performed a pinch weld flattening for clearance then took away clearance by adding the mudflap back? :shrug:

im intrigued now :snacker:

lol i kid

Lol no I cut up my mud flap to plug the hole like in post 17. So the mudflap is more of a patch than a mudflap. I’ll take a pic of it later for shits n giggles
 
Last edited:
One thing about the BFH is you can do stupid real fast with it.

Try a couple of Vise-Grip style pliers. Lock them down and start the folds, then BFH...the really cool kids with over size shoes like to fold them to the out-side, i hear more room.

I redid this mess with 3 vise-grip pliers, squeezed the seam flat then hammered inward, turned out pretty good considering i botched it the first hammer attack.
Tried the cut in 4" spaced sections on one side.
Then i just folded the other side thinking...less edges, less rust, less potential cracking do to cuts in sheet metal.

Also that seam goes up a way, behind the fender liners.

This guy...me...Whoops!

Glad I found this thread.

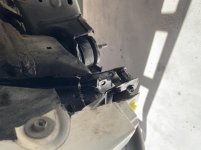
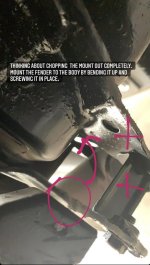
Anyone cut the fender mount completely off and remount the fender to the body?
 

Attachments

  • EDA49B6E-1E20-43EC-B9C1-D4430EA04D99.jpg
    EDA49B6E-1E20-43EC-B9C1-D4430EA04D99.jpg
    91.9 KB · Views: 1,366
Last edited:
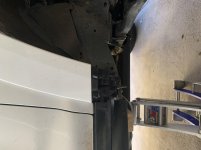
Drilled a hole through the side and ran a zip tie through to secure the flair to the fender. Painted the part that was covered by the black cover I removed.
 

Attachments

  • 1B4FBF79-2E53-4BF3-8842-9895C5A182E2.jpg
    1B4FBF79-2E53-4BF3-8842-9895C5A182E2.jpg
    108.3 KB · Views: 1,348
Last edited:
Down to one mounting tab on the passenger side. Rub was significant. So yeah who’s gone full retard with this?
 

Attachments

  • E90E2D16-B592-42DB-B2A0-BFEEC976CD2F.jpg
    E90E2D16-B592-42DB-B2A0-BFEEC976CD2F.jpg
    98 KB · Views: 1,300
Down to one mounting tab on the passenger side. Rub was significant. So yeah who’s gone full retard with this?
Seriously, cut that bastard off already.

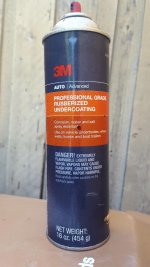
Also, for everyone, bash the crap out of that pinch weld with a 5 lbs. sledge til it's flat, but don't stop there, continue with the whole back of the wheel well so it deform the floor boards. Spray with 3M rubber crap.

Either commit or run 33's!

Sent from my SM-T290 using Tapatalk
 
Seriously, cut that bastard off already.

Also, for everyone, bash the crap out of that pinch weld with a 5 lbs. sledge til it's flat, but don't stop there, continue with the whole back of the wheel well so it deform the floor boards. Spray with 3M rubber crap.

Either commit or run 33's!

Sent from my SM-T290 using Tapatalk

I am running 33's tho :cry2: it's the -38 offset.

But, yeah no way around it. Gonna get to it tomorrow.

giphy.gif
 
Seriously, cut that bastard off already.

Also, for everyone, bash the crap out of that pinch weld with a 5 lbs. sledge til it's flat, but don't stop there, continue with the whole back of the wheel well so it deform the floor boards. Spray with 3M rubber crap.

Either commit or run 33's!

Sent from my SM-T290 using Tapatalk

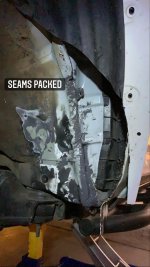
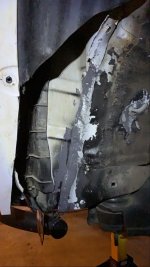
Smashed, cut, and packed the seams with jb weld. I’ll let it cure. Finish up tomorrow.
 

Attachments

  • 6F6E81C5-8302-475C-91FA-2C9615F3AE63.jpg
    6F6E81C5-8302-475C-91FA-2C9615F3AE63.jpg
    136.3 KB · Views: 1,452
  • B339A043-9049-4199-8618-9734B017EC92.jpg
    B339A043-9049-4199-8618-9734B017EC92.jpg
    134.5 KB · Views: 1,418
Last edited:
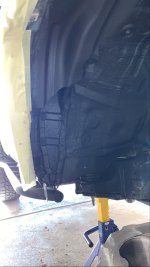
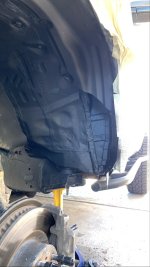
Sanded / scotched everything. Scrubbed the wells with a brush and simple green. Flushed it with more green and wiped clean with micro fibers. Took a heat gun and dried it all. Acetone wipe, more heat to the panels, applied 3m undercoat which had been warming in front of a heater vent inside.

Looks great.

Letting it cure then I have to figure out how to afix the fender.
 

Attachments

  • 35B2339B-66B4-4558-A749-6FFA616D6172.jpg
    35B2339B-66B4-4558-A749-6FFA616D6172.jpg
    121.6 KB · Views: 1,354
  • 3A431020-F33A-4A01-BF27-FD8CAA82A2B4.jpg
    3A431020-F33A-4A01-BF27-FD8CAA82A2B4.jpg
    126.5 KB · Views: 1,483
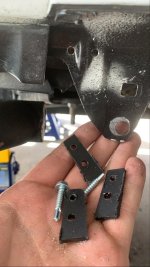
Cut up one of the glove box shelves I wasn’t using to shim the fender. Fender gap is near perfect but I need some slightly longer screws for another shim.

Overall pleased with the results. Time will tell if there is still rub but it should be mostly sorted.
 

Attachments

  • F46BE18E-8410-4360-837B-B2613F4B8F34.jpg
    F46BE18E-8410-4360-837B-B2613F4B8F34.jpg
    135.7 KB · Views: 1,317
  • A039481D-2511-40A3-BA22-1FD0E5C447B3.jpeg
    A039481D-2511-40A3-BA22-1FD0E5C447B3.jpeg
    100.2 KB · Views: 1,309
Off to finish the other side. Hope this helps others.
 

Attachments

  • A3B26B97-5BCB-4CA4-AEC0-F49EB7F6E240.jpg
    A3B26B97-5BCB-4CA4-AEC0-F49EB7F6E240.jpg
    112.7 KB · Views: 1,294
  • C98028EC-5C37-4307-AB10-F6138AC915DE.jpg
    C98028EC-5C37-4307-AB10-F6138AC915DE.jpg
    135.6 KB · Views: 1,297
Finished the drivers side. Jobs done.

Fender spacing and maybe making the passenger plastics look as clean as the drivers side is all that’s left.

Took my first rub free drive. Picked up a well deserved 12 pack. Idk how many days of labor I have into this truck but it’s a lot.
 

Attachments

  • 65DBFC3C-6C32-4DC2-9D7E-CC65E4402272.jpg
    65DBFC3C-6C32-4DC2-9D7E-CC65E4402272.jpg
    115 KB · Views: 1,481
Last edited:
Finished the drivers side. Jobs done.

Fender spacing and maybe making the passenger plastics look as clean as the drivers side is all that’s left.

Took my first rub free drive. Picked up a well deserved 12 pack. Idk how many days of labor I have into this truck but it’s a lot.


Looks amazing! You've done a far better job than I did for sure.
Thanks for documenting this will definitely be helpful to many
 
Clean them, spray with rubberized undercoating on the side you will be folding over. Fold over, spray rubberized undercoat over the whole pinch weld to seal it from the elements.

I did the above, i used a Small dead blow hammer
 
Finished the drivers side. Jobs done.

Fender spacing and maybe making the passenger plastics look as clean as the drivers side is all that’s left.

Took my first rub free drive. Picked up a well deserved 12 pack. Idk how many days of labor I have into this truck but it’s a lot.

Great job...and yes sir, thanks for the pictures and documentation!
 

Members online

Forum statistics

Threads
278,313
Messages
3,554,090
Members
248,016
Latest member
Advally Service

Trending content

Back
Top