Project NoRunner: 2000 SR5 4x2 Resto

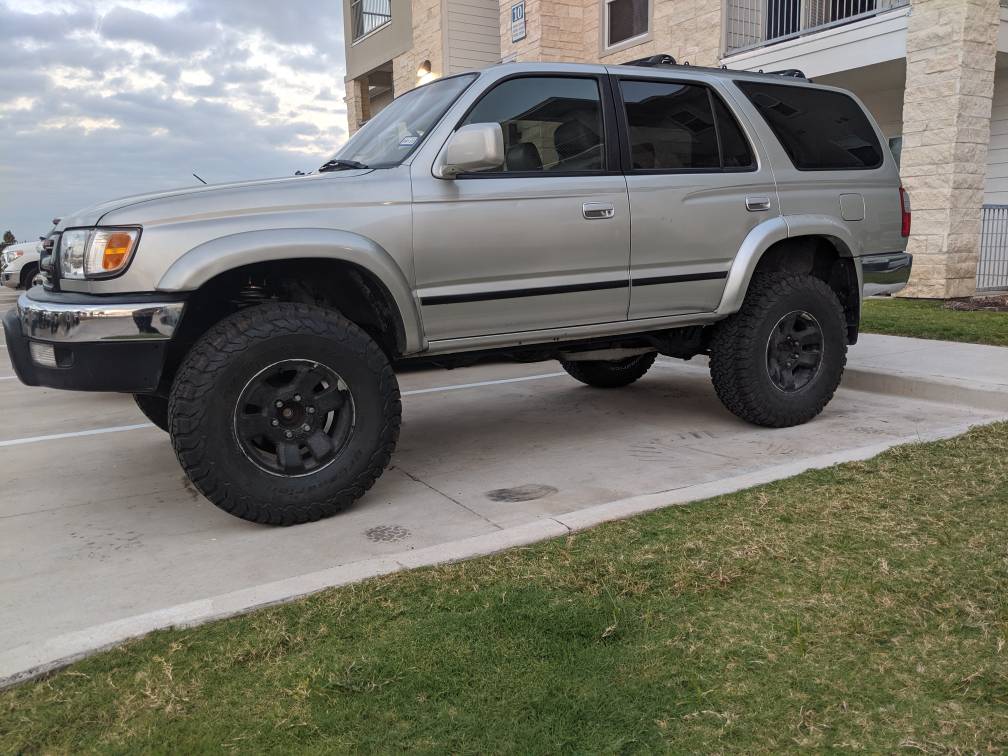
Here is how she sits now....it rides a million times better. But it def. is a bit interesting to drive it 70 mph, with a 30 mph cross wind. lol

I had no problems with my tires rubbing, I have 1.25" spacers on the front, I am very tempted to see if I can remove them and not have any problems.

I have a Sonoran adjustable pan hard bar coming, and that should hold the suspension over for a good while. I dropped the front sway bar, and bought new front sway bar links which are going to the rear end.

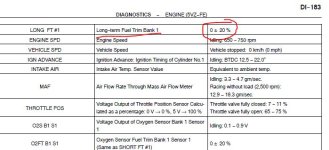
I am averaging 17 mpg's right now, and i got like in the above conditions for a 195 mile trip. Which is darn good when considering all things. and I figured out +20% LTFT is actually within spec for normal means.

enjoy the 1 picture lol I guess I have gotten her close to reputable status now, besides the missing front bumper flares.

uh6zrZOl.jpg


and my 20 dollar junkyard skid plates :D
oBhuvi6l.jpg
 
Last edited:
I am averaging 17 mpg's right now, and i got like in the above conditions for a 195 mile trip. Which is darn good when considering all things. and I figured out +20% LTFT is actually within spec for normal means.
20% fuel trim is *not* normal. Mine are all less than +/-5% I bet you still have something up, whether it is a leaking vacuum line or a dirty/worn/broken sensor...

17mpg is fine for your truck setup, at least - especially if you haven't calculated the tire size change into that figure.

-Charlie
 
20% fuel trim is *not* normal. Mine are all less than +/-5% I bet you still have something up, whether it is a leaking vacuum line or a dirty/worn/broken sensor...

17mpg is fine for your truck setup, at least - especially if you haven't calculated the tire size change into that figure.

-Charlie

Its within spec. Its on the high side but within spec...and if it wasn't I would be throwing a code.

but i wont deny there may be some leak or sensor that is putting this on the higher side. I need to smoke it out.
 

Attachments

  • Capture.JPG
    Capture.JPG
    59.8 KB · Views: 563
There's nothing wrong with inserts for the plugs assuming it was done correctly. Which, if it hasn't blown back out, it likely was. Do the maintenance. You've done this much, too late to back out now. Truck is looking good. I would send the panhard back and get the PCK from [MENTION=28464]eimkeith[/MENTION]. Even with a longer bar your geometry will be off. Also, nothing wrong with the spacers. You could ditch them and go up a perch but your preload will be higher. Preference really. Just make sure you have the correct bumps for your lift and you'll be fine.
 
There's nothing wrong with inserts for the plugs assuming it was done correctly. Which, if it hasn't blown back out, it likely was. Do the maintenance. You've done this much, too late to back out now. Truck is looking good. I would send the panhard back and get the PCK from [MENTION=28464]eimkeith[/MENTION]. Even with a longer bar your geometry will be off. Also, nothing wrong with the spacers. You could ditch them and go up a perch but your preload will be higher. Preference really. Just make sure you have the correct bumps for your lift and you'll be fine.


Yeah you have a point about the insert..... judging by the condition of the truck I can only imagine the same person is responsible for the quality of the rest of the work. I can only hope I have a work horse 5VZ!

I will consider returning that bar....but unlikely if shipping is expensive. I have not been able to find a reputable shop where I am living temporarily for work. I was not able to get any recommendations when I posted the question on another subject thread on this site :(

Do you have any recommendations on bumpstops?

I see the prices of them vary drastically.... Unfortunately I never measured the difference between before and after lift because the truck wasn't stock. I'm just going to follow the rules of thumb, drop the stop as much as the lift.

I guess the Toytec would do the job....and I kind of like the price.

The ride quality is a night and day difference. I actually have articulation now. Before this job the truck was as stiff as a brick.

I also put the front sway bar end links on the rear sway bar and gosh dang it the ride quality got even better. Its not 100% corner balanced but it's way better than when it had the short end links on.

I highly recommend to anyone extending the rear links when they do a suspension lift, and adjustable ones would take it a step further and getting it corner balanced.
 
Small Victories

Yesterday I decided to install a new bushing where the upper and lower shifter assembly mate together via a bolt. MAN WHAT A DIFFERENCE. zero slop its great. Well worth the few bucks to do it, took about an hour but i was changing my buddies lower ball joints out on his Volkswagen at the same time, so it could be done faster

This was the write up i followed for general idea. It was spot on.
Loose Auto Shifter Fix - YotaTech Forums

Also if anyone is on a budget and whats some front end service tools here is what i ordered on amazon when installing my suspension bits. I am not 100% sure how someone would install the oem ball joint but it should be possible with the kit. I noticed without spending unnecessary amounts of money toyota should have designed a steering knuckle that was able to be serviced without alittle more ease. Frustrating but manageable.

Here is the 6 piece pitman arm remover kit for 41 bucks!
https://www.amazon.com/8milelake-Tool-Ball-Joint-Separator/dp/B017AWRJZY

And ball joint remover 50% off Astro 7685:
https://www.amazon.com/Astro-7865-S...astro+7865&qid=1568716850&s=automotive&sr=1-1

This was all that was left for the bushings .There was nothing inside the housing after i pulled the bolt out.
QWN2fljh.jpg


For the people that dont know...this is what the bolt is supposed to ride on, thus removing the slop
QxPoRQmh.jpg


DbN0tm8h.jpg


Changed my upstream O2 sensor....by the looks of it this was probably the original one.
OpnEx1th.jpg


Here are some more pictures i forgot to share on the knuckles that i removed from the car that POS obviously was trying to destroy in every way possible

Shitty extended studs....probably got that to accommodate his 2.5inch spacer on the front. Can anyone spy what is wrong with the studs?:rockthrow:
ne9KUmBh.jpg


Here is the SPC knuckle insert and the bore which you can clearly tell was grinded down on the inside :sobbing:
McyB2zXh.jpg


And for reference here is a bore that hasnt been molested...
DPA1syrh.jpg


AND ONLY FOR PEOPLE REMOVING THE OEM BALL JOINT AND INSTALL A SPC INSERT. USE THE BOLT ITSELF TO PUSH THE BALL JOINT OUT. I am not i tried and tried to use some cups provided but that crap didnt work.
buh8J58h.jpg
 
Last edited:
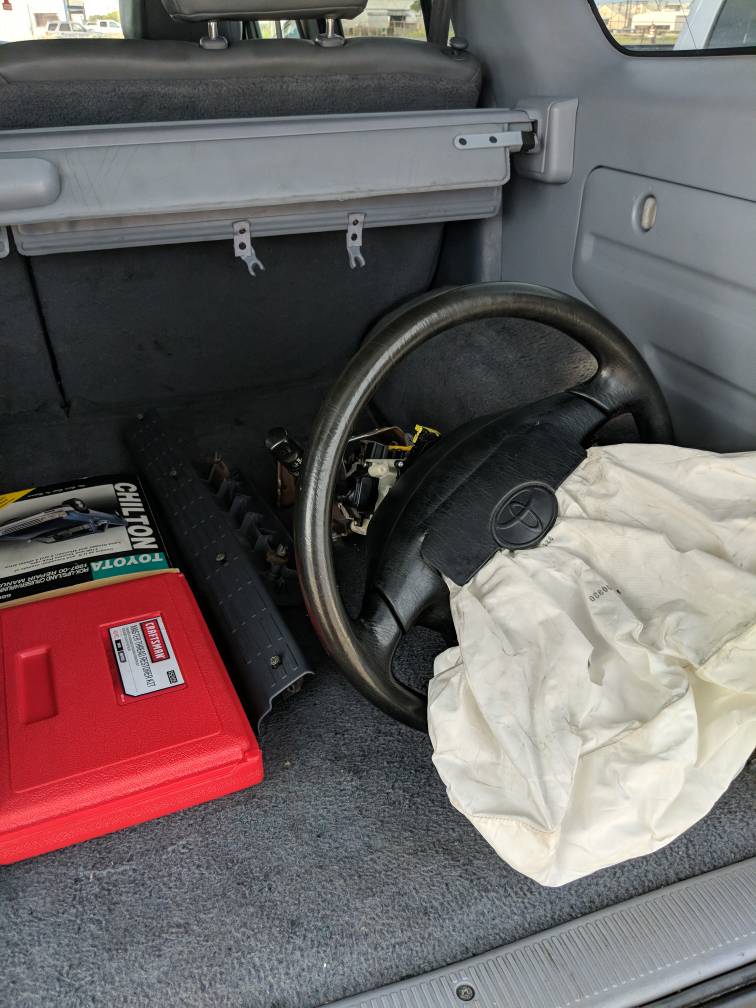
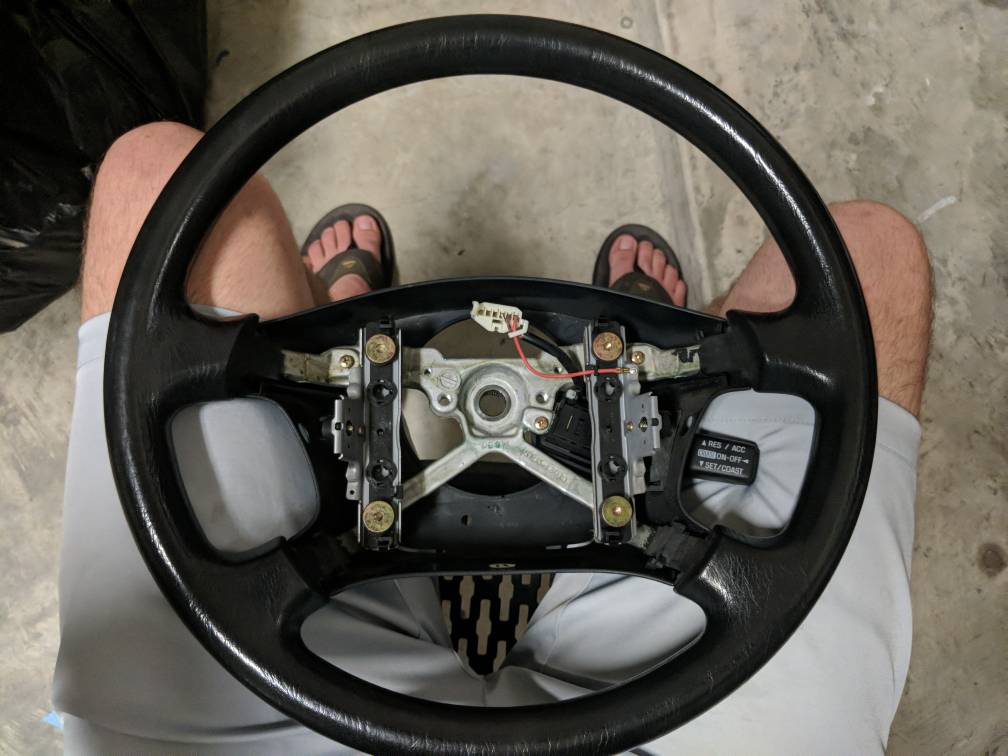
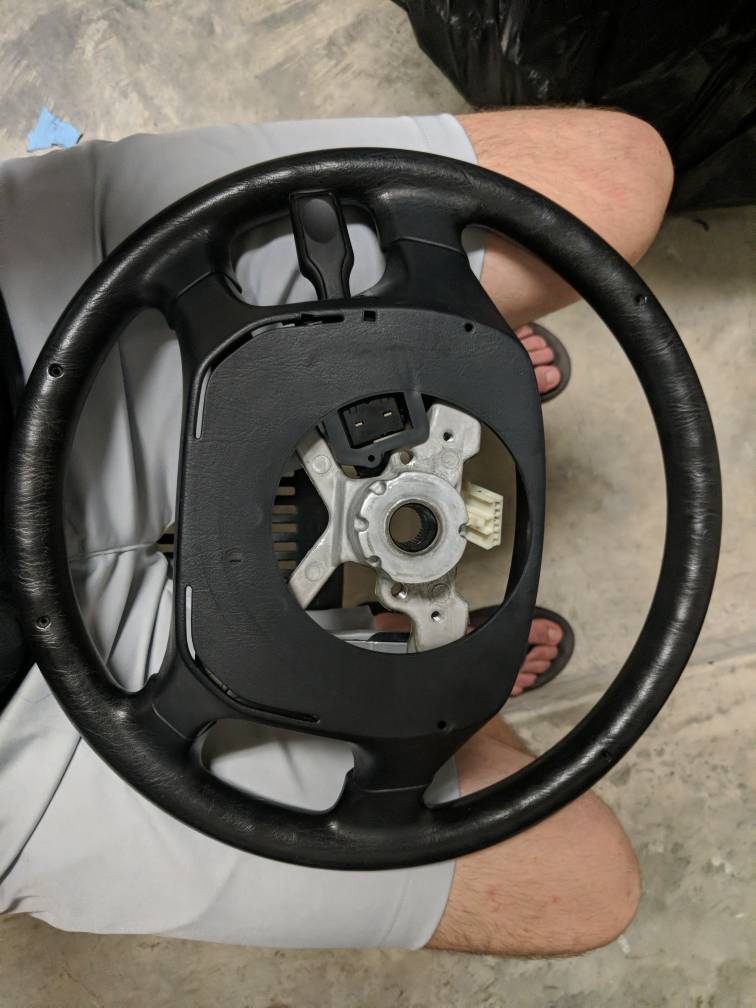
Wooo major score at the junkyard....I payed zero dollars for this puppy. A steering wheel in perfect condition. [emoji16]
9205d84d2a4cead8c1ccb6c091584018.jpg


Sent from my Pixel 2 XL using Tapatalk
 
Scored some rear axles. 75 bucks. Junkyard FTW. Going to rebuild these on the side and swap them out in time with my current ones.

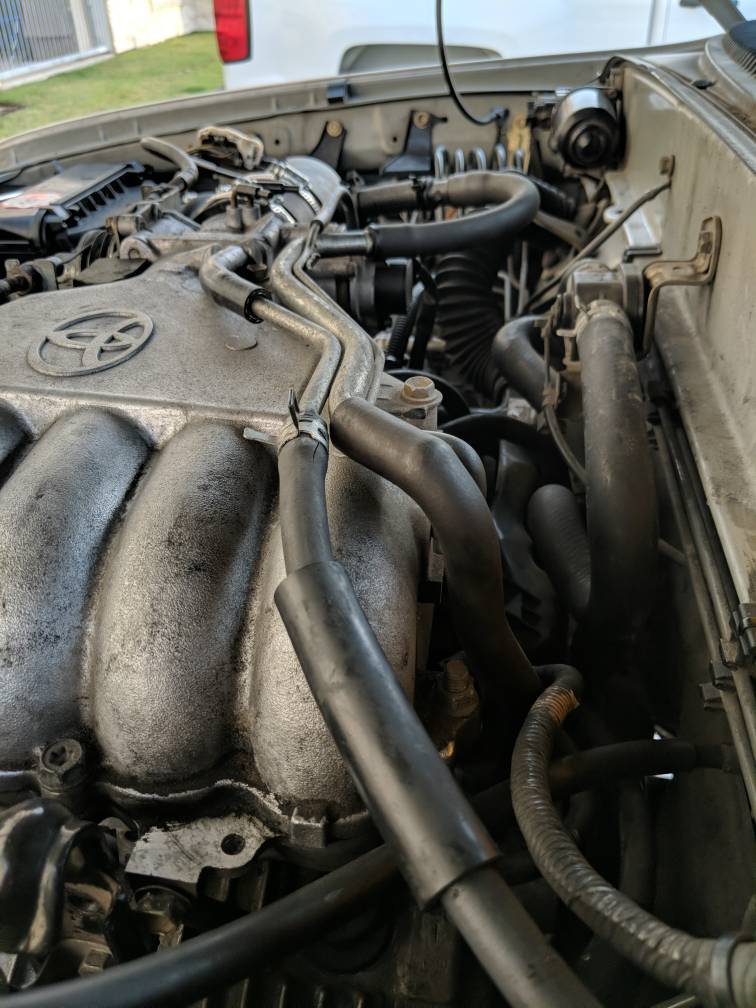
Found a cracked hose here, going to order a replacement for that one. I am hoping that is the source of this noise whenever I let off the throttle and weird 50 rpm subtle idle fluctuation
73f144ca8251c03e404ebcbd55efd2f3.jpg
1514e6c3c8eee057b608988c5d9c8ffa.jpg


Sent from my Pixel 2 XL using Tapatalk
 
Be on the look out in the for sale section....might put this up for sale instead if there is interest. This thing is in top shape. But it's gunna cost ya....

I don't need a steering wheel right now so might as well take that money and put it to better use.
d59eef07acbba90d317d5bfcb1b4082d.jpg
c78d22a57fe70871b01f4a8ccece50bc.jpg


Sent from my Pixel 2 XL using Tapatalk
 
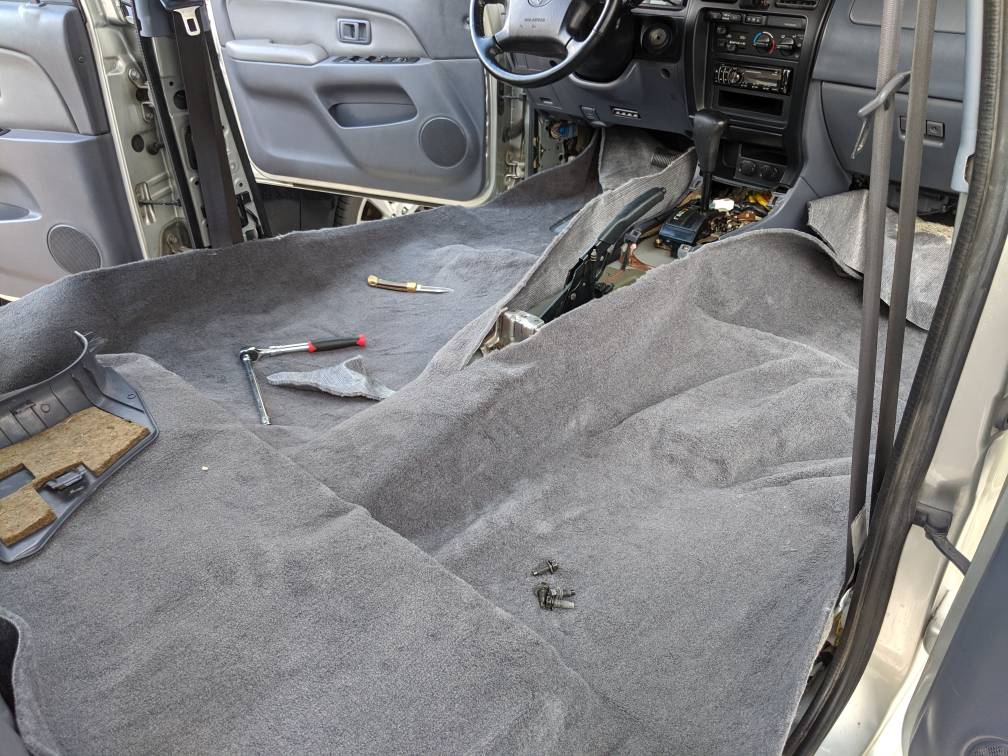
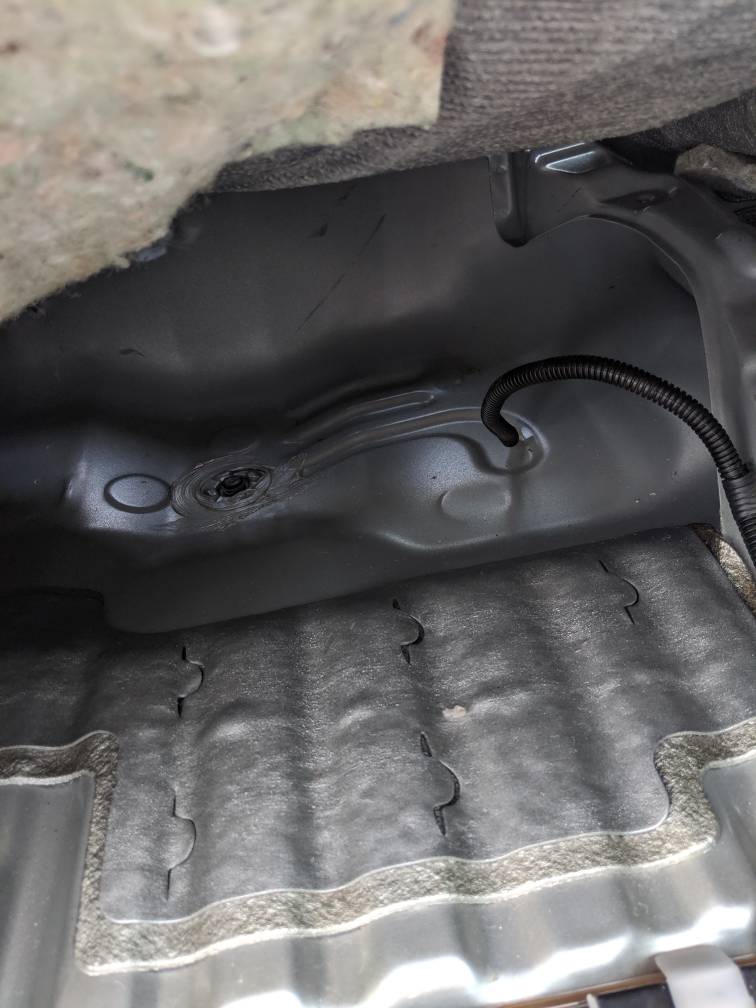
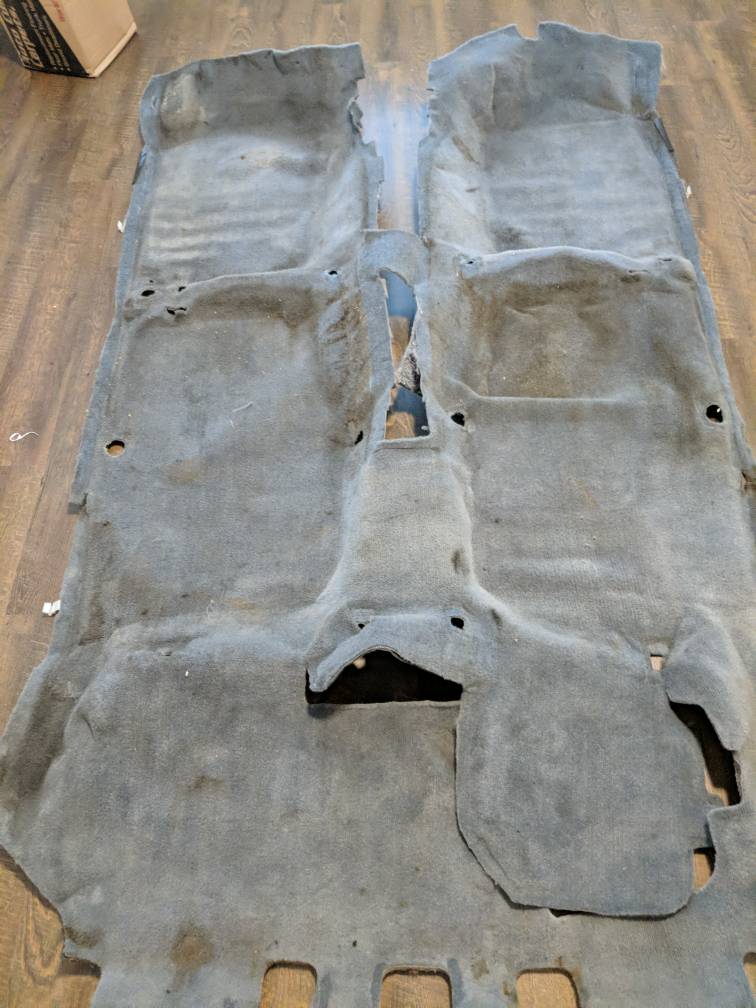
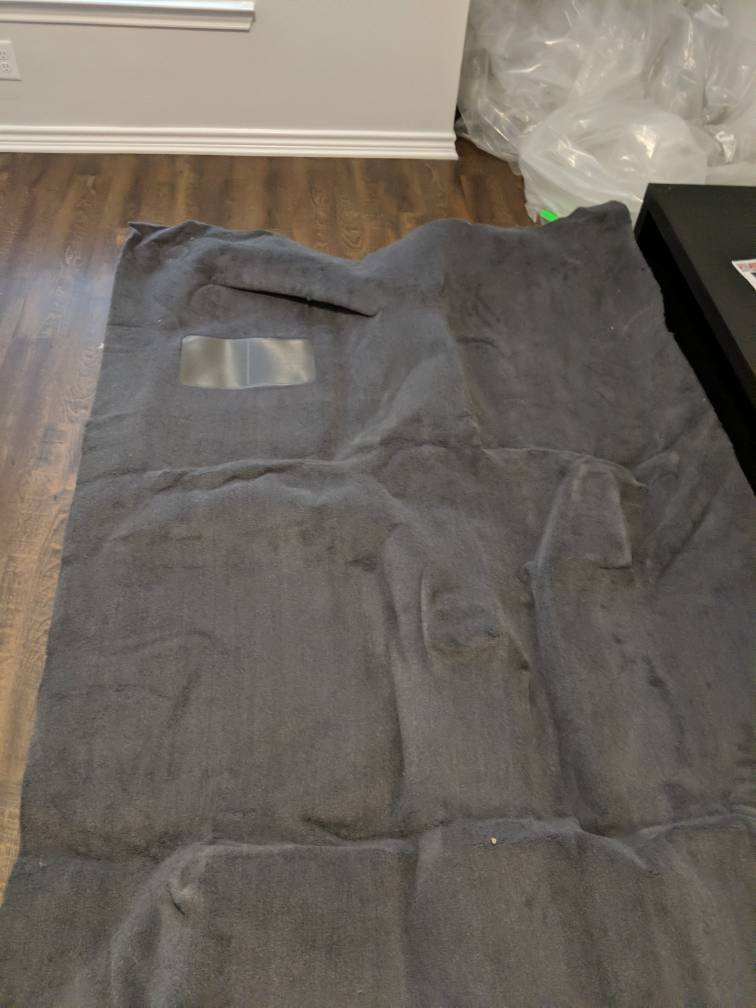
Starting to replace the carpet. I treated some surface rust spots with Chassis paint.

And for the freaking record, where no one has said anything about fitment, I don't have the rear heater option and this floor molding fits just fine.

I started by making 1 big cut down the center. But just FYI, the carpet is kept together around the cup holder area.

I brought the carpet into the truck and got it relatively center from side to side.

My biggest piece of take away advice is to use the molding where the front seats as an effective "centerline". After you establish where that is at I cut the holes out there and held the carpet down with the seat bolts so the carpet will not move around.

Cut alittle at a time. Gunna get some sticky adhesive so it conforms better

Took me an hour to get new carpet in and to slowly trim the front passenger area, rear passenger area won't take any time at all
aebfb3f655dfc3a14f8eb8ddf7c99178.jpg
6daf949590e727f8b746f2eb5a6cab49.jpg
aa229287c637069b3fa83654feb9b056.jpg
1bc2de8c25dca581bf529608054a4e3e.jpg


Sent from my Pixel 2 XL using Tapatalk
 
AC Compressor Locked Up

While the 4runner didn't have a belt for the AC compressor to run when I bought it. Just replaced the accessory belts and sure enough that mother f was squealing like a pig, and that ac compressor was burning up that belt like it was nothing.

So now.....AC compressor will be put on the list

But that's on the bottom of the list going to replace fuel pump, maybe charcoal canister, and definitely removing the aftermarket IAC.

And I'm replacing all suspension bushings, replacing the front wheel bearings and then re building the rear axles.

Hopefully have it all done within 2 months

Damn near replaced everything on the 4runner except the engine. And the only reason that hasn't happened is because I'm just gunna let it exploded lol

But who cares I talk to myself here. Brain purged

Sent from my Pixel 2 XL using Tapatalk
 
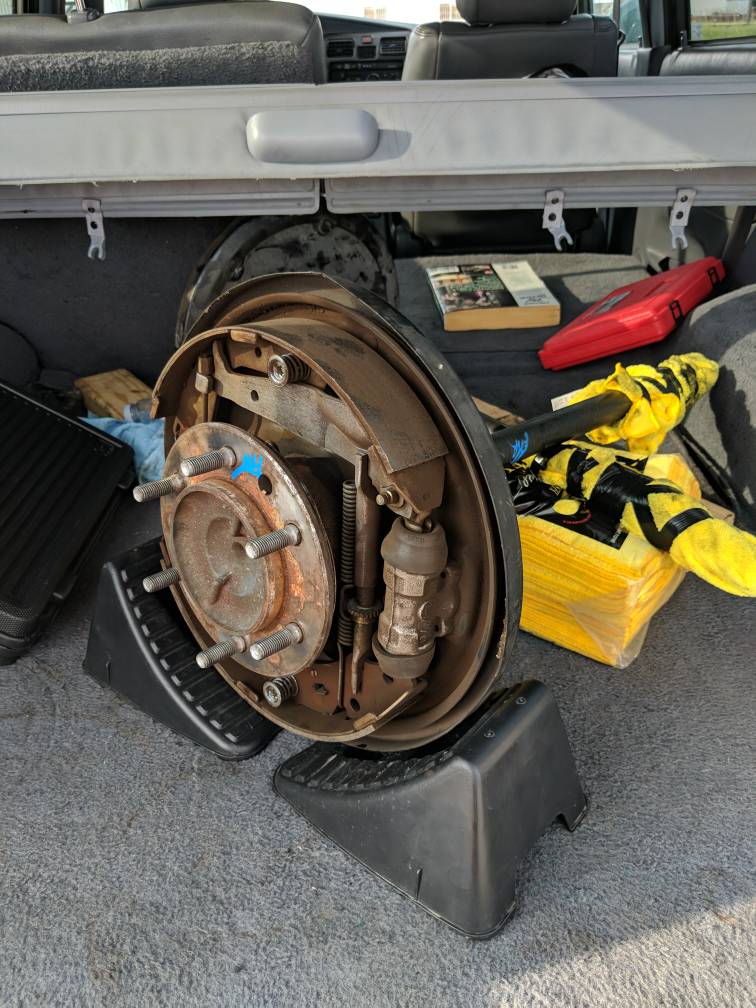
Rebuilding rear axles

Well I was starting to rebuild a set of rear axles as my passenger seal was leaking....

I got all my a parts and got the puller recommend by [MENTION=120071]mtbtim[/MENTION]. Got all the way to step one and came to a hault lol

I realized step 2 required the flanged nuts holding the axle shaft to the housing. So I stopped.to bad the puller doesn't use metric hardware.

I didn't wanna put my truck on Jack's until I was ready to swap the same day but I think I will have too. I need to get the nuts off the truck to use them to push the axle out.

Rule 1 of junk yard scavenging, always bring the nuts and bolts that you take off to get to a certain part. You may end up needing them! I left them on the ground whenever I pulled them off the wrecked runner lol

Going to rebuild the front spindles for shiggles after the rear is done.

Note to anyone doing a 2x4 auto....ignore all the other videos and info on how to press the wheel hub out. Buy the 4pin socket from Toyota. And remove the lock nut on the back of the hub before pressing hub out. It says to remove the ring after pressing the hub out but there is no way.

There is zero love for 2x4s and it's pretty amazing what a mess someone could get into going on info that is actually for a 4x4. Good thing I wasn't doing this on a spindle that mattered. Just a waste of time till I found the info I needed.
 
Note to anyone doing a 2x4 auto....ignore all the other videos and info on how to press the wheel hub out. Buy the 4pin socket from Toyota. And remove the lock nut on the back of the hub before pressing hub out. It says to remove the ring after pressing the hub out but there is no way.

There is zero love for 2x4s and it's pretty amazing what a mess someone could get into going on info that is actually for a 4x4. Good thing I wasn't doing this on a spindle that mattered. Just a waste of time till I found the info I needed.
That should have been pretty obvious. The axle on the 4WD's holds the bearings together. With no front axle, the lock nut holds the bearings together on the 2WDs - and the manual hub 4WD's (Tacoma only, unless swapped to a 4Runner)....

-Charlie
 
That should have been pretty obvious.

-Charlie

Pretty obvious to one person who has looked at the other configurations, yes. and maybe a better understanding of how bearings are preloading.

But having your head in the sand, and just looking at it straight up, no. lol

its not obvious until after you hunker down on the press and its not budging. it was only a mere 5 minutes. I had to test the press out, and I was surprised that the hub didn't come out until I looked closely at what was holding it back.

But its neither here or there. or any where else for that matter lol now it is.
 
This is coming out really nice bro!
Thank you! And thanks for coming back! Lol I put a hell of alot of work into and it still doesn't seem like I got very far. I still have a pile of work to be done. Just need more time.

Definitely no more death trap! Lol semi death trap now. Got a PCK from eimkieth that will get thrown on after the axles are down. Then it's bushings

Still no fun mods yet. :( Lol


Sent from my Pixel 2 XL using Tapatalk
 
Thanks for documenting your journey on your thread. I encourage you to keep it up, your doing great work. :tea:
 
Thank you for the kind words! I had another hell of a weekend.

I re built both axles that I pulled from junkyard. that was a chore because I started with 5mm of polished axle, ended up being too much and 3mm was the ticket for me

Something to think about....because 1996-2000 have different "axles" than 2001-2002, I wonder if that would be a reason why some people can get 5mm versus 3mm er 4?

I should have taken more pics but my wife was visiting me so I had to work fast even though this took me alllll weekend.

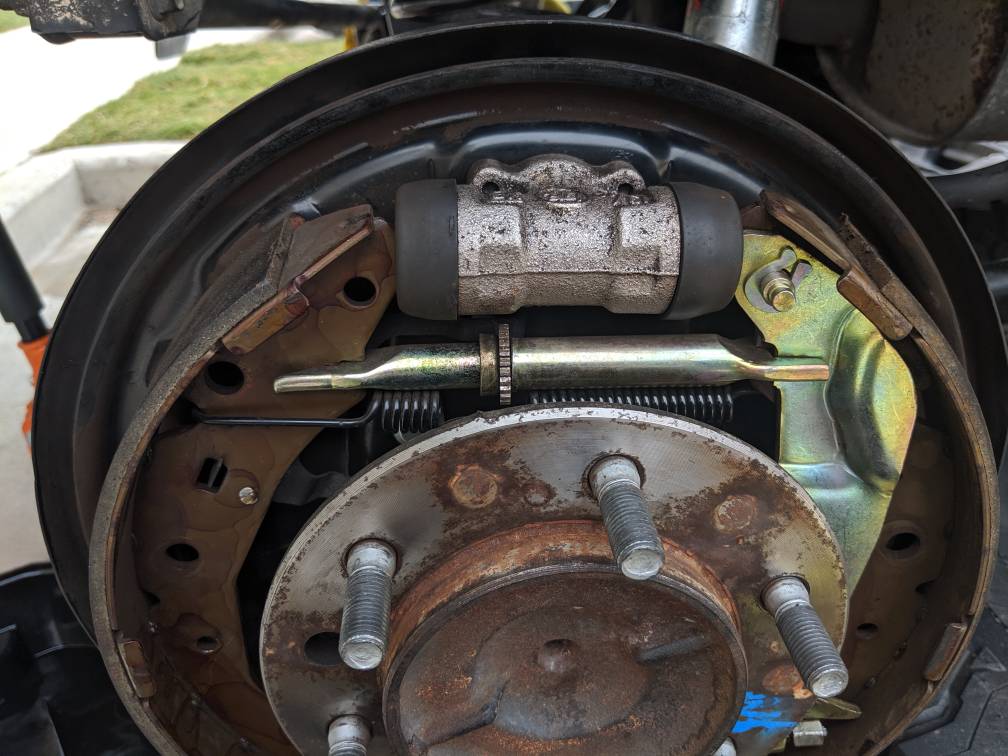
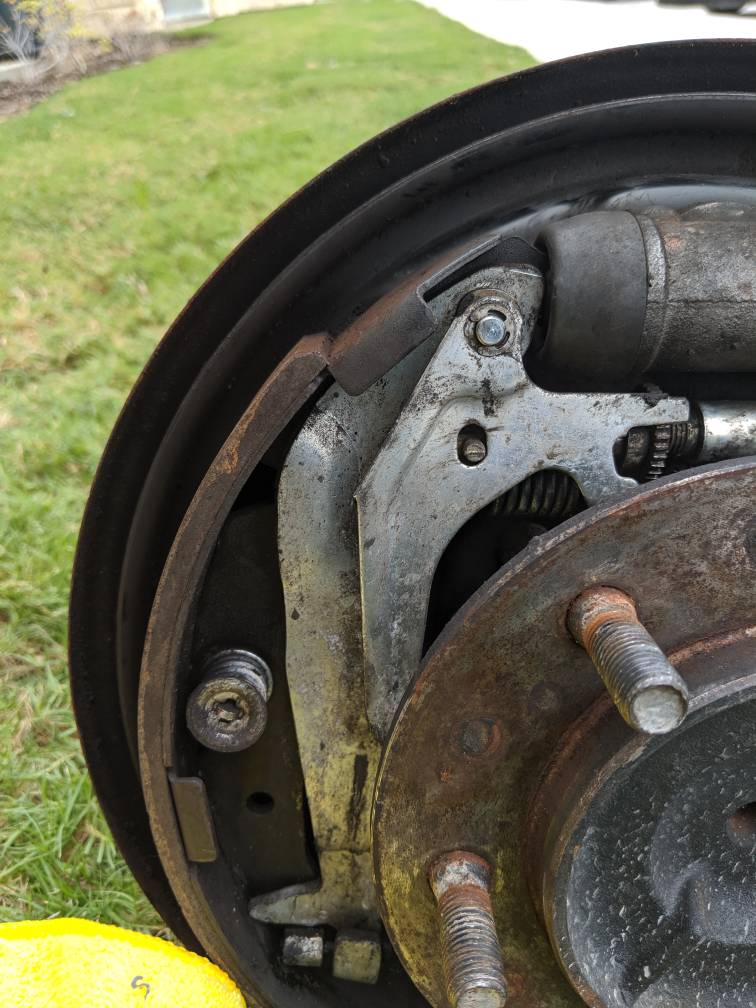
Something else I found that was different between 1996-2000 and 2001-2002, the automatic adjustment lever is different. Long story how I figured that out....

I have the oil soaked brakes in there at the moment. To see if the seal breaks within a week. If it passes, I already have a brand new set of OEM pads, drums, and cylinders here at the apartment.

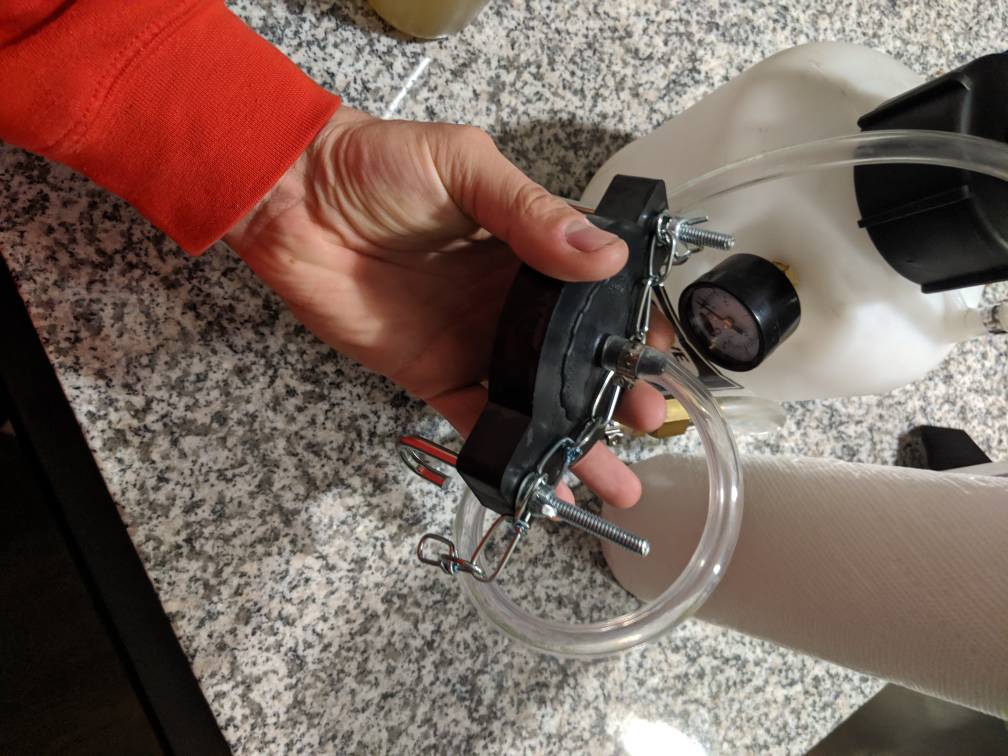
And if anyone hasn't gotten one already a motive brake bleeder is nice for having to bleed the brakes after you bolt everything together. I forgot the park number which is the adapter you need for the master cylinder. It looks a little ghetto but it involves J-hooks and a small chain lol

Pump it up about 3psi and that will be enough. Don't put the hydrualic fluid in the bleeder just top of resivoir with fluid then pump up and and crack bleeders.

I already have the motive brake bleeder for my race car Miata and it makes bleeding stupid easy

Then 2.6 quarts of 75w-90 later, and 1 extended rear diff breather mod and she is back on the ground ready to roll.
532ad8da909776f537d87ded13f809b6.jpg
91c803f5a8c41415de2783f11c201a10.jpg


This is the right rear brake assembly. The automatic adjustment mechanism is behind the pad I should have taken a better picture of it. Because of the relocation on the adjustment mechanism, the little dial thingy with a spur looking gear on it is different as well. What is it called again? Lol

The little head that attaches to the front pad is different. It doesn't have the pin for the self adjusting mechanism to hook on to. (I'm referring to the part below may not work for a 96-00 setup

Not sure how someone could get tangled into that kind of part swapping but I still wouldn't be surprised lol

645bcb8e2837e6d2f816a0fca46f82f5.jpg


This is the left rear brake assembly. Notice the automatic self adjusting mechanism. This should be the same setup for 1996-2000
6cd51121ade9cd706bf046a334a01028.jpg


Sent from my Pixel 2 XL using Tapatalk
 
Last edited:

Members online

Forum statistics

Threads
278,312
Messages
3,554,089
Members
248,016
Latest member
Advally Service

Trending content

Back
Top