Rear Axle Seals: The Ultimate Information and Replacement Thread (3rd gen)

You are in Az just as I am - I do axle seals for not that much compared to a dealer or any other mechanics shop.

If you want to do most of the labor at home, I can press apart your axles, replace bearings and press them back together properly for not that much $.
Oh nice. I forgot you were in AZ also. I will more than likely take you up on that offer. That's one thing I was worried about. Trying to find a reputable shop to do the pressing for a decent price. I might just do the whole job in that case. When I get closer to doing it, I will pm you so we can figure something out! What part of AZ are you in?
 
Oh nice. I forgot you were in AZ also. I will more than likely take you up on that offer. That's one thing I was worried about. Trying to find a reputable shop to do the pressing for a decent price. I might just do the whole job in that case. When I get closer to doing it, I will pm you so we can figure something out! What part of AZ are you in?

Let me know - I am in Laveen. Do the whole job if you plan to keep your runner. Don't do it half arsed. The time invested, brake fluid, replacing shoes again and seals again + all the cleaning supplies and de-greaser is just not worth a partial job.

OEM Parts in total are less than $200 shipped. Press work even less than that (I charge $150 if you bring me your axles). So in short, it is a $350 job if you do most of the labor and it will be done right.
 
Last edited:
Let me know - I am in Laveen. Do the whole job if you plan to keep your runner. Don't do it half arsed. The time invested, brake fluid, replacing shoes again and seals again + all the cleaning supplies and de-greaser is just not worth a partial job.

OEM Parts in total are less than $200 shipped. Press work even less than that (I charge $150 if you bring me your axles). So in short, it is a $350 job if you do most of the labor and it will be done right.
Yeah this makes sense. Didn't factor in the brake shoes. Definitely don't want to do those twice. Especially drum brakes. Laveen isn't too bad a drive from me. Worth it to know it will be done right.
 
Yeah this makes sense. Didn't factor in the brake shoes. Definitely don't want to do those twice. Especially drum brakes. Laveen isn't too bad a drive from me. Worth it to know it will be done right.

Exactly, a pair of OEM shoes cost more than the bearings!
 
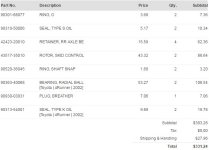
Here's an updated price and part number listing since the OP one is a few years old. I had to move my top retainer ring almost to the very tip of the machined portion on the axle (about 2/16")

Toyotapartsdeals was the cheapest online place I found. I just finished mine for about $450 total. The driver side was barely leaking but I went ahead and did both sides because the truck has 97K on it and it's a 2002. It was time.
 

Attachments

  • Capture.JPG
    Capture.JPG
    43.3 KB · Views: 674
I'm planning to do this repair this coming weekend.. What tool can be used to install the new wheel bearing and get it seated all the way? I'm watching videos on youtube and its a metal pipe? If so what size piping or is there a better way ?

TIA !
 
Sorry if this has been covered already, but does anyone have experience using Marlin Crawler's rear axle bearing kit on 3rd Gen 4Runners? I used it once with good success on my 1st gen a few years back.

He has a 79-99 option and a 00-04 option. Other than the ABS ring, I don't know what makes these kits different.

https://www.marlincrawler.com/axle/rear-axle-parts/rear-axle-service-kit-1979-99

They are missing the ABS ring and one bearing retainer. If your shop is good they can remove those and reuse them, but most will cut them off (and gouge your shafts while at it). I would make sure to let your shop know when you drop them off for the press work, unless you do it yourself.

It's not a bad price, but it's also not a screaming deal over an online toyota parts place. I'll keep it bookmarked. Thanks.
 
Thanks for the clarification. What changed in the rear axle design from 99 to 00? (According to Marlin's part selection, anyway)
 
Don't quote me on it but I think the bearing case is different. I know on the newer 01-02 4Runners the ABS system is a little different than on the older ones as well.
 
How to remove ABS wheel, retainers and separate shaft/bearing without special tools

Here is how to remove the abs wheel and retainers, and how to separate the bearing from the shaft without any special tooling.

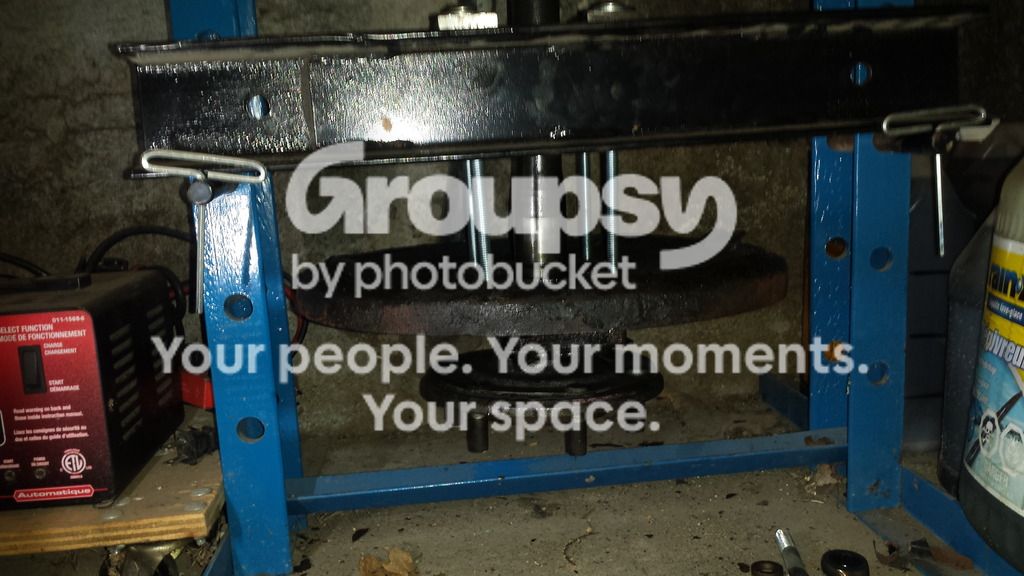
All that is needed is access to a press (I used my 130$ 12 ton press) and a set of 5 tons bearing separators (bought mine on princessauto.com).
diverscale-albums-misc-picture43051-8160483.jpg~original


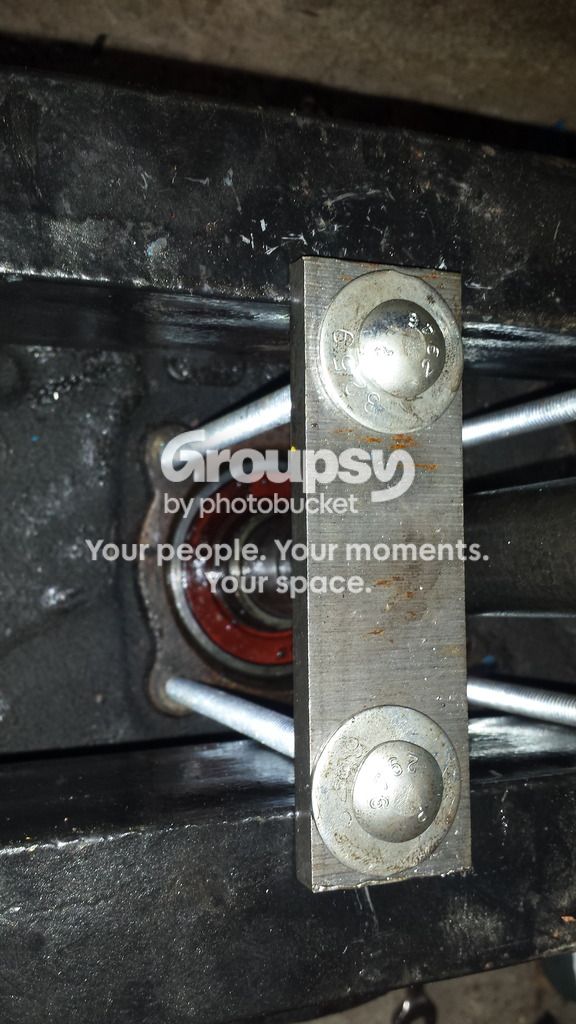
Hardware needed is only two 3/8-16 threaded rods, 4X 6inches 3/8 fasteners of any kind for the bearing separation from the shaft, and some metal plates. All available from your hardware store.


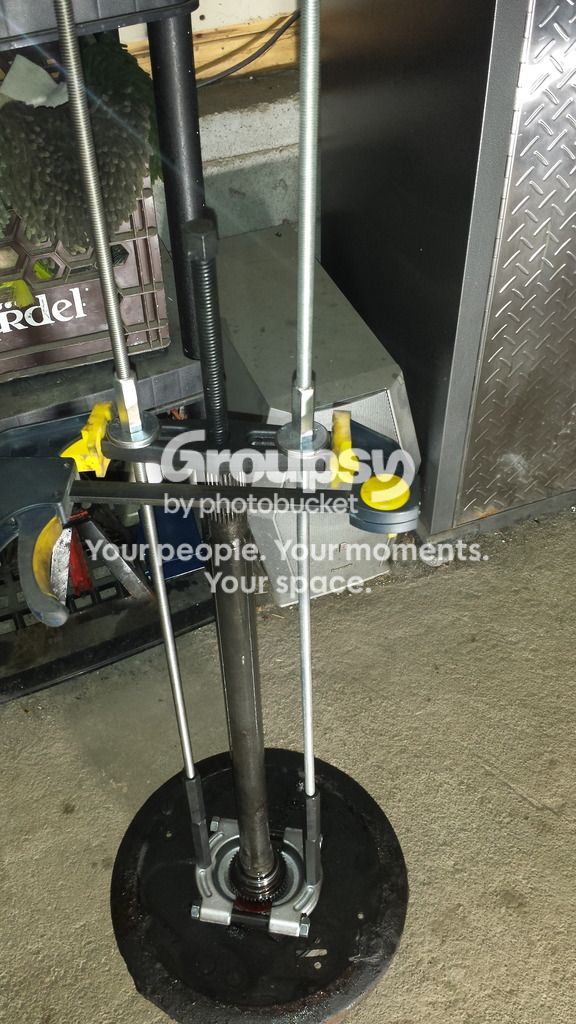
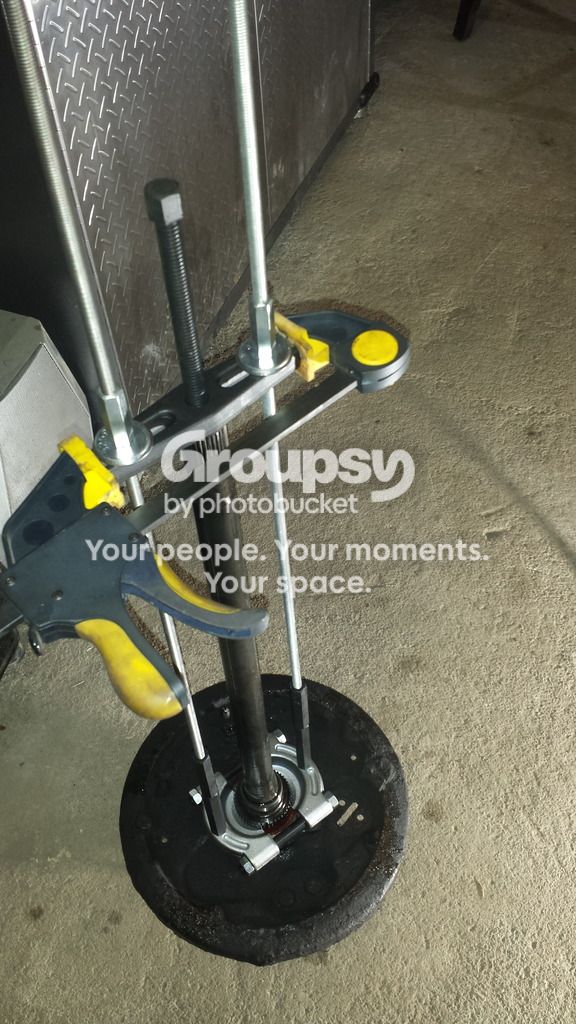
Here is the layout with the threaded rod and bearing separator kit. The puller is a part of a bearing separator kit. The long, black bolts at the bottom are also part of the bearing separator kit. It was pretty easy to remove this way. Just be sure to turn the puller screw just a bit, then un-tighten, screw the rod screws, then pull a bit again and again, so the puller screw does not get crooked. Took about 5 minutes of pulling. The clamp is not needed, I installed it for security reason. Use an impact on the puller screw if you have access to one as it will ease operation.

20161118_224619_zpsfgv0hz2g.jpg~original


20161118_224631_zpsgtbxo0dj.jpg~original


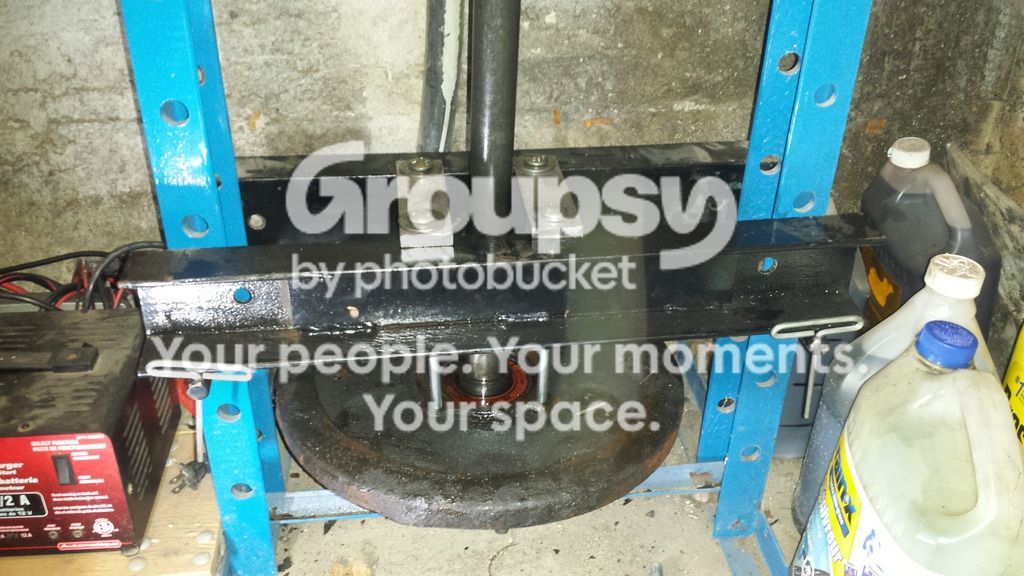
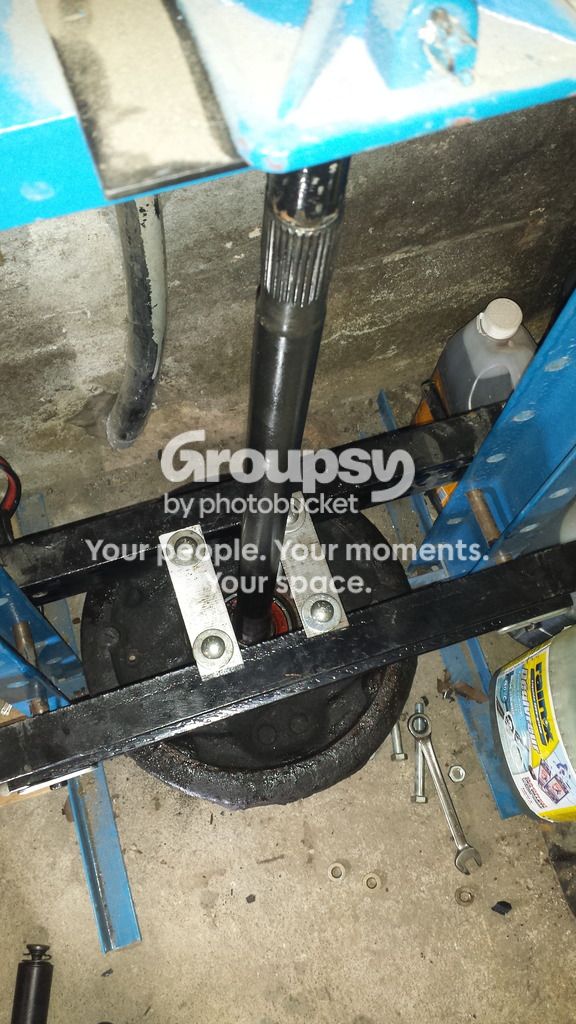
and here are a few views of how to use 6inch fasteners and the press to separate the shaft from the bearing.

20161119_002104_zpsgbytmis8.jpg~original


20161119_002035_zpsdh0ddv4w.jpg~original


20161119_002111_zpsguycgn6p.jpg~original


20161119_001959_zpshxnsgx44.jpg~original


here you can see where one of the nut, on the 6inch fastener goes. It takes the place of the four studs that holds the axle on the diff assy. It took most of my 12 ton press strength to start it out. Do not forget to remove the retaining ring like I did at first! The 3/8 fastener are the correct size to go through the stud openings.

20161119_002022_zps1ebibqxz.jpg


The re-installation process is pretty straightforward with the press. Just make sure the hardware goes in straight as even the ABS ring had a tendency to go in crooked.

 
Last edited:
Here is how to remove the abs wheel and retainers, and how to separate the bearing from the shaft without any special tooling.

All that is needed is access to a press (I used my 130$ 12 ton press) and a set of bearing separators.

Hardware needed is only two 3/8-16 threaded rods, 4X 6inches fasteners for the bearing separation from the shaft, and some metal plates. All available from your hardware store.


Here is the layout with the threaded rod and bearing separator kit. The puller is a part of a bearing separator kit. The long, black bolts at the bottom are also part of the bearing separator kit. It was pretty easy to remove this way. Just be sure to turn the puller screw just a bit, then un-tighten, screw the rod screws, then pull a bit again and again, so the puller screw does not get crooked. Took about 5 minutes of pulling.

Uxoh610diGvVF--NYLrr7KPtnvUdwDrNZha1ZgpLE9f-oCtttfabzbHdbdWOHOmW6RK9wZcJkmPY29xuQLNjHw1JTLEdY3HIGXyJIFOVPfvBxybd4Ji1d0AtIxi6s2lCVhCI3Xz1XRvJZJkKe66afUsMf4iril9UavxgS-kLQ071A-Rd8Nx4ihCdhd9gJrZY7LgI-A7gU9SPnt-wAk4SyGze-PG8eQyUsV0WqXdWD4U_qb8rDkwUEXbZaGP-ZLYPOuQpHPTQfE2GBkYcWzpCK5XB61H1qI5FeRwYLM_GRFCIlhkCOhomeByE4bNFipIeBoWIkoc2IhxY4vZyvO9kVnGKmV8jqp9BAPYEiUKjDukAbHA9mHtdMe7vDIgalaRB1FTnh5s186W0I8Kbe013yp9C0sugpCLbsJ4JwKy3Z6EaOLoogBG8TnIRIlNDoxYkjcafoPSeUNDxqiXRMWYjjoCuEgtNtBqpFCl8bI0QGbsFxuzceokKpUQPHwawmGeacZKu5JNKCoMd9sVHoM3n1xjLlyO7zqssqHCSQ-wmWJUyQ7Ea_vjHeksoxMn6LhzQ7qqVNQd6MnVlnyH2a4yVmUL_YrD8fPeuyzKjizjvgfpb3Z8=w535-h950-no


and here are a few views of how to use 6inch fasteners and the press to separate the shaft from the bearing.

m-_SyOZHDsluE6H3VScYoKDZ0x6SKtW3FgSM5vtCW2GL4_pnsN3LRiWVv7pE3EopG0WnKOmSxUveTyqddXXydeAEvSyL18WufqwlZQUUoqxiaYOK8oIhamGm4phM8YBt7dl5tBFKDpG7LwvYosXe-B01NpOzIdbwXTBu0Ggr4ejWStKP9owcdtk9EP-ZntU12UYQVerwZPxm5QKsn0tJUbkmB126mQvpj4DRVQrwFbHSKL728svNgb7sVH2_UlsHFXh8AOI063JkGM4vWUiJ2oOL5MDi7DKC9IgbJ46xebQVX74ycQj0SOsQ3leHFk1q1GLFjPd7rhPucwyZXluGK3kQ4eFeZo4B-iFhbO7E89qmpr8S102B2vx3ZEUilhtIgASnPqWDYTAj5wIPk3NZt7dM1mX9nMK6S6Ibj-uHgFQUVGaLSQ-3z3wrlFKB6Fi5NDRqibuMfsfgGQXKmt80qOBzBX34LbqjnRLuXw9YkqQ0ctuall3kbMqvK3wJKHK4cBYn48BX8ED5ioGLg0xOgUjWMJoJKdH-dL_TGyEPjRtC8BznMe9465ykXwNvHi8pBT8MHovYkum7YHmhMJStODoq-B6B5DbFdIg8zNr74e4EqJA=w1689-h950-no


FzsNM4_5k2bXp5I561CiDiQ6J86IkfhMkZLLe9G9UAR2YW2vtnjoiTW9EcwRHWaXuoKeNO-LQL0saUcObirW5hAoB9iOkt5x4E8YecyJs5u9VW3CJXJNq3tTA0hgWxcjgYVdDSyhHJmw56CbqRb7GzfJGzsdG2zH8UXiXRn_5tzO0lbxOuF4gJHUdx86cj9gvkrF5XUV4e0-2Qo_0L3ZU7sQ2Lb_OxTMkykMV2hUCy-dM-nXb_Oj1X5AgJwneDCcmYFYwLaz4YiEQPme228hOkAe97cGjONWaZHA_8hX0hMqAj2UtlNwetqQmNy-sgs-uM31QHlwlg8p4c0GoSAd71Lqt-z7ZGnTcOtJUVgBGOMVNE9x2WgTALiZQr-BJhZE049JChyrZR5Zb0OEZYXiqEkadRBXHoFMii9L8MU9X6NkHGY7Fja5CtT-2zXFCPKpFkUEgai00kqikusmKDRXGJ01petrjynDmvLzF6a9qkrf9xPPk7jTpHmpo96rbj10b_kSCXHUY6pk-hnFR8A1nMfheaK4g-AmQKl-cVHLkpKAvX__U6qYpv4Ff4sXVWFZVg0z_pvDgmezQNJUwIWc36q3lpLSrqanrtPEs-IBJ5jaiFE=w1689-h950-no


SDnPf6Fg3zD98tz0U2oxEE_wSR5dDO4nsxs0-fuE-eDSPsLoN0wfdK2wg4A0ntqTf9aAiTZlUw22SaDuU5Hq4QApWbwsKYAq29TVhb5JuX0xtLnedRc1TNTCt2Nxgz1uOvgbd-RjK1YHGu2U0M0IcEmmobdl4JhiBmnCzui0otcMEJdmeomod9tGDGj4MWCQnL3XO-Dli_XblFCbRcu-_H_GCnmiBF6CbAqHuKQP2Dhboc6dJjOk_dWd6N2x7vmKlkTEf74u8ZoV0lxfLE8vWGXfYBbqwxtx0PVBweiUy8KuOz-CG-c-yaduygvwghnHjPB7ZOYZZZybt9LmYVKOGJtI5REho3Oe-me2J5PrVaSkbwJzLyJWOC0ld52wAqXlz1ogOvjqy-3rFHQd71kKUW43S8aR7UWghbUq6-sGKuFmsi70pghRlsYAqu5FJkMqfuIATN6nkXD9U96uPP2FQ84ENh3E3d44aGJU5z2ob1NJz6QA22WisbD_aoVSXxKAiv5X7551Xd2-WaeP--94k6MXlfrVS8faYl-3Zy7dyyfXAlqxeevDEAna3xoCtMsTAS-v82-sHweNokS7QJ_JXLn_APGCNH6vgiRojAdU0887YyU=w535-h950-no


Rm0LGIXiFkvGTa53ovrvtcEdrEBf8uxISO-rEg16lOYZjdOwNz6uFQyohIxK3EbArlCUngz5Jo36qXv4mWPjZiAsP6-t1niXXkc6OFdrQjhvq2a9EwX01T3Ys7OH4sx1Cc06VG1rShuzpXfomiFLh40TcByiIEmYUsWpNEYjqp_K9TPEkETc8sij8Y8CHJ3NWVdc6q139EcMHoufOBlS3HTY8_uYN0jACgIgt89-Lu8MOsrpZBuDWLj3W78sxFbu__5RPKZ2mogzhBxLV0XkAvvszK39dcFQuspRTuGH-93fqweKelK4vxfcXxyUNmRBjeUXDHAzR99Sue_RwFqN-ekEVj-48vXRiuU81h8KRpKoH6RczYedUGFl7rGKSX9JsxDWVVnDmcU_hIWogBQ0DqbdVCJTA9qU-hUpCntZHFrWv24BCcxc3xY6KxJHC-SxQT9BMEvmjUlbjuC0kEGgW-800r_DwoWN70oJQhIHP-T6977_lQC2dS2_h_kMWHpsN57HUU9W_WzqqfDSovWgF7KEDPs3RnLLxjx8Buy9BRbl7QlfGZ1IxXGw01OfJc9UezDc97kZRre9hFthLW3i9RAg5Ferul8DMUiwJX7_jMP-Z2Q=w535-h950-no


here you can see where one of the nut, on the 6inch fastener goes. It takes the place of the four studs that holds the axle on the diff assy. It took most of my 12 ton press strength to start it out. Do not forget to remove the retaining ring like I did at first!

9frLFDgRTxGhVa7LluopsDfimH8XgeJgKOSo_v2WJ_k3YAuEUyYuFO_ApUYTs7uC73E-1RxoW1HdZ3YWSjhzM_enhbDUnQ7aPi2SThrjoEDAcHkXXf2Sh02CmH-xTKeMSja1Kk0dkDMgd4EGHZeIpns6beFwAZbghCiBp1XgeYdDKqB6svQ8UbTMu9liBtVPukP13cqFlYS6l_ty8tU-CcNbbp7PyVzmZN0JY2XNOJszpgbMXllFlGIlCEntRkC3dQhVi9aID6pfNgeLmsUAwdvE36CVsJCBlRi5dpqENAc1IOXZbi2aZGloYdimS4dPq8XKRi-0uFiRbxVNJDib1XVyG5gfkOYuiu5mWLW2zwj1yPT-IEVA8XzShR4fa5atolM1UAt5DUdTuM5EdD6ZnAK1O2AZcttPkNLbTLrjUpWr5QpkkWDvKXbFzQCSZl5fhl0YxVeKgU70gDWXMmmIOOz9y4RA7TtV_-blFU7wDjT8HuSzeHgZMshnYghwRCTL5haVbfKVTpXYy4dv4qk0khAUEBvyRb5iVxq8NUIQVRj_cv-R2M2_XZT4re8FOThzrIZKnIo3eWMTATc6v46-LDlbaZfDy4cXz-B6CUIM3cML7vA=w1689-h950-no


The re-installation process is pretty straightforward with the press. Just make sure the hardware goes in straight as even the ABS ring had a tendency to go in crooked.


Pics aren't working for me.....are they working for everyone else? I see there are image tags in the body of the text when I quote the post....but the actual post doesn't have any pics that I can see.
 
Might be because they are on a google image account. Ill correct that as soon as I get home

Any suggestion on where to easily post the pictures for sharing?
 
Last edited:
Might be because they are on a google image account. Ill correct that as soon as I get home

Any suggestion on where to easily post the pictures for sharing?

As much as I hate it....Photobucket works on this site.

By chance were the pics of a blue shop press? I saw some at the top of the banner under the most recently uploaded pics to the site to member's photo albums? If so....odd that it would work in the album section of the forum and not the post, so it may be something going on with my computer. ***EDIT*** yep....they're your pics. Let me see if I can link: http://www.toyota-4runner.org/members/diverscale-albums-misc-picture43050-20161119-002111.html


diverscale-albums-misc-picture43050-20161119-002111.jpg


***TEST***

I wouldn't put any additional effort into posting pics until someone else confirms that they can't see the pics in your post either.

Thanks for posting regardless....I could make the specialized tool for this, but if I dont' have to waste time or material and can do it without....I'd much rather go that route.
 
Last edited:
As much as I hate it....Photobucket works on this site.

By chance were the pics of a blue shop press? I saw some at the top of the banner under the most recently uploaded pics to the site to member's photo albums? If so....odd that it would work in the album section of the forum and not the post, so it may be something going on with my computer. ***EDIT*** yep....they're your pics. Let me see if I can link: Toyota 4Runner Forum - Largest 4Runner Forum - diverscale's Album: misc - Picture


diverscale-albums-misc-picture43050-20161119-002111.jpg


***TEST***

I wouldn't put any additional effort into posting pics until someone else confirms that they can't see the pics in your post either.

Thanks for posting regardless....I could make the specialized tool for this, but if I dont' have to waste time or material and can do it without....I'd much rather go that route.

I've uploaded to photobucket. I have not used the internal T4R.org system since they downsize the pics too much and one can't see the details.

I, too, had to equipement to do the tooling, but without the actual dimensions of the shaft and retainers on-hand without dismantling everything, I went another route. Laziness has something to do in this too. Please confirm that the pictures are working on post #353 :)
 
Last edited:
I've uploaded to photobucket. I have not used the internal T4R.org system since they downsize the pics too much and one can't see the details.

I, too, had to equipement to do the tooling, but without the actual dimensions of the shaft and retainers on-hand without dismantling everything, I went another route. Laziness has something to do in this too. Please confirm that the pictures are working on post #353 :)

Yep....pics work now. Thanks again for posting.
 
Hey guys,

I'm picking out parts for a rear wheel bearing job and was hoping for some clarification regarding the style of the bearing that is used.

My truck is a 99 4Runner, 3RZ manual, non-ABS.

Looking up the Toyota part number online yields 90363-40068. The picture of this bearing shows an extended inner race:

Extended%20Race_zps0rm2aqvu.jpeg~original


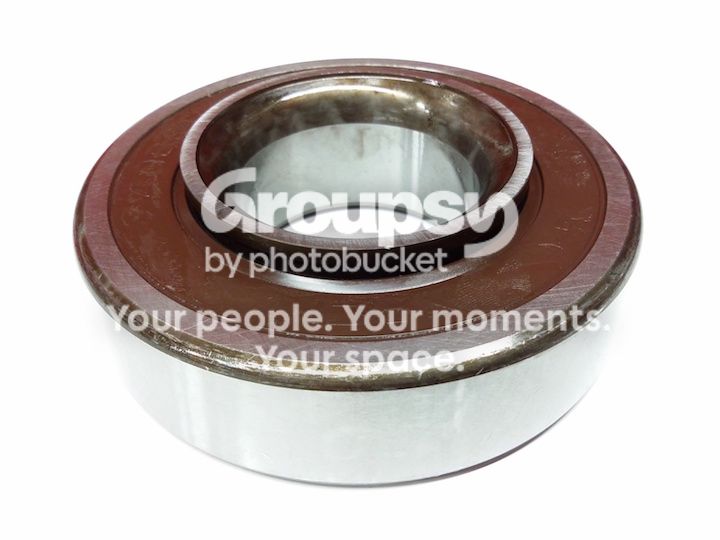
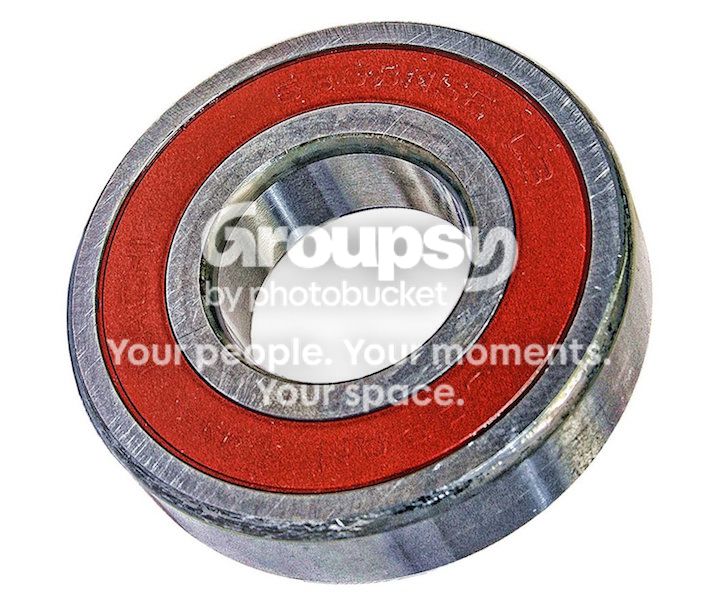
When I look up wheel bearing kits on sites like Marlin Crawler or even RockAuto they show a standard bearing without an extended race. When I did the wheel bearings on my 1988 4Runner I recall it had a standard race. Like this:

Normal%20Race_zps2uxbybl4.jpg~original


If I can confirm that my truck uses the standard bearing style without the extended race I can just order a premium Japanese 6308 double-sealed bearing and be good to go.

I seem to recall reading somewhere that the extended race actually appeared in the 2001-02 4Runners?

Any guidance here would be appreciated!
 

Members online

Forum statistics

Threads
278,316
Messages
3,554,114
Members
248,016
Latest member
Advally Service

Trending content

Back
Top