The Ever Popular P1300 CEL

What are the consequences of using a basic lead free silver solder?

Edit: can I use a really high quality caps, like the ones that looks like they are cover in a metal sheath?

Sent from my SM-G930T using Tapatalk

Lead-free has a higher melting point, so greater chance of damage to the board. Nobody knowledgeable would use it on PCB work. Plus you want rosin-core, not acid core or no core. The one I posted is nice and thin and perfect for the job. Silver solder has an even higher than normal melting point, very bad choice. Save it for jewelry, not electrical boards.

Like I said, caps are caps, just get size and polarity right.
 
Last edited:
Lead-free has a higher melting point, so greater chance of damage to the board. Nobody knowledgeable would use it on PCB work. Plus you want rosin-core, not acid core or no core. The one I posted is nice and thin and perfect for the job. Silver solder has an even higher than normal melting point, very bad choice. Save it for jewelry, not electrical boards.

Like I said, caps are caps, just get size and polarity right.

I agree with the Durk.

60/40 leaded rosin core solder, a new cap and an Iron is all that is required. A solder sucker or solder wick doesn't hurt, but shouldn't be a requirement when you are only replacing one cap.

Any news on the truck ZionXIX?
 
I agree with the Durk.

60/40 leaded rosin core solder, a new cap and an Iron is all that is required. A solder sucker or solder wick doesn't hurt, but shouldn't be a requirement when you are only replacing one cap.

Any news on the truck ZionXIX?
Just waiting for the parts to finish their pilgrimage from the states to the island.[emoji41]
Making sure I have lube for customs [emoji53]

Sent from my SM-G930T using Tapatalk
 
Update:

Hey guys, it's been a while since I've posted. I finally received all necessary parts and I'm beginning to make progress. I'm trying to take my time since this is a sensitive repair job. Up until this post I have removed the 2 suspect capacitors. 1 capacitor was blown, the other appeared intact. I wasnt sure until I removed them. I have a couple of progress pictures and some questions.

It was suggested to me that I use alcohol and cotton swabs or a tooth brush to clean off the electrolytic fluid. This stuff is dry, crusty and extremely stuck on. I'm scrubbing really hard without much removal. Lastly I tried using a small jewelers flat head screw driver to scrape the material away using as little pressure as possible. Just the weight of tool. Is this a bad idea? What happens if I leave some fluid behind?

f6a9e63749f70d4f5993e712fddb426a.jpg


5876482a5e075f29d6b4a12a14f410a1.jpg


Before cleaning

501478d03ef53ac99d7b8750de3399bb.jpg


During cleaning
3dda20d910bc9060a2270364e81555e3.jpg


Sent from my SM-G930T using Tapatalk
 
Last edited:
I would try a stronger solvent, just test it on the edge of the board first so there is no bad reaction. Lacquer thinner or paint thinner would prob be more effective. I have a spare ecm for a 97 if you want but it won't be plug and play
 
Well after I scraped some of the capacitor crap off, I noticed what looks to me like teeny tiny gaps in the copper traces. I put a multimeter on the pins they go to and some have very low almost "0" resistance and some have super high resistance. I don't know if my scraping damaged them or if the electrolytic fluid ate the copper. I bought extra capacitors, I'm thinking of just putting them on the board and seeing what happens. I suppose I could bypass a couple of the bad traces. Most people would probably just go get a used ECM bit I'm having fun with my little circuit board project. Does anyone know where I could get technical information on the PCB itself to see what these specific traces are for? Also any info on solder insulated copper wire to pcb traces would be greatly appreciated.

Sent from my SM-G930T using Tapatalk
 
UPDATE:

Its been a while since my last update. I havent had much time to work on the ECU board due to so many exams. I actually have another one in 2 days. Anyway, I have not given up trying to fix this board. I have taken a slightly different repair path that I normally would never have chosen. I dont want to post any details until I get a chance to test it out. In the mean time I had an opportunity appear. A friend of mine is traveling to the states this weekend and offer to bring stuff back in luggage if I needed it. So I found a used ECU with part number 89661-3D160 on Ebay and had it shipped. This way I avoid those ridiculous import taxes! Of course 5 mins after I bought it I saw a another one for almost half the price! Where was that ECU during the hour I spent searching Ebay. Anyway my question is about the ECU I just bought. It has the same number but it says manufactured in Tennessee, where as my original says Japan. There is a different barcode number and so forth. Does this matter?

I still plan on fixing my original but its nice to have a backup in case I fry the thing.

Thanks, -Z
 
Last edited:
UPDATE:

Its been a while since my last update. I havent had much time to work on the ECU board due to so many exams. I actually have another one in 2 days. Anyway, I have not given up trying to fix this board. I have taken a slightly different repair path that I normally would never have chosen. I dont want to post any details until I get a chance to test it out. In the mean time I had an opportunity appear. A friend of mine is traveling to the states this weekend and offer to bring stuff back in luggage if I needed it. So I found a used ECU with part number 89661-3D160 on Ebay and had it shipped. This way I avoid those ridiculous import taxes! Of course 5 mins after I bought it I saw a another one for almost half the price! Where was that ECU during the hour I spent searching Ebay. Anyway my question is about the ECU I just bought. It has the same number but it says manufactured in Tennessee, where as my original says Japan. There is a different barcode number and so forth. Does this matter?

I still plan on fixing my original but its nice to have a backup in case I fry the thing.

Thanks, -Z


I missed you updating this thread somehow and was wondering "damn, it sure takes forever for the parts to arrive to St. Kitts"
Its always the case when you order/purchase anything. You buy for one price and right after you see a smoking deal. Often it is best to stop looking entirely if there is no way to back out of the purchase. You dont need to see the potential savings you lost out on.

I am really curious about the ECU fixing. The FSM is all over the web. Have you checked the electrical section to see if there is anything on the ECU itself?

Looking forward to more updates :)
 
I missed you updating this thread somehow and was wondering "damn, it sure takes forever for the parts to arrive to St. Kitts"
Its always the case when you order/purchase anything. You buy for one price and right after you see a smoking deal. Often it is best to stop looking entirely if there is no way to back out of the purchase. You dont need to see the potential savings you lost out on.

I am really curious about the ECU fixing. The FSM is all over the web. Have you checked the electrical section to see if there is anything on the ECU itself?

Looking forward to more updates :)

I have a copy of the 2002 manual and some sections of the 1996 but not the entire 1996 manual. Thats what I really need sometimes cuz the ECUs are very different between the 1996 and 2002. I would love a technical diagram on the ECU but I dont think anyone but toyota has those. After I purchased the used ECU on Ebay I noticed it was manufactured in Tennessee where as my ECU was manufactured in Japan. They both have the same model number so I dont see why there would be a difference. I just try to make sure since I have to wait so damn long for stuff to get here, and I have to pay 45% import tax! That is why I couldnt pass this opportunity up. Then I google Denso of Tennessee and saw a few articles about a dropped lawsuit against ECUs accused of unintended acceleration :shocked:
 
I have a copy of the 2002 manual and some sections of the 1996 but not the entire 1996 manual. Thats what I really need sometimes cuz the ECUs are very different between the 1996 and 2002. I would love a technical diagram on the ECU but I dont think anyone but toyota has those. After I purchased the used ECU on Ebay I noticed it was manufactured in Tennessee where as my ECU was manufactured in Japan. They both have the same model number so I dont see why there would be a difference. I just try to make sure since I have to wait so damn long for stuff to get here, and I have to pay 45% import tax! That is why I couldnt pass this opportunity up. Then I google Denso of Tennessee and saw a few articles about a dropped lawsuit against ECUs accused of unintended acceleration :shocked:

Thats not the news you were hoping for, strange issue for sure.
Hopefully its not a deal though.

I just searched google for "1996 4runner ECM PCB data sheet" and didnt really up come up with anything besides sellers. I did catch your post on another forum though.
You could always check in with an hardcore electrical/PCB hobby/professional forum, some may be nice enough to help.
I dont know enough about PCB's and would be in a similar situation to you. I would see if someone could help me and do some reading about troubleshooting PCB's in general.
Honestly, I think it would be really cool if your issue was the PCB but even cooler if you were able to fix the existing one.
 
Thats not the news you were hoping for, strange issue for sure.
Hopefully its not a deal though.

I just searched google for "1996 4runner ECM PCB data sheet" and didnt really up come up with anything besides sellers. I did catch your post on another forum though.
You could always check in with an hardcore electrical/PCB hobby/professional forum, some may be nice enough to help.
I dont know enough about PCB's and would be in a similar situation to you. I would see if someone could help me and do some reading about troubleshooting PCB's in general.
Honestly, I think it would be really cool if your issue was the PCB but even cooler if you were able to fix the existing one.

At this point its pretty clear to me that the PCB is the problem. If I had a big fancy shop filled with tools and oscilloscopes I could have performed all the necessary tested required to properly investigate the P1300 code with the different ignition signals. Given the state of the PCB I am very confident that a replacement will solve the issue, ~99% :noidea:.
The opportunity to have an ECU brought to me tax free will finally enable me to drive the vehicle I have come to love so much, even if she has been the least reliable. Assuming that fixes the issue I plan to continue trying to fix the old ECU to practice my soldering skills and to have a backup ECU if Im able to repair it. I have posted on several enthusiast circuitry type forums and they have all told me the same thing. Bypass all the damaged traces. None of them seem to like how few resources I have to work with. Well Im workin on it. I hope to have it repaired by the end of this weekend but not having any Flux has really been putting a damper on my soldering skills.
 
At this point its pretty clear to me that the PCB is the problem. If I had a big fancy shop filled with tools and oscilloscopes I could have performed all the necessary tested required to properly investigate the P1300 code with the different ignition signals. Given the state of the PCB I am very confident that a replacement will solve the issue, ~99% :noidea:.
The opportunity to have an ECU brought to me tax free will finally enable me to drive the vehicle I have come to love so much, even if she has been the least reliable. Assuming that fixes the issue I plan to continue trying to fix the old ECU to practice my soldering skills and to have a backup ECU if Im able to repair it. I have posted on several enthusiast circuitry type forums and they have all told me the same thing. Bypass all the damaged traces. None of them seem to like how few resources I have to work with. Well Im workin on it. I hope to have it repaired by the end of this weekend but not having any Flux has really been putting a damper on my soldering skills.

Flux is really helpful but your solder should be rosin core which has flux in it. There is a learning curve to soldering though.
You can test your existing traces with the multi-meter to see if they are indeed F'ed. I would only use alcohol or another PCB approved solvent. I saw that someone suggested something harsher, that could destroy the PCB layering and give you more issues.
Toyota's are great and do last a long time but they also break all the time. Its usually little things that people neglect over the years. We all have our share of things to fix and replace but there is an strange love we all seem to have with our 20 year old junk: AKA Toyota's!
You have been troubleshooting this issue well and I think there is lots to learn about your thread. Hopefully you have gained something along they way.
A few months after everything is fixed and working well you wont even remember quite how much of pain this all was and life will go again.... until the next thing breaks :)
 
Sunday Update:

Happy Sunday All,

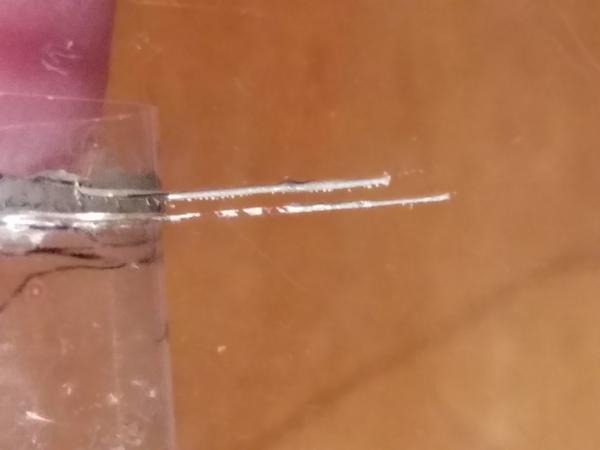
In my previous update U told you guys I was trying a repair method that I did not have much confidence in but I tried it anyway. It didnt work, but that was no surprise to me. If you are interested, I bought one of those Silver conductive trace repair pens. I think it pretty cool. It didnt work for this repair but Im sure it would work for other simple stuff.

Warning, before reading any further........its still broken :cry2:

My original plan with this stuff was to put down a layer of scotch tape and cut away the tape over each of the damaged traces trying to cut the same width of the traces. Then apply the silver over a large area and let half way dry. Then pull the tape away like a stencil. The advantage to this method is I would have been left with super thin traces that almost perfectly matched the originals. However the traces proved to be to close together and I could not accurately cut over one trace with out affected its neighbor.

Here is where I tested on some plastic. Those lines are thinner than mechanical pencil lead.

zionxix-albums-my+4runner+stuff-picture42617-20161017-0951211024x768.jpg


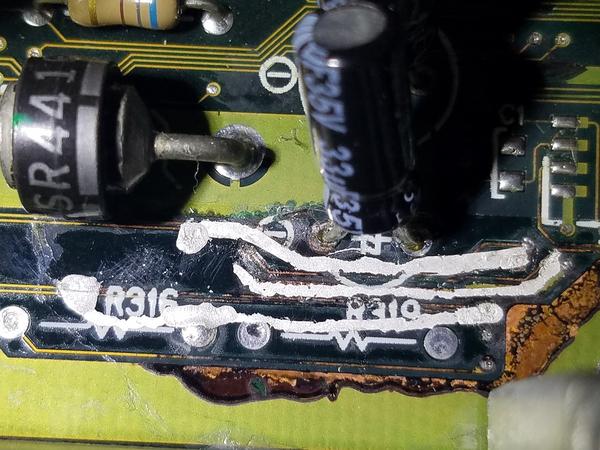
My next try was to forget about make tiny traces and just connect the important parts. I put a new layer of tape down and only cut open small holes over the beginning and end of the affected traces and "formed" a line of silver on top of the tape. I thought that was brilliantly simple. Still didnt work.

zionxix-albums-my+4runner+stuff-picture42618-20161018-1939321024x768.jpg


I posted on several Circuit Board enthusiast type forums and found one that was willing to give me some advice without too much BS. Originally before all of this I wanted to bypass the trace or repair them with small copper pieces. What discouraged me from that route was my poor excuse for soldering skills. My biggest problem was that I could even get started properly like getting solder to stick to the iron. The circuit forum guys gave me some tips that worked out fantastic. I was soldering within minutes after reading their replies. I was really feeling good at this point. :boxing:
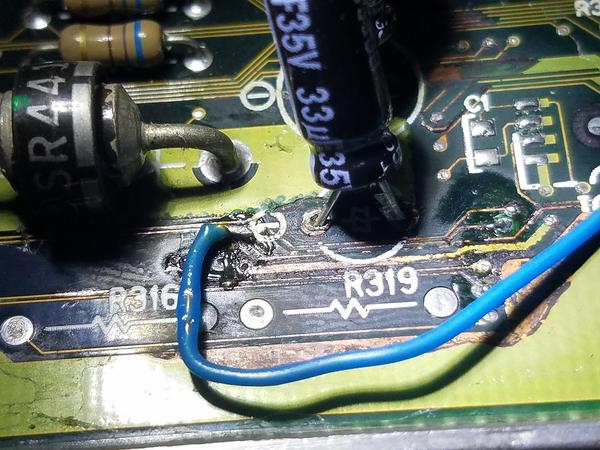
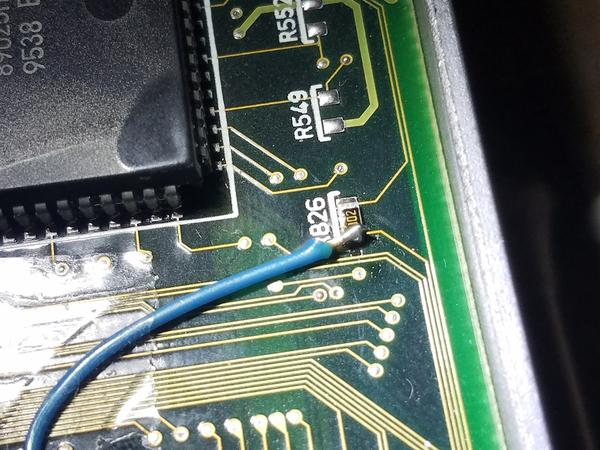
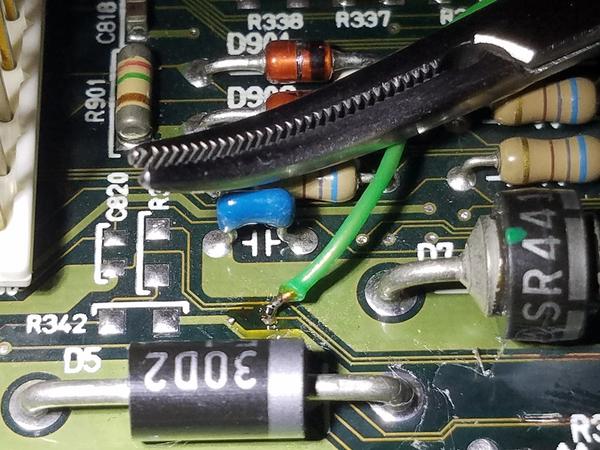
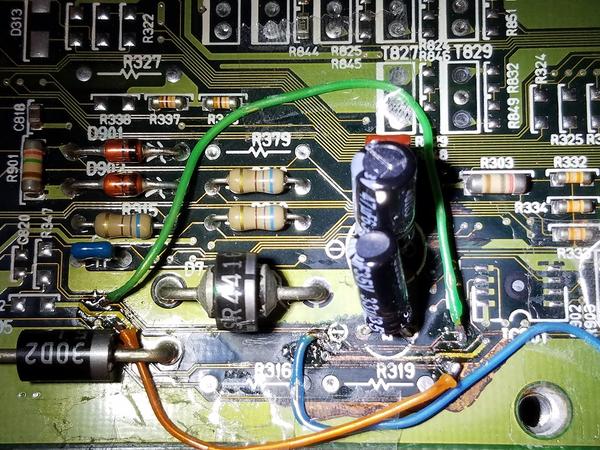
One item I did not have was some copper wire. They suggested taking a wire made up of lots of smaller gauge wire and pulling one of the strands out and using that to do repairs. This is really only useful for laying directly over the traces. I already learned how close together the traces are and that I would not be able to do that with just me and magnifying glass. I chose instead to bypass the traces completely from point to point on the board. I remembered I have an entire roll of Cat6 cable in the closet, (how could I forget?). I think twisted pairs are roughly 26AWG. I was able to use this wire to solder directly to point that were the same diameter as the wire or smaller. The different colors from the insulation are nice touch as well. Here are some pics:

zionxix-albums-my+4runner+stuff-picture42619-20161021-0807201024x768.jpg

zionxix-albums-my+4runner+stuff-picture42620-20161021-0807381024x768.jpg

zionxix-albums-my+4runner+stuff-picture42621-20161021-0835561024x768.jpg

zionxix-albums-my+4runner+stuff-picture42622-20161022-1333441024x768.jpg


I know they are rough. Its the best a novice like me can do at this stage. Im really proud of those joints. some of them may not be shiny, but they are holding quite strong.

I threw in the board this morning after the last soldering and the engine wont even start up now. Its turning over no problem but no ignition. I have order a replacement ECU but I have noe idea when it will arrive #TimeToRant,

[So I found a good price on Ebay for a 96' ECU for $140. A friend of mine flew back to the states fro the weekend since we are in the middle of mid semester break. The Ebay post shows the item is in Delaware and my friend lives in New Jersey so I paid for the ECU on Tuesday. The seller refused to do any kind of expedited shipping. I checked the tracking number the seller sent me and the ECU is coming from freaking California! It wont even be delivered until Wednesday. My friend is leaving Tuesday. I feel as though the universe does not want me to fix this vehicle.] :mad:

Seperate possibility for no crank. Last week one of the island gas stations "accidentally" put a bunch of water into its fuel supply causing a dozen or so vehicles to stop running as soon as they left the station. The gas station shut down their pump and paid for damages but seriously WTF??!!:wtf: Then I was informed by some upper semesters that many of the gas station "water" down their fuel with alcohol or whatever and to avoid certain stations. It would have been nice to know that a year ago when I arrived. The point of this is that my 4runner has been sitting un moved since August. I have a horrible feeling that if i have water in my gas that it separated a long time ago and is pumping water into my piston chamber instead of gas :fear:. Can I check for spark by laying a spark plug with boot from the driver side on top of the intake plenum and cranking?


I think Im just not going to mess with it until I get the replacement ECU :sad:, Its causing me too much heartache to have every repair thrown back in my face.

*Deep Breath* I feel a little better after today's T4R.org therapy session


Thanks, -Z

 
I know I said I wasn't gonna mess with it. I lied. The engine is turning over but I don't think it's getting spark. I tried the screw driver test but couldn't see any spark. I'm not sure if the human eye can. When I turn the key to the "on" position I hear 2 clicks right after each other. It sound like a click "on" then a click "off". Anyone know what those clicks could be? Or a better way to check for spark?

Sent from my SM-G930T using Tapatalk
 
This thread is like a detective novel. If it was in print I would not be able to resist the temptation to read the last page right now.

Can't wait to hear the final result. :thumb:
 
I second BoomSticks! Wow! These problems would have most people throwing in the towel long ago!
I repaired circuit boards for years for a large TELECO in Canada. I'm sorry to see your repair didn't take--- without a gentle touch its easy to damage the board. A lot of commercial cct brds in the 90's were multi-layer boards, so you could have traces sandwiched between the top and bottom of the board. Electrolytic caps fail all the time(what you pictured). We usually, using a microscope and a small exacto-knife, scrapped off the residue (as its corrosive),and the con-formal coating (green), and soldered 30ga wire to the traces. At times, I'd excavate the board using a dremel and carefully re-soldering the feed-throughs and inside traces. After this, we'd epoxy the repair. If you don't have a schematic diagram, its difficult to ensure you've repaired all the traces!

Please keep us up to date with your ultimate fix.... reading through your thread, I was starting to think fuel, if not the ECU....

I take my hat off to you for your dedication, I hate troubleshooting electrical problems! I had a similar symptom with my 99' Suburban years back and it turned out to be a poor aftermarket alarm install going bad! after I removed the stupid thing, never had anymore intermittent sudden failures....
 
Now that I think about it, the clicking could be a relay. Are there any relays on the passenger side that activate when the ignition is set to the "ON" position?
 
Now that I think about it, the clicking could be a relay. Are there any relays on the passenger side that activate when the ignition is set to the "ON" position?


Your persistence on the issue is a great motivator for anyone troubleshooting their own issues. I don’t know if the ECU is in fact dead or still salvageable. I hope it can be saved! I think there is more than one relay but I don’t know, I’d have to spend some time on the Google machine. You will definitely here the fuel pump relay with the key set to ON.

You should be able to lay the spark plug on the intake or anything else metallic and see the sparks when cranking. You could even toss a blanket over the hood so it’s all dark under there and it would be very obvious if you have spark.

You will solve this problem one way or the other. The dedication you have towards this troubleshooting is fantastic, don’t get too down on yourself because you will succeed in the end.

As always, keep up updated :)
 
Your persistence on the issue is a great motivator for anyone troubleshooting their own issues. I don’t know if the ECU is in fact dead or still salvageable. I hope it can be saved! I think there is more than one relay but I don’t know, I’d have to spend some time on the Google machine. You will definitely here the fuel pump relay with the key set to ON.

You should be able to lay the spark plug on the intake or anything else metallic and see the sparks when cranking. You could even toss a blanket over the hood so it’s all dark under there and it would be very obvious if you have spark.

You will solve this problem one way or the other. The dedication you have towards this troubleshooting is fantastic, don’t get too down on yourself because you will succeed in the end.

As always, keep up updated :)

Thanks, your comment really makes my day. I did check for spark by myself and remembering that I'm a melinnial decided to record in case I missed it or was doing it wrong. I don't think the plug was in contact with the intake so I may have tested incorrectly. Definitely didn't see any spark. I check the starter relay for fun, it's working fine when putting 12volts on and it passed a multimeter check.

https://youtu.be/LKMknANrO0U

Sent from my SM-G930T using Tapatalk
 

Members online

Forum statistics

Threads
278,316
Messages
3,554,111
Members
248,016
Latest member
Advally Service

Trending content

Back
Top