Urban assault's '99 4runner build

Thanks! I am right in the heart of Atlanta. Grant Park. Though I work up in Northern Gwinnett Co. Reverse commute. No traffic.

Yes. That is Bell Mtn. I have been there 2x. Long drive for short trail. Do you mean bypass the first big gully on the trail? I didn't bypass it. In fact, that is the very spot that led to the genesis of my rear quarter panel protection. Without it, it took about 10 attempts to keep the sheet metal off the wall. With the RQP I made it on 1st try with a little rub/kick. Scary close to a driverside flop in that spot though.

That's the bypass I reckon haha. I've been looking to get up there but it's not something I want to go do by myself.

Other then that gully what's the trail like?
 
That's the bypass I reckon haha. I've been looking to get up there but it's not something I want to go do by myself.
Other then that gully what's the trail like?

You'll be fine. There is a bypass for the first obstacle, then a narrow 'road' all the way to the top. It's steep, and rocky but a 'FactoryRide' will love it.
IMHO, too far for too little. I would prefer to road trip to Gulches, or Adventure Offroad.
 
You'll be fine. There is a bypass for the first obstacle, then a narrow 'road' all the way to the top. It's steep, and rocky but a 'FactoryRide' will love it.
IMHO, too far for too little. I would prefer to road trip to Gulches, or Adventure Offroad.

I hear ya man. I haven't gotten to go to either of those parks. Actually it's the first I've heard of Adventure. I'll probably go ride around Tray mountain when I go to bell. I've got maybe an hour and a half drive to get there.
 
On a recent flight, I had exhausted all other forms of entertainment and distraction. I began looking around at the infrastructure and engineering of the plane. I noticed the attachment of the seats to the floor. It was basically a track system enabling variable seat arrangement.

I wish they had allowed more spacing for my row.

Thats pretty cool, and if it works for airline seats, then it will work for my cargo. A quick google search turns up a system called Core Trax. Core Values, Cargo Containment, Exterior Truck Accessories ;Same concept. There are other similar, but this one was beefier, powder coated, had more options, etc. I love modular things. This has provisions for bolt down tracks, quick loops and lots of cool add ons. Even a dog leash on a swivel attachment.
Since the spare tire is now on the swingout, it was easy access to the bottom of the cargo area. There were only 2 mounting holes I couldn't easily get to, so they got sheet metal scews. Neverthless, I think there are 7 bolts with 1" washers and locknuts, and 1 sheet metal screw per track, except for the center track which is 8 bolts. Way overkill, like I do everything else.

I removed my carpet a long time ago and bedliner'd my cargo area. The trax fit nicely in the factory contours of the sheet metal and sit flush. This would also work if you have the carpet and may actually recess a bit in the carpet, which would be cool. I ran 3-36" trax.


This is my everyday driving setup, which includes a good bit of wheelin' gear for those impromtu trips


And this is the full blown wheelin' trip with spare parts, tools and my supa'-pimp Yeti cooler.

Everthing is ratcheted to the floor with no movement or rattles. I hate rattles. Furthermore, the cargo is secure in the event of flip, flop, or roll. I've kinda worried about that over the years and lately its been a focus. I guess fatherhood does that to you.
My hi-lift is on top, mounted to my Thule rails. Though will soon have a new, more stylish, roof top home ;)

This setup is soooooo much better than my previous system of spaghetti straps searching for the 4 factory tie down loops.
Thanks for checkin' in!
 
Added in-cab winch control. I got the switch and harness from The 12Volt Guy, and used the awkward little space beside the 12volt plugs, under the cigarette lighter.

I cut out the back of that recess. I had already drilled a hole in it a few years ago when I had an external Sirius radio mounted in there.


Made a fiberglass blank for that space, cutout the necessary opening for the switch. Some filler, sanding and some satin black paint.


Aviation style toggle switch. The switch cover says, "PLAN B", and laser etched IN / OUT buttons. I've always liked the flip-up aviation switches.
(Sorry for the under exposed pic)

I was originally going to mount it in the blanks to the left of the steering wheel. However, it fit nicely in the console and it's a cool switch so I didnt want to hide it.

I may use the ashtray space for a 5 bank switch panel using the same method. I need to get my secondary fuse block first. I'm going to need it with some of the accessories I am mounting on this

Thank you [MENTION=77764]Whitson Metalworks[/MENTION]
 
Love the build. I'm curious what issues you were having with the RCV Axles. The wife has given me approval to start putting money aside for RCVs.
 
Looking sweet!! What are planning on mounting on the rack?
Thanks Josh! I love it!
Will be mounting some side LED's and some rear facing LED's. I will be mounting a fairing to the front. I do not really need any more forward facing LED's. I have plenty of lights on my bumper. I rarely wheel at night, and even more rarely am I the lead vehicle at night.
I welded on some threaded tabs from RuffStuff for the fairing.
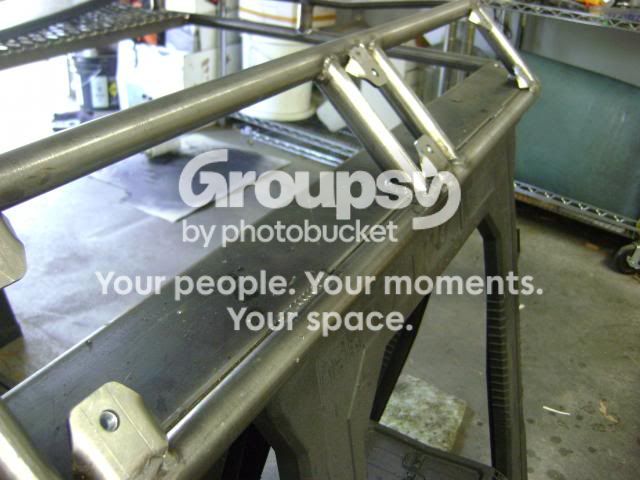
Will likely pick up a piece of 1/4" black ABS for the fairing. I am going to wait until I have it on top to figure out the fairing size and pattern.

The hi-lift will also go back on top, where it has been for years.
I picked up some weld on mounts from Off Road Warehouse -
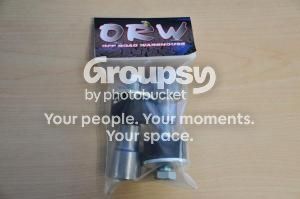
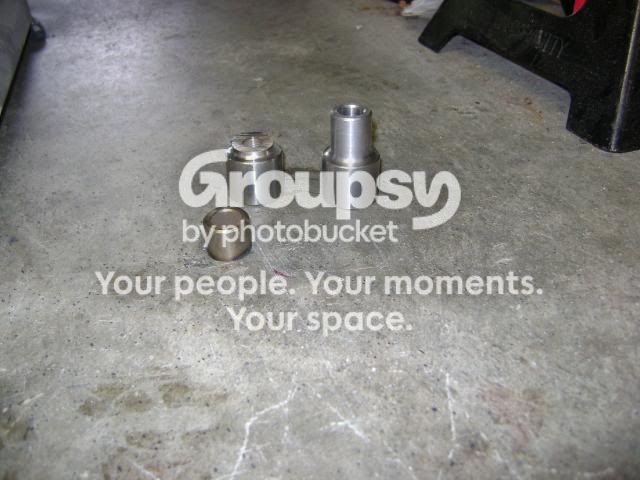
I thought about making my own by welding some nuts inside some scrap 1" and using some old sway bar bushings, but this is a machined piece, and for $14, I'm too tired to reinvent the wheel.
I did cut them down by 3/4". I need everything to be as low profile as possible so I can still get in the garage. This leaves the jack flush with the top of the rack, without touching the floor of the rack.
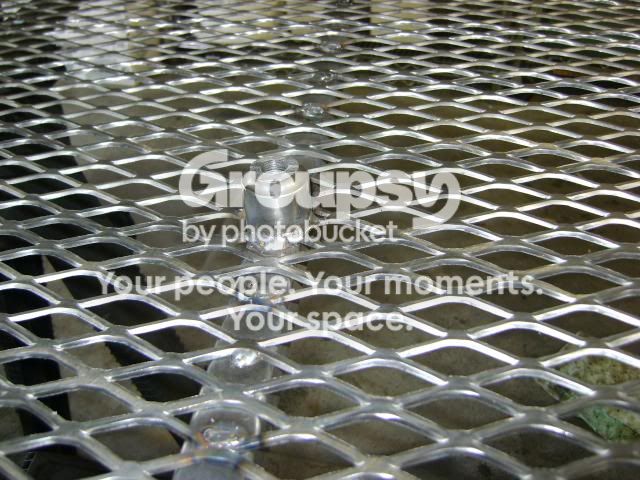
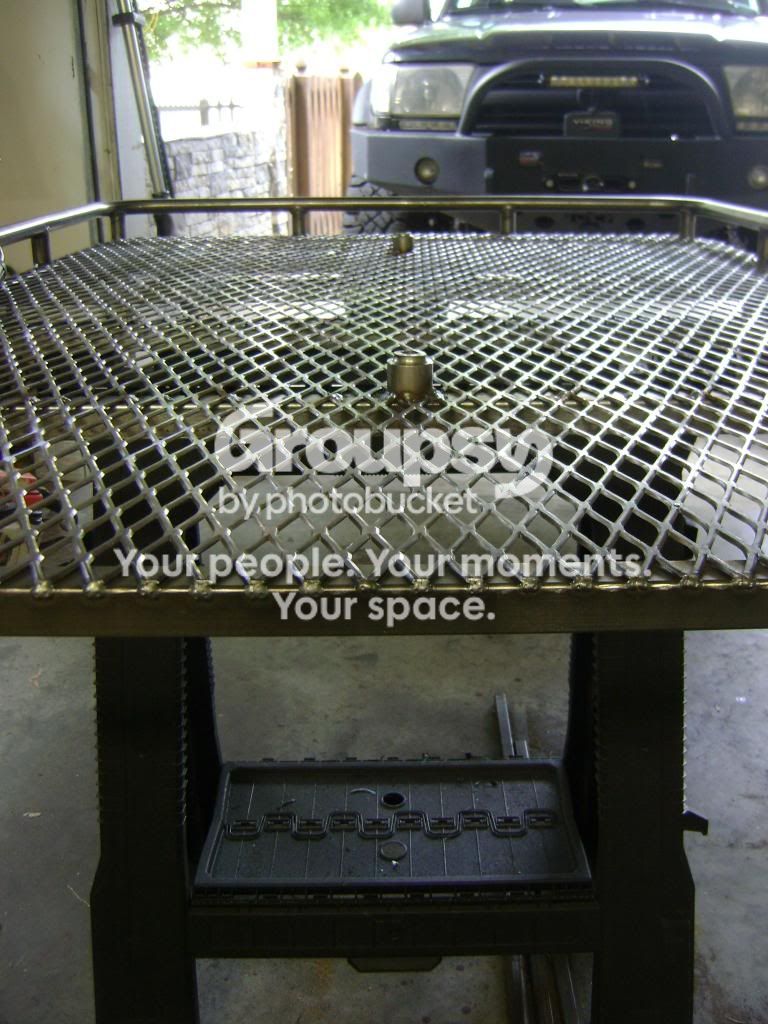

The hi-lift is in the middle and I will be adding a Rotopax set up on either side of it for the full weekend trips. I'm not too worried about easy accessibility of the hi-lift. Pretty much, if I'm pulling that off the top, the day has taken a turn for the worse, and I'm going to be late anyway.
I also added a few more tack welds of the floor to the cross bars. This isn't necessary, but as long as I had the welder fired up I figured there would never be a better time to minimize any potential noise from the rack.

Will put a few coats of paint on it and hopefully have it on top in the next few days.

Love the build. I'm curious what issues you were having with the RCV Axles. The wife has given me approval to start putting money aside for RCVs.
Unbelievably, I'm still dealing with this. Even when I get on to my kid, or employees, or whoever, I start, and end with a positive.
So, for starters, I'm going to keep them, and the components of the axles are super stout. And by sorting thru all of the R&D stuff for them, hopefully you guys will have a better experience. In a nutshell, RCV seems to have some communication problems within their own office. Perhaps they grew too quickly or have turnover, whatever. I am currently on my 3rd trial and error set. Nothing breaks, they're just not right. On the 1st set, they neglected to add the grease port in the outer bell housing. That is a key feature. The 2nd set, after a few offroad trips and a few hundred miles, I noticed the inner boot was loose on the housing. The flange it is clamped to was very small and the boot could not maintain grip on it overtime. They redesigned the inner boot, which looks great and a huge improvement, though on the 3rd set, they forgot to drill and tap the outer bell for the grease port...again. Every step requires a handful of emails, phone calls, fedex labels blah blah blah. I'm almost numb to it. On a positive note, they address it, send me a new set, and then I swap out the previous and return.
Basically, if they had tapped the outer bell on this current set we would be golden. The product quality is great, their system of checks and balances to ensure quality control is poor. I will keep you updated.

If all else fails, I could use them for this:

or this

or this

 
Headed out with a local group to Choccolocco ORV Park in Jacksonville, AL. Myself, [MENTION=67110]RedDragonATL[/MENTION], and one well built SAS tacoma were the only Toyotas. The other 20+ rigs were jeeps.


T4R's lead the way


New roof rack bolted on, with hi lift and some Rotopax on top. Quickly got dirty with lots of loose rock/dirt at this park.


Nice work Jason, [MENTION=67110]RedDragonATL[/MENTION]


Coming over the top of a trail called Tombstone. An otherwise easy trail, with the exception of a boulder that looks like a buried volkswagen, right at the crest of the trail.

Backside view of same spot


Will be cutting up an ABS plastic sheet this week for a wind fairing on the front of the rack.


Cool ol' Yota

On a section of a trail called "Boatramp". Nobody made it up. Zero traction. Winches got a workout


I had a great day...right up until I broke a rear axle shaft :redbrick: Passenger side. F! So, I understand I should just write "For Sale" on my dusty windows? [MENTION=57546]4-Ripcord[/MENTION] :jk:
I was on a trail, funny enough, called "Rubicon". The stars misaligned as I was trying to bump up a ledge. Lost traction and bounced back down hard. I will have lots more action pics soon, including some of this incident.
Soooooo...The full float axle/disc brake conversion was about 12 items down on my future mod list. It just got promoted to Number #1.
I didn't expect rear axle problems. I will take some pics when I pull the broken shaft.
So all of my little "decoration mods", switch panel, TRD sticker, Rack LED's etc are on hold for this more important issue. Looking forward to the full floater, and disc though. Just wish I could've chosen it on my own time. Anyway, from this negative, will come a positive.
Thanks! I will post up some more pics as they come in.
 
Last edited:
I had a great day...right up until I broke a rear axle shaft :redbrick: Passenger side. F! So, I understand I should just write "For Sale" on my dusty windows? [MENTION=7992]Ripcord[/MENTION] :jk:
I was on a trail, funny enough, called "Rubicon". The stars misaligned as I was trying to bump up a ledge. Lost traction and bounced back down hard. I will have lots more action pics soon, including some of this incident.
Soooooo...The full float axle/disc brake conversion was about 12 items down on my future mod list. It just got promoted to Number #1.
I didn't expect rear axle problems. I will take some pics when I pull the broken shaft.
So all of my little "decoration mods", switch panel, TRD sticker, Rack LED's etc are on hold for this more important issue. Looking forward to the full floater, and disc though. Just wish I could've chosen it on my own time. Anyway, from this negative, will come a positive.
Thanks! I will post up some more pics as they come in.

Even the guys with Dana 60s break axle shafts. Glad to see you're not discouraged. :thumb: Compare a Dana 60 axle shaft to a Toyota axle shaft and you will find that they are not that far off in size.
 
A few more pics. I jumped at the opportunity, and photo opportunity, to pull a Jeep up a hill ;)


But the following pics is where my day ended. It wasn't that big of an obstacle, and have done more difficult sections. Broke the passenger rear axle shaft, from a hard hit while tire was spinning, or from crawling under rather than over the rock.


Time to order some parts.
Thanks!
 
I had a great day...right up until I broke a rear axle shaft :redbrick: Passenger side. F! So, I understand I should just write "For Sale" on my dusty windows? [MENTION=7992]Ripcord[/MENTION] :jk:
I was on a trail, funny enough, called "Rubicon". The stars misaligned as I was trying to bump up a ledge. Lost traction and bounced back down hard. I will have lots more action pics soon, including some of this incident.
Soooooo...The full float axle/disc brake conversion was about 12 items down on my future mod list. It just got promoted to Number #1.
I didn't expect rear axle problems. I will take some pics when I pull the broken shaft.
So all of my little "decoration mods", switch panel, TRD sticker, Rack LED's etc are on hold for this more important issue. Looking forward to the full floater, and disc though. Just wish I could've chosen it on my own time. Anyway, from this negative, will come a positive.
Thanks! I will post up some more pics as they come in.

Wow, that sucks! But I'm not going to lie, it doesn't really surprise me. You will like the full-float kit; the increase in braking alone is amazing, and the extra strength, along with the ease of maintenance really make the swap a good one. It's not cheap though, especially once you add all the parts together.

If you haven't already, read these links, it will give you a good idea of parts you need and some issue's I had. If you have any questions feel free to PM me, or mention me if you want a record of the process in your build thread.

http://www.toyota-4runner.org/3rd-gen-t4rs/95322-dirtcos-1999-4runner-build-32.html#post1126743

http://www.toyota-4runner.org/3rd-gen-t4rs/95322-dirtcos-1999-4runner-build-36.html#post1180849
 
Wow, that sucks! But I'm not going to lie, it doesn't really surprise me. You will like the full-float kit; the increase in braking alone is amazing, and the extra strength, along with the ease of maintenance really make the swap a good one. It's not cheap though, especially once you add all the parts together.
If you haven't already, read these links, it will give you a good idea of parts you need and some issue's I had. If you have any questions feel free to PM me, or mention me if you want a record of the process in your build thread.
http://www.toyota-4runner.org/3rd-gen-t4rs/95322-dirtcos-1999-4runner-build-32.html#post1126743

http://www.toyota-4runner.org/3rd-gen-t4rs/95322-dirtcos-1999-4runner-build-36.html#post1180849

Thanks! Your build was certainly the inspiration for the conversion. I was tuned in like a hot new mini-series during your process:snacker: As soon as I saw it, I put it on my list. I bet I've read those threads a dozen times since. I would've preferred to wait until Fall to tackle the project and expense, but the timing isn't bad.
This was my last wheeling trip until late August/early September since the wife is super preggers right now:preggers:
Come to think of it, wasn't your wife pregnant when you did your conversion??
There you have it! Pregnant women break rear axles! (Don't tell them that)
I will send you a PM as I have some questions regarding sourcing some chromoly parts. I will be using the FROR kit as well.
Thanks again!!!
 
How'd you like Choccolocco? I'm about 30 mins from Jville but have never been up to that particular park. I've had some buddies go and they seemed to enjoy it.
 
How'd you like Choccolocco? I'm about 30 mins from Jville but have never been up to that particular park. I've had some buddies go and they seemed to enjoy it.

I thought it was a great park. I will go back. Lots of trails for everybody. On the park map (which is not much help), the trails are marked easy, moderate and extreme. However a more accurate categorization of the trails would be Challenging, and Ridiculous. Not much in between. There was one bone-stock jeep in the group and he really struggled, and rearranged a few body panels. I kept joking with him and saying, "Enterprise Rent-a-car is going to be pissed when you take that back."
Great park and facilities for camping etc. We were there on a Saturday and had the park to ourselves. I'll be back someday to avenge my rear axle.
 
I'm still waiting on a few parts for the full floater rear axle/disc brake conversion. I should have everything this week.
In the meantime, I've been ticking a few smaller items off the list.
I added a wind fairing to the front of the roof rack. I ordered a piece of 1/4" ABS online. 40"x9" piece for $23 shipped. Not bad in my book. Tapplastics.com
I mocked up a piece of poster board so that I could match the crown of the roof.

Then masked off the plastic along the cut lines so that it would not chip.

I used an air saw which made quick work of it. Cuts easily and the blade doesn't move fast enough to melt the plastic.
I added a piece of automotive weather stripping to the bottom where it contacts the roof.

Previously, I had welded on some threaded tabs from ruffstuff. So after I drilled 6 holes, it bolted right up.
The 1/4" ABS is stout. Thicker and more stable than the Thule fairing that had been up there for the past 10 years.

I love [MENTION=34852]crazydubman[/MENTION] 's wrap around fairing. Though, I do not have the plastics skills for that.
This looks the part and should help deflect some air over the rack and my rotopax setups rather than air getting caught up in the rack.
 
Looks great urban. I wouldn't mind making another fairing that was thicker than what I have now. Then again, as you say, it does the job. :biggrin1:
 
Great build:) your native land of AZ and Big Rocks is calling you back to wheel!!! Wait till it's cooler though. LOL :nicethread:
 
Great build:) your native land of AZ and Big Rocks is calling you back to wheel!!! Wait till it's cooler though. LOL :nicethread:
Man, I hear that call. It haunts me! Someday, I will end up back out west. Previously, I've just gone where the opportunity (career stuff) was the best. And it has been great. Though, the centuries old western pull lives on. Thanks!!!
 
RCV Update:
It has been a long process to get to this point. I received the most recent evolution of the RCV for 3rd Gen T4R last week. Upon initial inspection, they appear to be the total package.


I think this is the 4th set. Nothing has broken or failed, the previous sets just weren't right or complete. Missing zerk fittings etc. The most recent set was nice, and I wheeled and drove it a ton. However, I noticed the inner boot would pucker away from the housing during rotation and virtually ride off at full droop. The new set now has a boot that clamps and seals over the housing rather than on a small flange in front of it.
This is a comparison of the RCV next to my reman'd stock CVJ's


The components are larger and virtually everything is chromoly.
Considering what I've been thru to get to this point, I am stopping short of recommending them at this point. But I have high hopes for these.
I would go test em out right now, but I am still working on my rear axle repair (full float/disc brake conversion) Breaking a rear axle wasn't on my radar.
RCV has addressed every problem I've had, and these have a lifetime warranty. Potentially still the weak link of the truck, but likely the strongest "weak link" available. We shall see and I will continue to update. Thanks!
 

Members online

Forum statistics

Threads
278,316
Messages
3,554,106
Members
248,016
Latest member
Advally Service

Trending content

Back
Top
