What Did You Do To Your 3rd Gen Today?

Status
Not open for further replies.
Looking to do the same

Installed the new Bilstein 6112 coilovers for 3rd gen T4R's. I had been riding around on the original stock everything (180K miles) and getting freaked out about all these LBJ failure posts so I installed new OEM ITR, OTR, LBJ, Energy Suspension poly steering rack and end link bushings. I matched this in the rear with new 5100 shocks, OME 906 coils, and new Energy Suspension poly end link bushings. I set the 6112's at the #7/#6 height for 1.64" of lift and actually got closer to 1.75" in the front and a full 2" in the rear with the 906's. We'll see if it settles at all. I also removed the running boards so the truck has a whole new stance/look. Just got back from the alignment shop and so far very pleased with the ride/feel.

I am also looking at OME 906's.
 
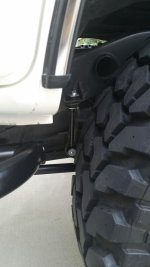
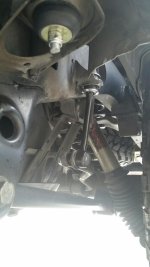
Longer rear sway bar end links

Finally got around to this project today... New order Aftermarket '98 front links used for rear. Did the trick nicely. We'll see if they last. Considering I never broke the shorties even off-road with a lift maybe these will also hold out. FWIW: Each kit only came with top and bottom cup washers. So I salvaged the two each from the old set where it passes through the frame mount top and bottom. You can tell by the color in the picture. YMMV...

IMG_0109.jpg

IMG_0110.jpg
 

Attachments

  • IMG_0109.jpg
    IMG_0109.jpg
    66.4 KB · Views: 561
  • IMG_0110.jpg
    IMG_0110.jpg
    78.3 KB · Views: 553
Last edited:
Should have the final shape done in the morning and then be able to remove it for final weld up and paint!
 

Attachments

  • IMG_0910.jpg
    IMG_0910.jpg
    131.6 KB · Views: 521
It took a while, but my friend and I managed to install my lift today/night. King 2.5 extended travel coilovers, SPC Light Racing UCAs, SS 1.2 rear lift and SS front drop diff spacers, MStudt's front extended sway bar links... and I guess that's about it.

I have an appointment to have it aligned tomorrow morning at Firestone. I hope they can figure out the SPC LR UCAs. I will bring the sheet in for reference.

Less than awesome things to happen during install:

I found out that Discount Tire cross threaded one of my lugs. Snapped that off... I also found a suspiciously short stud on the other rear wheel. Hrmmm. I called DT and they will take a look tomorrow.

When bleeding the rear brakes after installing the extended rear SS brake lines, I ran into a little issue that is concerning. The passenger side was able to bleed normally and all went well. The driver's side rear, not so much. It was acting like the line was clogged. We disconnected the line up front and attached some compressed air and were able to blow it through. So no blockage, but, it still was only bleeding at a trickle at best. So to me, it sounds like there might be some mysterious problem with the ABS or pump not pushing fluid to my driver's sided rear brake. I'll have to investigate further.

Any clues?

Oh, and, it's dark so no pics yet.
 
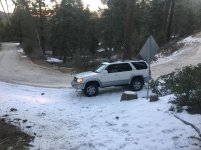
Took a drive up to big bear :) girlfriend planned a whole thing for my birthday and wanted to off road. Lucky man.
 

Attachments

  • IMG_1771.jpg
    IMG_1771.jpg
    136.2 KB · Views: 477
Replace both O2 sensors and cat

just hit 216,000 miles as the original owner and have been slowly upgrading and replacing various OEM parts. This weekend included a new catalytic converter and both O2 sensors. hoping to see some performance come back as my truck has been running really sluggish and I have seen some P441 codes pop up and disappear along with getting a P0420 at one point. Plus being in California I am due for a smog test in December and last time (2years ago) my truck barely passed smog. I figured I might as well make some repairs in preparation.

Also...
Looking to upgrade the suspension and add a little lift next. Not interested in spacers, etc. I'd prefer to go with new shocks, coils. These forums are wealth of info so I will be reading up! Suggestions welcome.

And...
I want to get the front seats reupholstered since the leather is all torn and cracked. But wow quotes for reupholstering both seats is about $1000 dollars here in Los Angeles and thats for vinyl! I am seriously considering doing it myself.
 
What I did to my 3rd gen today was buy it!

peom5J5.jpg


108k miles for $5995. It is the lowest priced and lowest-miled 4runner I've seen in a 200 mile radius, and I've been searching for three months.

Drives great and looks. Everything is great except dreaded undercarriage rust. I've been looking at the various threads here to address this problem. If anyone can recommend a nice step-by-step, that would be appreciated.
 
Last edited:
Salvagable?

Sent from my SM-G930T using Tapatalk

I flushed the system with about 4 gallons of transmission fluid and its shifting on the dot, the weirdest thing ever. :shrug:

How did you realize it happened?

My dad picked up this particular 4Runner up real cheap the other night. I pulled the tranny stick this morning and couldn't believe it. Popped the radiator cap and it was just full of the pink stuff. He told me it drove home perfectly fine. We flushed it out and it's still driving great. I don't really get it. Only time will tell I guess.
 
just hit 216,000 miles as the original owner and have been slowly upgrading and replacing various OEM parts. This weekend included a new catalytic converter and both O2 sensors. hoping to see some performance come back as my truck has been running really sluggish and I have seen some P441 codes pop up and disappear along with getting a P0420 at one point. Plus being in California I am due for a smog test in December and last time (2years ago) my truck barely passed smog. I figured I might as well make some repairs in preparation.

Also...
Looking to upgrade the suspension and add a little lift next. Not interested in spacers, etc. I'd prefer to go with new shocks, coils. These forums are wealth of info so I will be reading up! Suggestions welcome.

And...
I want to get the front seats reupholstered since the leather is all torn and cracked. But wow quotes for reupholstering both seats is about $1000 dollars here in Los Angeles and thats for vinyl! I am seriously considering doing it myself.

If you haven't already done so, I hope new OEM lower ball joints and a new radiator are the highest priority on your list.
 
just hit 216,000 miles as the original owner and have been slowly upgrading and replacing various OEM parts. This weekend included a new catalytic converter and both O2 sensors. hoping to see some performance come back as my truck has been running really sluggish and I have seen some P441 codes pop up and disappear along with getting a P0420 at one point. Plus being in California I am due for a smog test in December and last time (2years ago) my truck barely passed smog. I figured I might as well make some repairs in preparation.

Also...
Looking to upgrade the suspension and add a little lift next. Not interested in spacers, etc. I'd prefer to go with new shocks, coils. These forums are wealth of info so I will be reading up! Suggestions welcome.

And...
I want to get the front seats reupholstered since the leather is all torn and cracked. But wow quotes for reupholstering both seats is about $1000 dollars here in Los Angeles and thats for vinyl! I am seriously considering doing it myself.

Here, join the original owners club. There's not many of us left.
[MENTION=144462]Sean K.[/MENTION] too
 
Last edited:
Accessory Switches

Didn't have time to get into any heavy maintenance. Decided to work on a fun little project and get my harness for my accessory switches inside the cockpit completed.

Went with 18AWG Ancor Tinned Copper wire with Ancor 16-14 Gauge female connectors for double wire splices and Ancor 22-18 gauge female connectors for the single wire splices.

Finished off the connectors with heat shrink, the harness with solid (not slit) braided sleeve and an eight-pin Deutsch Connector with solid contacts.

Switches will be installed in my paranoid fabrications 6-hole switch plate (finally). Still have the fuse box and relays to install on the other side of the firewall.

Fun little afternoon or "commercial-breaks" or "half-time" type of project.


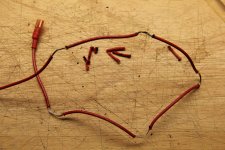
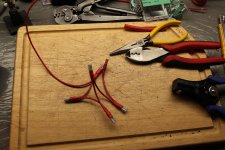
You can either cut, twist, solder and crimp or do it the way I did as seen below. Just strip off a section of wire, bend, twist and use a 14gauge connector. I like this way the best.
Positive Daisy Chain.jpg

Photo of the end result. I made two daisy chains; one for the positive side of upper lights, (always on or switched) and one for the negative side of both dependent and independent lights.
Positive Daisy Chain_1.jpg

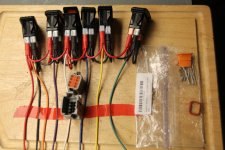
Here's a good look at each individual switch and the wiring. Notice the color coded wires. All 18AWG since they're just switches on this side of the firewall.
Contura Switches_1.jpg

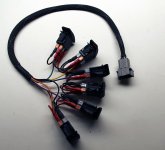
Finished product with a two-foot length harness, braided with heat shrink and an eight-pin Deutsch connector.
Contura Switches_2.jpg
 

Attachments

  • Positive Daisy Chain.jpg
    Positive Daisy Chain.jpg
    136.6 KB · Views: 578
  • Positive Daisy Chain_1.jpg
    Positive Daisy Chain_1.jpg
    133.4 KB · Views: 555
  • Contura Switches_1.jpg
    Contura Switches_1.jpg
    120.3 KB · Views: 553
  • Contura Switches_2.jpg
    Contura Switches_2.jpg
    82.6 KB · Views: 558
Last edited:
Status
Not open for further replies.

Members online

Forum statistics

Threads
278,316
Messages
3,554,120
Members
248,016
Latest member
Advally Service

Trending content

Back
Top