What Did You Do To Your 3rd Gen Today?

Status
Not open for further replies.
Guy in my town built a 4Coma that I would pass along my way home very often (Taco front end fabbed onto our 4R). Always thought it looked good when it was flying by. Finally pulled up by it at a stop light today and the thing looks so damn funky I couldn't believe it, didn't even think about snagging a pic at the time :doh:
 
Washer fluid relocate mod and big 3 mod

I decided to prep the RNR for a future wheel install and went over to O'Reilys and purchased a aftermarket coolant return system that many of us have been using for the washer fluid container relocate.

<a href="https://imgbb.com/"><img src="https://i.ibb.co/fdBTWdm/6010253-idy-bvr4-pri-larg.jpg" alt="6010253-idy-bvr4-pri-larg" border="0"></a>

The job was pretty easy; there are many tutorials to give you and idea of how it works then it's all up to you as to how you want to install the Toyota pumps onto the new container. Personally, I clipped the containers lower bracket nipples and then step drilled to fit the Toyota grommets on each side and then mounted the pumps which cleared the radiator and the head light plug :thumb3:

<a href="https://ibb.co/fDNJ6Gw"><img src="https://i.ibb.co/MB1dw50/20210131-203848-Copy.jpg" alt="20210131-203848-Copy" border="0"></a>

To help with future plans, I bought 4 gauge wires and connectors to beef up the grounds/electrical;

Engine to Chassis:
<a href="https://ibb.co/mCBLkqj"><img src="https://i.ibb.co/ynRwty9/20210204-113918.jpg" alt="20210204-113918" border="0"></a>

Positive to Alternator:
<a href="https://ibb.co/KKgGL0x"><img src="https://i.ibb.co/7kDzRYt/20210204-113853.jpg" alt="20210204-113853" border="0"></a>

Negative to chassis:
<a href="https://ibb.co/Ws24HD0"><img src="https://i.ibb.co/yVQcNhp/20210204-113848.jpg" alt="20210204-113848" border="0"></a>

Military grade battery terminals:
<a href="https://ibb.co/NKMBJtq"><img src="https://i.ibb.co/m43W2bK/20210204-113904.jpg" alt="20210204-113904" border="0"></a>

:cheers:
 
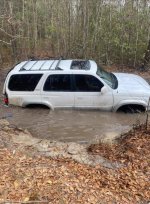
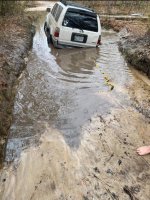
Got stuck for the first time. Dang Carolina sand.. always trust your first judgement, not the passenger that tells you "just gun it and you'll make it"
 

Attachments

  • Screenshot_20210206-175033_Gallery.jpg
    Screenshot_20210206-175033_Gallery.jpg
    145.2 KB · Views: 338
  • Screenshot_20210206-175104_Gallery.jpg
    Screenshot_20210206-175104_Gallery.jpg
    141.5 KB · Views: 310
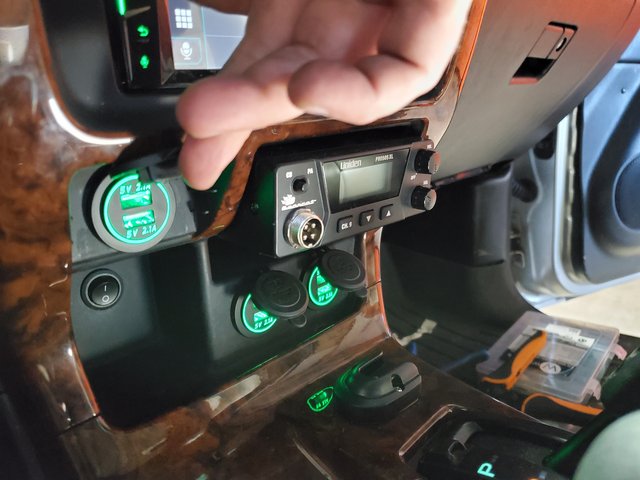
Alright folks, here's what i have today:

Alpine ILX-650
Wireless carplay dongle
Course motorsports magnetic phone mount
Dual 3.0 usb ports with voltmeter
Standard 12v socket
OEM BT mic from a Silverado gutted to allow Alpine mic to drop in

Tomorrow, I'll tackle the front and rear cameras.
376568d1612659355-looking-carplay-headunits-img_8081-jpg

376569d1612659366-looking-carplay-headunits-img_8079-jpg
 
Alright folks, here's what i have today:

Alpine ILX-650
Wireless carplay dongle
Course motorsports magnetic phone mount
Dual 3.0 usb ports with voltmeter
Standard 12v socket
OEM BT mic from a Silverado gutted to allow Alpine mic to drop in

Tomorrow, I'll tackle the front and rear cameras.
376568d1612659355-looking-carplay-headunits-img_8081-jpg

376569d1612659366-looking-carplay-headunits-img_8079-jpg

Nice integration of the microphone. That’s great work. Any idea where to source that particular mic?
 
Thanks. I got it from this seller on ebay. Headliner mounted bt mic. I had to install it on the passenger side of the sunglass holder as there is a metal bracket on the driver side.

I made several test calls with my sister and she said the audio is clear. One thing i did extra on the mic cover was drill out another round of holes with a 1/16 drill bit. The indentations are already there so just follow through it. Just wanted the mic to have more coverage.

2014-18 Silverado & Sierra Headliner Mounted Microphone-Tan OEM# 23104659 | eBay

Nice integration of the microphone. That’s great work. Any idea where to source that particular mic?
 
Just replaced two lug studs on the rear of the truck. How did this happen?

I had America's Tires, Redwood City, Ca, place 285's on some 2014 OEM rims. I saw the guy torque on my rear without hand threading it. When I got home, I checked and sure enough...it was frozen.

I'm never going back to America's Tires for any wheels anymore. They just lost my business.

Now, I spent a few minutes taking off my drum and knocking out the broken stud lugs:
<a href="https://ibb.co/Nn7jMvc"><img src="https://i.ibb.co/G3F2q6z/20210205-073609.jpg" alt="20210205-073609" border="0"></a>

<a href="https://ibb.co/TcNsP09"><img src="https://i.ibb.co/dBHRkp8/20210205-082342.jpg" alt="20210205-082342" border="0"></a>

After all that mess, I drove my Gs300 down to Napa auto parts and picked up two lug nuts and lug studs. Went to work and then added a 1.25 Spidertrax spacer.

I went from this (The roof rack and rims were from the previous owner:
<a href="https://ibb.co/gPdDqSv"><img src="https://i.ibb.co/X3Dz07y/20201130-172628.jpg" alt="20201130-172628" border="0"></a>
<a href="https://ibb.co/5nLTG42"><img src="https://i.ibb.co/ZYxdGXN/20201130-172555.jpg" alt="20201130-172555" border="0"></a>
<a href="https://ibb.co/H7qy5Gn"><img src="https://i.ibb.co/cJQ942D/20201130-172605.jpg" alt="20201130-172605" border="0"></a>


To this:
<a href="https://ibb.co/w6YzbQ0"><img src="https://i.ibb.co/vzDjrdw/20210205-105510.jpg" alt="20210205-105510" border="0"></a>
<a href="https://ibb.co/fr1zBQZ"><img src="https://i.ibb.co/dkWw17X/20210205-105520.jpg" alt="20210205-105520" border="0"></a>
<a href="https://ibb.co/FxfmQVZ"><img src="https://i.ibb.co/vwrVNYy/20210205-105531.jpg" alt="20210205-105531" border="0"></a>

*There was not wheel well rubbing with OEM 17" at 285/70/17's. Once the 1.25" Spidertrax were added, I had rubbing in the front and rear flares and pinch weld.

I hammered down the pinch weld, cut some flares in the front and heat gun'd the rear wells plastic lining and flare mounts until I had not rubbing. *I still have to get down there and remove the coil and check for full compression rubs another day.

*I already got a buyer for my Vision 353 Turbine's. - 800 total for them along with a near full tread Yokohama Geolander A/T's on all four.

:guitar3:
 
Last edited:
[MENTION=631596]shawnathan9[/MENTION] Looks great with the 5th gen rims and the spacers! Was there any chance you could have cleared the running boards with more trimming?

I'm loving the look but need to get in out out of my rig!
 
Thanks. I got it from this seller on ebay. Headliner mounted bt mic. I had to install it on the passenger side of the sunglass holder as there is a metal bracket on the driver side.

I made several test calls with my sister and she said the audio is clear. One thing i did extra on the mic cover was drill out another round of holes with a 1/16 drill bit. The indentations are already there so just follow through it. Just wanted the mic to have more coverage.

2014-18 Silverado & Sierra Headliner Mounted Microphone-Tan OEM# 23104659 | eBay

Thank you! How did you adapt the wire? Can you just cut and crimp a bluetooth wire?
 
Thanks. I got it from this seller on ebay. Headliner mounted bt mic. I had to install it on the passenger side of the sunglass holder as there is a metal bracket on the driver side.

I made several test calls with my sister and she said the audio is clear. One thing i did extra on the mic cover was drill out another round of holes with a 1/16 drill bit. The indentations are already there so just follow through it. Just wanted the mic to have more coverage.

2014-18 Silverado & Sierra Headliner Mounted Microphone-Tan OEM# 23104659 | eBay


thnaks, prob one of the best mic mounts I have seen, thanks for the link, ordered one
 
[MENTION=631596]shawnathan9[/MENTION] Looks great with the 5th gen rims and the spacers! Was there any chance you could have cleared the running boards with more trimming?

I'm loving the look but need to get in out out of my rig!

Judging by the amount of clearance I didnt have, I believe that the stock running board would get I the way of the wheels.

In a month, ull be getting my BAMF sliders then I'll be selling these mania step sides. Maybe you'll want then layer?
 
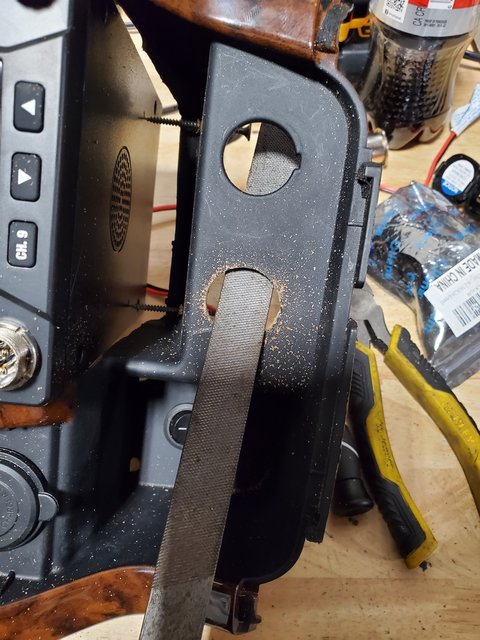
I removed the OEM Chevy mic guts, carefully as there are several pieces. I drilled a hole through the backside until the Alpine mic can fit snugly. I filled the gaps with hot glue and that did a great job securing the mic straight. I wished I had taken photos, but was in the zone. It's really easy once you look at. You will need to cut out a 3/4 hole in the headliner and trim according to fit the base grooves. The mic cover snaps over the protruding base through the headliner.

Thank you! How did you adapt the wire? Can you just cut and crimp a bluetooth wire?
 
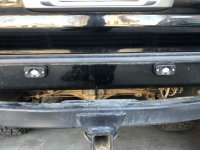
Installed some Harbor Freight lights in the rear bumper... we’ll see how they hold up
 

Attachments

  • 956EB8E9-CDA5-40CF-8698-A7343FC83B91.jpeg
    956EB8E9-CDA5-40CF-8698-A7343FC83B91.jpeg
    100.7 KB · Views: 390
Status
Not open for further replies.

Members online

Forum statistics

Threads
278,316
Messages
3,554,120
Members
248,016
Latest member
Advally Service

Trending content

Back
Top