2010,2011,2012 4runner Dual Battery (Tray$25, no Power Steering Reservoir relocation)

Dual Battery Terminal Connections

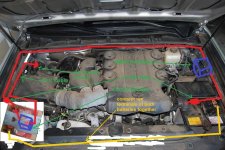
This is to update the ideas of battery terminal connections:

1. The 2nd battery positive terminal connects to battery isolator.

2. The 2nd battery negative terminal connects to the main battery's negative terminal directly.

3. It is also intend to place the battery isolator close the the main battery (i.e. on the right side of the engine compartment).

4. Pls take a look of the attached photos and give comment if any.
 

Attachments

  • Battery Terminals connection.jpg
    Battery Terminals connection.jpg
    125.5 KB · Views: 4,615
2010,2011,2012 Dual Battery (Tray Installation)

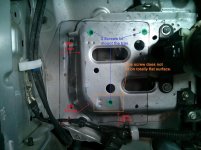
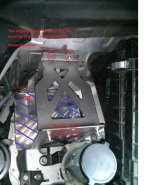
In order to verify if the battery tray can be securely mounted on the platform (without relocate the power steering fluid reservoir), I tailor made a transparent sheet that has the same dimension (size) of the battery tray's bottom.

I put this transparent sheet on the battery platform so that I can find out :

1. Positions of the 3 screws that I need to drill on the bottom of the battery tray. One of the screw seems is near the edge of the battery tray. Is there any problem?

2. The gaps where the battery tray CANNOT sit on it. There are 3 gaps (4cm, 6.5cm and 2.5 cm) where no support on the bottom of the tray. Is there any potential problem to mount the tray as this configuration? Will it be strong enough to hold the tray with 3 screws only?

3. There is one screw that does not sit on totally flat surface. There may have a small angle of this screw. Will this be a problem? If yes, how to fix it?
 

Attachments

  • Battery Tray Bottom Surface.jpg
    Battery Tray Bottom Surface.jpg
    129.6 KB · Views: 1,436
  • IMG_20131107_183620.jpg
    IMG_20131107_183620.jpg
    131.9 KB · Views: 1,541
In order to verify if the battery tray can be securely mounted on the platform (without relocate the power steering fluid reservoir), I tailor made a transparent sheet that has the same dimension (size) of the battery tray's bottom.

I put this transparent sheet on the battery platform so that I can find out :

1. Positions of the 3 screws that I need to drill on the bottom of the battery tray. One of the screw seems is near the edge of the battery tray. Is there any problem?

2. The gaps where the battery tray CANNOT sit on it. There are 3 gaps (4cm, 6.5cm and 2.5 cm) where no support on the bottom of the tray. Is there any potential problem to mount the tray as this configuration? Will it be strong enough to hold the tray with 3 screws only?

3. There is one screw that does not sit on totally flat surface. There may have a small angle of this screw. Will this be a problem? If yes, how to fix it?

#1: as long as you are not so close to the edge that you can't get the head of the bolt to sit flat, you should be good to go. For example, if your hole needs to be 1mm away from the edge, it's not going to work, lol. If you've got ~10mm space between the edge and the center of the hole, I think that's should be about enough.

Speaking of bolts heads being in the way, how do you plan to make the bottom entirely flat once the bolts are in place so that the battery can sit flat on the tray? I am not sure if your material is thick enough to counter-bore the bolt holes and use countersunk screws...just some food for thought while you're still in the planning phase :)

#2: IMO, you don't need to be worried about gaps where it is not being bolted on; those 3 bolts are where all the clamping forces are, so as long as it fits snug over there, you should be okay.

#3: This might be an over the top suggestion but check out this kind of washer if you really want everything 100% perfect: McMaster-Carr

However, if it was me, I would probably just get a small rubber washer, squeeze it in there and bolt it all down. The angle seems minimal, so a washer should be able to fill the gap.

I am assuming the welded nut is facing straight up and parallel with the other 2 nuts? If the nut itself is angled you might have a problem. Why don't you thread a bolt into each of the 3 holes and see how straight they all line up and then see if it will work? It's hard to say from the picture if it will work or not, sorry...
 
#1: as long as you are not so close to the edge that you can't get the head of the bolt to sit flat, you should be good to go. For example, if your hole needs to be 1mm away from the edge, it's not going to work, lol. If you've got ~10mm space between the edge and the center of the hole, I think that's should be about enough.

Speaking of bolts heads being in the way, how do you plan to make the bottom entirely flat once the bolts are in place so that the battery can sit flat on the tray? I am not sure if your material is thick enough to counter-bore the bolt holes and use countersunk screws...just some food for thought while you're still in the planning phase :)

#2: IMO, you don't need to be worried about gaps where it is not being bolted on; those 3 bolts are where all the clamping forces are, so as long as it fits snug over there, you should be okay.

#3: This might be an over the top suggestion but check out this kind of washer if you really want everything 100% perfect: McMaster-Carr

However, if it was me, I would probably just get a small rubber washer, squeeze it in there and bolt it all down. The angle seems minimal, so a washer should be able to fill the gap.

I am assuming the welded nut is facing straight up and parallel with the other 2 nuts? If the nut itself is angled you might have a problem. Why don't you thread a bolt into each of the 3 holes and see how straight they all line up and then see if it will work? It's hard to say from the picture if it will work or not, sorry...


Thank You for such detail thoughts and ideas that I never think of. I will try out different screws with washer (plastic or metal) to find out the best way to secure the tray.

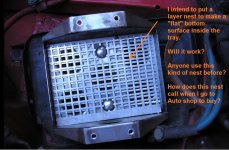
In addition, I intend to use a "nest" , do not know the official name it. It can provide a "flat" surface to avoid the bolts head. Anyone use it before?

.
 

Attachments

  • Tray Nest.jpg
    Tray Nest.jpg
    137.6 KB · Views: 1,224
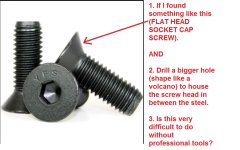
That material you posted looks like some kind of house hold radiator mesh grill you might be able to find in your local home depot or lowes. You know if that's what you plan to do, you might benefit from getting some lower profile button head bolts instead of hex bolts. It would be a lot easier for you to clear them since the head is much more low-profile. Kind of like this:

BBH2.JPG


The nest material should work out fine, but if it was me, I would probably look for something that is like that but plastic. Probably would be quieter without metal to metal contact, plus you don't need to paint it, and it won't rust ever :)
 
^^You need to first check if the battery tray material is thick enough steel or else the countersunk screws you want to use might get pulled through under stress.

Cutting a countersunk hole might be kind of hard with just a hand drill in metal...I am not sure because I've never tried it on anything beside wood, lol.

You might be better off just spacing it up higher with the mesh like you were originally planning :)
 
2010,2011,2012 5th Gen 4runner Dual Battery

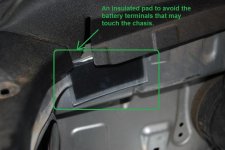
I intend to use an insulation pad to avoid the battery terminals that may touch the body chassis. Is this useful?
 

Attachments

  • Protect Earth.jpg
    Protect Earth.jpg
    71.4 KB · Views: 1,234
Yes by all means additional insulating is always good, but I think you're worrying too much. From your previous mock up pictures it looks like you have plenty of room :)

The battery won't move that much once you bolt it all down, especially in that type of mount you have, I doubt it would move at all, lol.

Put on a good set of terminal boots, and you'll be good to go!

battery-terminal-covers.jpg
 
Odyssey Battery PC1200

Black Friday sale is around the corner (next week), I am wondering if I could get any discount for Odyssey Battery PC1200.

Is there anyone knows if Odyssey dealer would usually have bigger discount every year during Black Friday ?

ODYSSEY Batteries - Dealer Locator

Is there any other reseller who you would recommend to watch for better discount ?
 

Attachments

  • Odyssey PC1200.jpg
    Odyssey PC1200.jpg
    74.1 KB · Views: 1,116
Odyssey Battery PC1200 (Metal Jacket or no Metal Jacket)

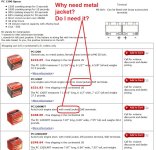
I did a research of Odyssey battery options before I place order. It is found that I can choose Metal Jacket and no Metal Jacket.

May I seek your expert advice:

1. What is Metal Jacket? Why we need this kind of jacket?

2. What applications to be used with metal jacket?

3. In my case, install it under 4runner hood, do I need a metal jacket?

Thanks
 

Attachments

  • Odyssey pc1200 metal jacket.jpg
    Odyssey pc1200 metal jacket.jpg
    130.3 KB · Views: 1,450
I did a research of Odyssey battery options before I place order. It is found that I can choose Metal Jacket and no Metal Jacket.

May I seek your expert advice:

1. What is Metal Jacket? Why we need this kind of jacket?

2. What applications to be used with metal jacket?

3. In my case, install it under 4runner hood, do I need a metal jacket?

Thanks

More important question is, will your mount fit the one that has the metal jacket? The dimension look slightly larger all around. Go measure the inside dimensions of the mount you have and see if it even fits :)
 
More important question is, will your mount fit the one that has the metal jacket? The dimension look slightly larger all around. Go measure the inside dimensions of the mount you have and see if it even fits :)

I just got the confirmation from the battery tray supplier that this tray has been designed for Metal Jacket.

For those people to order the tray, be aware of this point.

Then, why metal jacket is needed? What is the purpose of having it?
 
Does it mean that Metal Jacket is for extreme weather e.g. Alaska, Arizona ?

Well I don't think it gets that warm in Alaska, but it is probably good for racing applications or any high temperature situations for example high outside temps and slow vehicle movement.
 
Odyssey Battery Sale (Black Friday)

I have been searching different battery resellers.

It looks like battery is quite standard item. They don't have promotion or special sale even during Blackfriday. It is not a consumer product which I found in Costco or BestBuy.

In addition, shipping cost for these kind of battery is quite expensive. May be it is due to its weight.

Your thoughts and ideas about battery market, please.
 
2010,2011,2012 4runner Dual Battery (Battery Tray Installation))

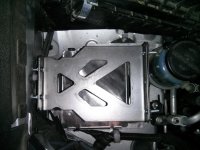
I put a real Odyssey Battery PC1200 (with metal jacket) into this tray over the weekend. It perfectly fits into this tray.

If I install this tray with 3 screws, the screw heads together with the layer of plastic mesh to make the bottom flat so that I can house the battery.

It results that the battery will be leveled in a little bit upward. Then, the holes in the lids must make it larger of drill another 4 holes on it.

Please give ideas how to fix this issue .

Thanks.
 

Attachments

  • Tray Holes.jpg
    Tray Holes.jpg
    125.7 KB · Views: 868
How much extra thickness do you need to clear with the plastic mesh installed?

Have you tried finding those lower profile button head screws to bolt the tray to the body? It shouldn't be more than 1/8" taller or so, and a thin piece of plastic mesh should do the trick.

After you've made it as low as possible, what I would do is use a metal file and elongate the holes attaching the upper bracket.

Don't just elongate one set of holes only on the tray or only on the top clamping piece of the tray. If you file the holes upwards on the tray, and downwards on the top clamp piece you will get more total clearance, if that makes sense?

Last thing you can do is flip the bolts around to make them point inwards if you are having clearance issues with the inner fender, which it seems like you are looking at your last pictures.
 
How much extra thickness do you need to clear with the plastic mesh installed?

Have you tried finding those lower profile button head screws to bolt the tray to the body? It shouldn't be more than 1/8" taller or so, and a thin piece of plastic mesh should do the trick.

After you've made it as low as possible, what I would do is use a metal file and elongate the holes attaching the upper bracket.

Don't just elongate one set of holes only on the tray or only on the top clamping piece of the tray. If you file the holes upwards on the tray, and downwards on the top clamp piece you will get more total clearance, if that makes sense?

Last thing you can do is flip the bolts around to make them point inwards if you are having clearance issues with the inner fender, which it seems like you are looking at your last pictures.


Thank You for ideas and helpful info.

Sorry I may not digest too much with descriptive words, but I will try my best to see if I can fit the battery into it.
 

Members online

Forum statistics

Threads
278,315
Messages
3,554,130
Members
248,016
Latest member
Advally Service

Trending content

Back
Top