2UZ-FE R&R T-Belt & Water Pump

2UZ-FE Major Service Write Up? Yar/Nay?


  • Total voters
    161
Excellent job man! You have provided me with enough confidence to tackle this job myself. I'll be able to save a lot because of this, and have an excuse to put that would-be shop's labor money into some new tools in the process!
 
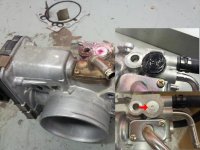
This is just a small "fix" to help save you roughy 1k on a new throttlebody.

When I did my Timing Belt I noticed my throttle body was leaking from one of the plugs on top, its about a grand for a new throttle body and it honestly does not affect performance, but does put your coolant at risk (OAT coolant does not like dissolved air and leaks can quickly degrade coolant's attributes.) I got mine covered unde rmy extended warranty, but a quick and simple fix is to just clean the area off very well, then apply either something like FIPG, or maybe even JB weld over the plug's edges as a "seal".

Here's a picture showing the leak, new Throttle Body's clean plug and my "fix" to the old plug.

TBleak.JPG

I kept the old throttle body, because as I said its still a good part mechanically, just that small leak was the issue.
 

Attachments

  • TBleak.JPG
    TBleak.JPG
    116 KB · Views: 2,833
thanks for that bit of information.. good to know what to check when i do my timing belt, and a cheap fix with some fipg.
 
Too much for this guy! I'll be taking her to the shop for this! Lol. Good Lord...

Very very much appreciate the write up so I understand this process - just too much for my self trained/home-garage self to handle!
 
Awesome review! One quick question with replacing the timing belt with an original OEM with all the markings. I've aligned the pulley indents with both "T" markings, and the crankshaft with the dimple as you've shown.

When putting on the new Timing Belt (OEM), I assume the RCAM should align with the passenger side, the LCAM with the driver's side, and the RC should align with the white dot on the crankshaft? I believe this will make the arrows on the belt point towards the rear of the car, correct?

Everything I've read and seen so far points to this, but I would like to double check this to make absolutely sure.
 
Last edited:
I try an do write-ups as I work on my truck and find interesting things that would help other members. I don't have access to a lot of 4th Gens and I mainly work on all the used vehicles at the dealership this days so I don't do a lot of regular services like 30k, 60k, 90k ect on them these days. Since the 4Runner is my DD I also don't tear it down regularly, our new service manager doesn't want us doing side jobs anymore so I can't help other members like that anymore either.

I'll try and make more write-ups on things when I get the opportunity, but unfortunately as you can see I don't get that chance often.
 
I just did the 90K service myself on my '04 Sport. I ended up buying the Aisin service kit which includes the water pump, belt, tensioner and pulley, metal silicone gasket and idler pulley.

Aisin is the OEM supplier to Toyota, so I got the same parts you would get at the Toyota dealer for less than half the cost.

Total cost was $195 for the Aisin pump/belt service kit. Denso plugs were another $6 ea. The Walnut Creek Toyota dealer wanted almost $2,000 for this service. out the door I paid just under $300 for all the parts.

The Aisin kit includes a Mitsuboshi timing belt which is pre marked with the cam and crank shaft alignment marks. But I used a paint pen too to double check.

I left my radiator in place and used the starter motor with a socket on the crank bolt to get the crank pulley removed as shown in the U Tube video. My impact wouldn't fit with the radiator left in place. I also only removed the pulley from my power steering pump to slide the alternator forward. I did not need a puller for the crankshaft pulley or the power steering pulley. Both slid off by pulling with my fingers.
 
Last edited:
I try an do write-ups as I work on my truck and find interesting things that would help other members. I don't have access to a lot of 4th Gens and I mainly work on all the used vehicles at the dealership this days so I don't do a lot of regular services like 30k, 60k, 90k ect on them these days. Since the 4Runner is my DD I also don't tear it down regularly, our new service manager doesn't want us doing side jobs anymore so I can't help other members like that anymore either.

I'll try and make more write-ups on things when I get the opportunity, but unfortunately as you can see I don't get that chance often.

Thanks for the good write-up. I plan to do this on my 03 here in the next few weeks.

I have read up a lot on the coolant and it seems that many Toyota techs are saying that they have noticed issues w/ the pink coolant and have switched over to the standard green. Have you noticed anything like this?
 
Tollboothwilley, I have not heard of Toyota switching to a Green Coolant; we actually strongly recommend against it. We haven't had any issues with properly maintained systems using Toyota's Red or Pink (where applicable) coolant. Part of the reason we frown on using "generic green coolant" is because every manufactuer has specific chemical additive packages to their coolants to prevent various chemical processes that can degrade the coolant and damage the engine and few coolant manufactuers bother to do extensive testing on their "universal" coolants (Valvoline is actually the only one I can vouch for because I spoke with the factory rep and have seen testing documentation on their "Asian Vehicle Formula")

Also, I updated the first post in this thread with a downloadable .pdf from the FSM on changing the timing belt for those who want printable instructions.
 
pump too...) The power steering pump is held by four 14mm bolts, 2 on the front of the engine the other 2 on the side accessible from the passenger side wheel well.
PSPump_zps6836a1b3.jpg~original


After removing the power steering pump
I did my WP, and belt last weekend, and found out you don't have to remove the PS pump. its a lot easier to just unbolt the pulley.
its splined, so once you remove the nut, the pulley just slides off. this is on my 06, it may be different on different years...

Now before you take the crankshaft off, I'd turn the engine so that the white mark matches the dot on the plastic cover, not the TDC mark! (This is optional really, I just did this because I am anal retentive sometimes!)
PulleyMark_zps23dbb789.jpg~original

After the crank is now at (IIRC its something like 50* After TDC or whatnot) you'll notice your cams should be lined up with these raised lines on the valve cover faces (The ones next to the "T" in the picture.) If they don't just rotate the crank again and line it up with the marks. These are the correct timing marks, with the pulley at its white dot, the cams should line up about exactly with these lines. If it doesn't you now have an example of a stretched belt (happens to everyone so don't feel self-conscious! :P )
CamTimingMark_zpsddf94646.jpg~original

After the pulley is removed you'll see a small V notch cut into the crank gear, this should line up with a small pimple where that white dot on the plastic cover was. Its almost easy to mistake it for a defect in casting so look carefully! I know its hard to see in this picture, but that's it right there.

CrankMark_zps2c4636ef.jpg~original
I ran into something strange here.


if I lined up the crank as shown above, my cams were lined up with the T, and not the LINE.

the only way to get the cams on the LINE was to put the crank on TDC. after doing that, the crank pulley lined up with that little notch the way its supposed to.
I put it back together the way it was when I took it apart. I had no warning lights, and it runs the same as it did before.

unfortunately, I didn't get any pics. I just wanted to get it done.
im not sure why it would be different though.
 
I know we were talking back and forth about that Nevada; I vaugely remember there being something about the T being to check timing and the line being to actually replace the belt? I didn't see anything in the FSM, but I may have missed it when I looked over it this morning Nevada.
 
I know we were talking back and forth about that Nevada; I vaugely remember there being something about the T being to check timing and the line being to actually replace the belt? I didn't see anything in the FSM, but I may have missed it when I looked over it this morning Nevada.

no worries.
I wasn't questioning you, or your methods/advice.
I was just pointing out that mine ended up being slightly different.


and, I think you might be right, using different marks helps get the belt on correctly the first time. because, often times you set the belt in place, then turn it over 2x, and after the tensioner pulls the slack from the right side...you end up being off 1-2 teeth off. ive encountered that often.
 
I have the 2UZ-FE engine in my '99 Landcruiser. Your post was the only place on the net where I could find the engine block drain plug for the coolant. Thanks for the great picture and for relieving my frustration.

How many gallons of coolant does your system take? My owners manual indicates 16.2 quarts (My LC has the rear heater), but only 3 gallons drained from radiator and engine block and I was only able to put 3 in the system. I had both heaters turned on while draining and refilling (ignition was off on draining).
 

Forum statistics

Threads
278,317
Messages
3,554,128
Members
248,016
Latest member
Advally Service

Trending content

Back
Top