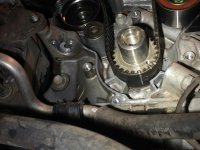
2UZ-FE R&R T-Belt & Water Pump

2UZ-FE Major Service Write Up? Yar/Nay?


  • Total voters
    161
Do you mean the camshaft Plug?
If looking down at the engine from the front of the 4Runner. I made sure that the plug was routed in between the belt and through the timing belt cover hole.
I never removed the crankshaft sensor until after everything was together and
That was from under the 4Runner. Also can I check for power to the crank shaft plug?
From the plug itself possible with the ignition on?
Or does the car need to be cranking over ?
Just to see if it is getting power to the sensor.
 
I ordered the crank sensor from Toyota should be here Wednesday.
When I get back to work Tuesday. I will check the wiring to see if Something went screwy. Also I forgot to mention I did check for spark but there is none.
I will let the curious know what I find.
 
Okay well the problem was me!!
I pinched the crank position sensor wire.
Runs great!! burping the system now.
Thanks for the help everyone.
 
Just about to finish, thanks blackworks for all the help. Still have to get some new hoses. As an aside, I have a 2004 and noticed that the power steering bolts on mine mount on the front only like the 3part video. Also for others the rear ac compressor bolt only needs to come out about a quarter inch. It's ALOT easier if you jack up to front driver side just so the wheel is off the ground but the wheel doesn't necessarily need to come off. The hardest part is definitely getting the crank bolt off and back. I used a chain wrench with the old serp to protect, with the upper end of the jack handle as additional lever then cranked on the 24" torque wrench.
 
Last edited:
So I'm being paranoid and going over in my head to make sure I checked everything. I did use the videos to help and I was just rewatching them and noticed that when he puts the crankshaft pulley back on it goes on at 10* (see here: 14:22)
http://youtu.be/fM1A0DWhRHc
but the timing marks are lined up. Then he turns the cranks and it ends up back at 0 which is where mine was. Just trying to figure out how it went on at 10* since there's a guide on it that sets the location?

I turned mine over six times, every other turn puts the cam pulley back to the | where they were when I took the belt off. I didn't advance forward, I set the pulley to 0 and the cams lined up perfect. I do smell a hint of gas when hand cranking, is that ok?

Also is the dot on the cs supposed to be at bdc when timing is aligned? The little bumps lined up on the gear and the engine.

Am I missing anything?
 

Attachments

  • image.jpg
    image.jpg
    131.5 KB · Views: 1,942
Last edited:
I think the guy that did this video is super lucky. He didn't put the cams into the timing belt service position, only at TDC. One movement of a cam, and he would have been screwed. Not sure why the crank pulley ended up at 10 degrees, then in the video after, ended up at 0 degrees. The mark on the timing belt at the crank looks good. How are your other marks?
 
Last edited:
Some of you guys are making this too stressful on yourselves. Simply remember one thing. If the cams and the CS do NOT move during the course of installing a new belt then all will be fine. There are many different ways to hold the cams in place to keep it from jumping a lobe. You can put the belt on in any timing position in all reality, not advising you to do so! I have done several hundred T/Belt replacements over my 30 years of wrenching. I'm just trying to put you at some ease.
 
I think the guy that did this video is super lucky. He didn't put the cams into the timing belt service position, only at TDC. One movement of a cam, and he would have been screwed. Not sure why the crank pulley ended up at 10 degrees, then in the video after, ended up at 0 degrees. The mark on the timing belt at the crank looks good. How are your other marks?

So with the pulley on it sits at 0 and the marks on the cams are aligned with the | mark on the engine and were originally aligned with the belt. Hand cranking two laps of the crank puts the cams back in the same position. I feel no interference of any kind other than the compression. I did have the right cam move about one tooth but it moved back with a little nudge.

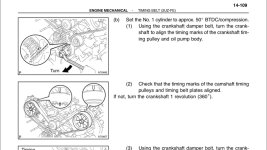
Here's from the fsm, it's shows the vertical marks on the cams aligned when the mark on the cs is also aligned to the engine mark but they call this 50* btdc so??
This is what I did but my pulley says its at 0.
 

Attachments

  • image.jpg
    image.jpg
    109.4 KB · Views: 2,058
Last edited:
Some of you guys are making this too stressful on yourselves. Simply remember one thing. If the cams and the CS do NOT move during the course of installing a new belt then all will be fine. There are many different ways to hold the cams in place to keep it from jumping a lobe. You can put the belt on in any timing position in all reality, not advising you to do so! I have done several hundred T/Belt replacements over my 30 years of wrenching. I'm just trying to put you at some ease.

Stressful? This for me isn't stressful just being super careful. Stressful is proving out someone else's programming on the machine at work. I know what I know and I know what I don't, this I don't.
 
So with the pulley on it sits at 0 and the marks on the cams are aligned with the | mark on the engine and were originally aligned with the belt. Hand cranking two laps of the crank puts the cams back in the same position. I feel no interference of any kind other than the compression. I did have the right cam move about one tooth but it moved back with a little nudge.

Here's from the fsm, it's shows the vertical marks on the cams aligned when the mark on the cs is also aligned to the engine mark but they call this 50* btdc so??
This is what I did but my pulley says its at 0.

Sorry, I don't understand your question. How I do Toyota timing belts is if the marks on the belt line up with the cams and crank, you are set, regardless of their position with respect to the engine block/head markings. I'm not sure if on the 2UZ that the belt will line up with the markings on the cam/crank after turning the engine. I know for a fact that on the 5VZ, the belt marks won't line up after turning the engine.
 
Last edited:
It's ok - thanks stir fry. It's quite a bit to explain even in person. I had a coworker here take a look at the fsm and he is pretty well versed, he can't make much sense of it, the manual contradicts itself. Everything is exactly as it was before I took the belt off so I think it's good to go.
 
Last edited:
I too found some confusion on this point between FSM and blackworks words/pictures, and some other writeups I followed. It depends on version of the 2UZ for where the cam marks line up, VVTi etc.. Bottom line is that you line up the crank mark and then note where your cam marks are lined up on the old belt (either the "T" OR the vertical cam mark), mark the belt to each cam with paint pen or your womans nail polish, and twice to the crank, lay old belt on new belt lining up teeth and transfer 4 paint marks over to new belt (or some new belts will have the markings on it already still overlay to confirm) then replace belt onto cams and crank lining up markings. Since the new belt might be tighter you may find the cams want to spin towards each other ever so slightly to get the right marks lined up. Once you have the belt on and tensioned and bar the engine over, the marks will not line up again and this is normal, one engine rotation has no relation to belt rotation since the belt is a larger multiple of teeth than any of the gears involved. Technically you could do this technique at any engine position if you locked the cams in place, but aligning the crank ensures that the cams are in a place in their rotation that you're not going to be fighting the valve springs to hold them in place, they will simply stay there when the belt is removed. If one moves don't panic, you've marked it already! Same number of belt teeth need to go between your gear paint marks as the last time and you're good to go.
 
Last edited:
I too found some confusion on this point between FSM and blackworks works/pictures, and some other writeups I followed. It depends on version of the 2UZ for where the cam marks line up, VVTi etc.. Bottom line is that you line up the crank mark and then note where your cam marks are lined up on the old belt (either the "T" OR the vertical cam mark), mark the belt to each cam with paint pen or your womans nail polish, and twice to the crank, lay old belt on new belt lining up teeth and transfer 4 paint marks over to new belt (or some new belts will have the markings on it already still overlay to confirm) then replace belt onto cams and crank lining up markings. Since the new belt might be tighter you may find the cams want to spin towards each other ever so slightly to get the right marks lined up. Once you have the belt on and tensioned and bar the engine over, the marks will not line up again and this is normal, one engine rotation has no relation to belt rotation since the belt is a larger multiple of teeth than any of the gears involved. Technically you could do this technique at any engine position if you locked the cams in place, but aligning the crank ensures that the cams are in a place in their rotation that you're not going to be fighting the valve springs to hold them in place, they will simply stay there when the belt is removed. If one moves don't panic, you've marked it already! Same number of belt teeth need to go between your gear paint marks as the last time and you're good to go.


^this! Exactly.
 
Confused as to why you would want to mark a belt when they already come marked from Toyota?

Not all belts come marked like the Toyota ones, and even with the marked ones, line the marks up with your old marked belt to confirm it's the right belt, right number of teeth and spacing. I've gotten plenty of wrong parts in right boxes before. In the land of timing triple checking isn't a bad idea. It's an easy job but can be nerve racking, so I calm mine by making damn sure. It's up to you.
 
Not all belts come marked like the Toyota ones, and even with the marked ones, line the marks up with your old marked belt to confirm it's the right belt, right number of teeth and spacing. I've gotten plenty of wrong parts in right boxes before. In the land of timing triple checking isn't a bad idea. It's an easy job but can be nerve racking, so I calm mine by making damn sure. It's up to you.

In an interference motor, I wouldn't trust any other belt/water pump/idler pulleys besides OEM. That's just me. I've heard of any other belt brands flopping around in there, including Gates.
 

Members online

No members online now.

Forum statistics

Threads
278,316
Messages
3,554,121
Members
248,016
Latest member
Advally Service

Trending content

Back
Top