
You are using an out of date browser. It may not display this or other websites correctly.
You should upgrade or use an alternative browser.
You should upgrade or use an alternative browser.
5th Gen Spark Plugs- Photo Tutorial. So easy a 6 yr old girl can do it...
- Thread starter Antman
- Start date

FactoryT4R
New member
Thank you for posting this. I thought this was going to be an easy job but it looks like a little more work. I have a 2016 SR5, those two buggers (cylinders 2 and 4) will be more work than necessary. I wonder why Toyota changed this?
Yes, thank you!! This is nothing, I thought it was going to be worse. I may change the plugs out just because this wknd.

1000MPH
Senior Member
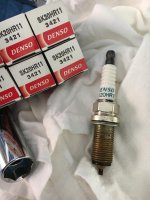
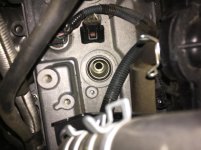
Changed out my plugs this past weekend because I wanted to try out a cool plug wrench and some socket extensions. Not as easy for me as it was for your kiddo, took me about 1-1/2 hrs. Biggest PITA was removing the connectors.
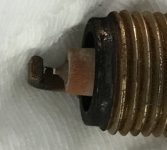
I got some build up on the ground electrode so I'm glad I replaced them. Probably nothing but the deed is done.
I got some build up on the ground electrode so I'm glad I replaced them. Probably nothing but the deed is done.
Attachments
Last edited:

Ray Dunakin
Senior Member
Bummer, all the original post pics are gone thanks to Photobucket. 

Antman
Elite Member
Bummer, all the original post pics are gone thanks to Photobucket.
They will be fixed soon...
They will be fixed soon...
You still plan on fixing them? :hiding:
hornet7288
New member
Great write up! I was able to replace the spark plugs on my 11 SR5 thanks to the info in this thread. It was a breeze. I will definitely refer back to this in the future.
magistersmax
New member
Question for the spark plug thread: I bought NGK LFR6AIX-11 plugs for my wife's old RX350 a while back and never used them. Will these work in a 4Runner?
It looks like NGK ILFR6A or NGK PLFR6A-11 plugs are replacement options for the Denso plugs, but I'm not entirely sure what NGK's product naming scheme is.
It looks like NGK ILFR6A or NGK PLFR6A-11 plugs are replacement options for the Denso plugs, but I'm not entirely sure what NGK's product naming scheme is.

Sputnik
New member
Now, all the others are exactly the same process. You will use different combinations of extensions, 1 2 or all three to make it easier to get the ratchet in place. Here are some pics of the others...
**Grace wanted to make a special note about the drivers side rear-most plug. It's obstructed by the heater hoses a bit. Don't be afraid to bend the hoses outta the way to get to everything- after all they are rubber...easy!
Aren't you glad you replaced these old things? These look exactly like they should BTW.
So... not too hard, right? Hopefully this inspires you to get in the garage and DIY. I'll leave you with one more pic of the cutest little mechanic I ever did see...:biggrin2:


Thank you for this write up.
I’ll be doing my plugs this weekend at 130k. I’m a little late, I know

Purple Pirate
New member
New to the forum so learning how to navigate. Just purchased 2011 Limited with 73K miles...looks like I don't need to worry about plugs for 30k more miles? Also, no history about oil changes for this vehicle...pulled dipstick and the level is okay, color is just turning a little dark. Should I go ahead and change?

TrkyMfns
New member
New to the forum so learning how to navigate. Just purchased 2011 Limited with 73K miles...looks like I don't need to worry about plugs for 30k more miles? Also, no history about oil changes for this vehicle...pulled dipstick and the level is okay, color is just turning a little dark. Should I go ahead and change?
Plugs and Oil are relatively cheap. In your position, I would just replace them for piece of mind.
jospradlin
New member
Excellent job! Thank you!


CutthroatSlam
Senior Member
Maybe [MENTION=65614]Antman[/MENTION] won't mind me adding here for the later models (2013+ I think) that have the air switching valves in the way of a few of the plugs. I wouldn't think there are too many folks that have many miles yet, but at some point it will come into play. With a 2016, I obviously haven't done this, so it's just pics of the interferences you'll have to remove. Sorry, I don't have the panache of Miss Gracie. You'll just have to bear with me on a boring writeup.
So this is an air switching valve that blocks access to a couple of the plugs. There is one on each side of the engine. They are not identically shaped due to mounting point differences, but other than that they are the same. The one shown in the picture is on the passenger side.

To remove the air switching valve:
1) First remove the attached air tube by removing the 4 bolts/nuts (yellow circles), 10mm socket. At each end of the air tube, there is a metal gasket. The gaskets will be replaced but be sure not mar the mating surfaces.
2) Disconnect the electrical connector and rubber hose from the valve (blue arrows). The rubber hose is attached with a standard spring clamp. Pinch the two tabs together with a pair of channel locks to widen the clamp for removal. Make sure you take note (or pic) of how the hose and clamp were aligned. There is a paint mark on the hose that lines up with a raised projection on the valve body. You will want the hose and clamp lined up properly when you reinstall.
3) Now you can remove the 3 mounting nuts (red circles), 12mm socket, and then remove the valve. The 2 that are visible are easy to get to. The one you can't see in the picture is behind that wiring harness. This nut may be the one thing that could complicate this job, so I'll focus on it for a second.
The FSM actually has you remove the air cleaner cap and hose before you mess with the air switching valves. The only reason I can see you would need to do this is for that one mounting nut on the passenger side air switching valve. So I recommend assessing this and trying to loosen that nut before starting this job. If you think you need to, go ahead and remove the air cleaner cap and hose before you start on the air switching valves. Here's how you would do that.
In the picture below
1) Unfasten the 4 hook clamps (red circles), just like your were replacing the air filter.
2) Disconnect the mass air flow connector (yellow circle)

In the picture below
1) Remove the rubber vacuum hose and detach the wiring harness (red arrows)
2) Remove the mounting bolt (yellow circle), 10mm socket
3) Sorry the next two are not pictured cos I was too lazy to take the engine cover off, but it should be obvious with it off
4) Remove the rubber ventilation hose, has a spring style clamp just like the hose on the air switching valve
5) Loosen the screw-style clamp on the hose where it attaches to the throttle body
6) At this point (unless I missed something) everything should be disconnected and you can wiggle and lift the air cleaner assembly out and set aside

With air cleaner cap and hose off, you should have no problem accessing all the mounting nuts and removing the passenger side air switching valve. For the driver side, it's basically the same except you don't have the air box in the way. After removing both air switching valves, you should be set up to do the spark plug replacement just like shown in the OP.
Installation of everything is essentially the reverse of removal. Just remember to get everything lined back up the same way. And also you're dealing with engine intake that is taking in air that goes through your filter so you do not want any foreign material getting in all that stuff during removal or installation, so keep it clean. Here's the torque specs for all the extra stuff and part #'s for the air tube gaskets, etc. that you'll need. I'll also point out that depending on your model year, the spark plug part # is different, so check that below as well.
Torques:
Air switching valve mtg nuts - 186 lb-in/21Nm (12mm)
Air tubes - 88 lb-in/10Nm (10mm)
Air filter hose clamp - 44 lb-in/5Nm (10mm)
Air filter hose mtg bolt - 44lb-in/5Nm (10mm)
Parts:
6 spark plugs
Toyota part # 90919-01233/DENSO SK16HR11 ('14-'16) or
Toyota part # 90919-01191/DENSO SK20HR11 ('10-'13)
4 gaskets for air tubes - Toyota part # 17377-38010
Hope this helps. First time doing something like this and I'm sure I messed something up or missed something. Certainly willing to take some feedback to make it better.
I ran into an issue doing this job. While removing the wire plug from the coil on the middle cylinder on the driver's side, the wires pulled from the plug on the cam position sensor. These wires seem to simply poke into the plug and are held in by a rubber sleeve, which is not a very sturdy design.
I went to a Toyota dealer where the parts guy was of no help. First off his computer parts system was down. Then he said if it were up, it would just show the plug without wires or the entire wiring harness. Neither were a good answer. He suggested I look online which is my normal course.
Rockauto sells a repair plug by Dorman and I ordered one:

My question is what is the order or placement of the wires into the plug? There's a green, green w/ black stripe, and a pink wire. The repair plug from Rockauto shows all three wires the same color. Can someone take a picture of their plug for reference?

oljedi11950
New member
Thank you Gracie !! And you are/were right that rear most on drivers side is a real B*^*H !! Lots of bad words .........

Fredward
New member
Maybe [MENTION=65614]Antman[/MENTION] won't mind me adding here for the later models (2013+ I think) that have the air switching valves in the way of a few of the plugs. I wouldn't think there are too many folks that have many miles yet, but at some point it will come into play. With a 2016, I obviously haven't done this, so it's just pics of the interferences you'll have to remove. Sorry, I don't have the panache of Miss Gracie. You'll just have to bear with me on a boring writeup.
So this is an air switching valve that blocks access to a couple of the plugs. There is one on each side of the engine. They are not identically shaped due to mounting point differences, but other than that they are the same. The one shown in the picture is on the passenger side.
To remove the air switching valve:
1) First remove the attached air tube by removing the 4 bolts/nuts (yellow circles), 10mm socket. At each end of the air tube, there is a metal gasket. The gaskets will be replaced but be sure not mar the mating surfaces.
2) Disconnect the electrical connector and rubber hose from the valve (blue arrows). The rubber hose is attached with a standard spring clamp. Pinch the two tabs together with a pair of channel locks to widen the clamp for removal. Make sure you take note (or pic) of how the hose and clamp were aligned. There is a paint mark on the hose that lines up with a raised projection on the valve body. You will want the hose and clamp lined up properly when you reinstall.
3) Now you can remove the 3 mounting nuts (red circles), 12mm socket, and then remove the valve. The 2 that are visible are easy to get to. The one you can't see in the picture is behind that wiring harness. This nut may be the one thing that could complicate this job, so I'll focus on it for a second.
The FSM actually has you remove the air cleaner cap and hose before you mess with the air switching valves. The only reason I can see you would need to do this is for that one mounting nut on the passenger side air switching valve. So I recommend assessing this and trying to loosen that nut before starting this job. If you think you need to, go ahead and remove the air cleaner cap and hose before you start on the air switching valves. Here's how you would do that.
In the picture below
1) Unfasten the 4 hook clamps (red circles), just like your were replacing the air filter.
2) Disconnect the mass air flow connector (yellow circle)
In the picture below
1) Remove the rubber vacuum hose and detach the wiring harness (red arrows)
2) Remove the mounting bolt (yellow circle), 10mm socket
3) Sorry the next two are not pictured cos I was too lazy to take the engine cover off, but it should be obvious with it off
4) Remove the rubber ventilation hose, has a spring style clamp just like the hose on the air switching valve
5) Loosen the screw-style clamp on the hose where it attaches to the throttle body
6) At this point (unless I missed something) everything should be disconnected and you can wiggle and lift the air cleaner assembly out and set aside
With air cleaner cap and hose off, you should have no problem accessing all the mounting nuts and removing the passenger side air switching valve. For the driver side, it's basically the same except you don't have the air box in the way. After removing both air switching valves, you should be set up to do the spark plug replacement just like shown in the OP.
Installation of everything is essentially the reverse of removal. Just remember to get everything lined back up the same way. And also you're dealing with engine intake that is taking in air that goes through your filter so you do not want any foreign material getting in all that stuff during removal or installation, so keep it clean. Here's the torque specs for all the extra stuff and part #'s for the air tube gaskets, etc. that you'll need. I'll also point out that depending on your model year, the spark plug part # is different, so check that below as well.
Torques:
Air switching valve mtg nuts - 186 lb-in/21Nm (12mm)
Air tubes - 88 lb-in/10Nm (10mm)
Air filter hose clamp - 44 lb-in/5Nm (10mm)
Air filter hose mtg bolt - 44lb-in/5Nm (10mm)
Parts:
6 spark plugs
Toyota part # 90919-01233/DENSO SK16HR11 ('14-'16) or
Toyota part # 90919-01191/DENSO SK20HR11 ('10-'13)
4 gaskets for air tubes - Toyota part # 17377-38010
Hope this helps. First time doing something like this and I'm sure I messed something up or missed something. Certainly willing to take some feedback to make it better.
Just did the plugs on my 16 tep. 73,000 miles. They needed it for sure. I can confirm that it is quite easy. All you have to do is remove the egr air pumps as pictured above as renau001 mentions. You don't need to remove all 4 of the yellow circled screws for the small metal tube. Just disconnecting it from the air pump will do. Pay attention to the metal gasket on that tube and make sure it's there when reassembling.I also removed the braket holding the heater lines to the intake manifold. Also on the passenger side I removed the small valve above the air pump. Probably didn't need to but it made access easier. Took me about an hour.
Just did the plugs on my 16 tep. 73,000 miles. They needed it for sure. I can confirm that it is quite easy. All you have to do is remove the egr air pumps as pictured above as renau001 mentions. You don't need to remove all 4 of the yellow circled screws for the small metal tube. Just disconnecting it from the air pump will do. Pay attention to the metal gasket on that tube and make sure it's there when reassembling.I also removed the braket holding the heater lines to the intake manifold. Also on the passenger side I removed the small valve above the air pump. Probably didn't need to but it made access easier. Took me about an hour.
So did you take the air intake box off or were you able to access all the nuts holding down the air pump without doing that?
Fredward
New member
I took the intake off. The filter box stays. Just the one bolt, the hose clamps at the throttle body and the filter box, a small vacuum line, and a hose (I think it's a pcv hose) and that whole intake piece comes off to give you access to the front coil. It's pretty obvious once you get in there. A little girl could still do it.

Similar threads
- Replies
- 1
- Views
- 35K

- Replies
- 10
- Views
- 13K


