My Experience With Changing Lower Control Arm Bushings
This is to help anyone changing their lca bushings, especially for those who, like me, have to deal with RUST.
To summarize, I will probably never do it again. Next time I'll just get new pre-assembled bushings. Or more likely replace the control arms and bushings together. RUST was the biggest issue I had, and made almost every stage of the process difficult. For that reason, and not having ideal tools for some of the steps, I would call this project pretty close to 10/10 for difficulty. Hopefully this write up will help a few people in the future. I'll try to show the process I went through with as much detail as possible.
Won't go in to too much detail about removing everything, as that part is fairly straight forward. But for anyone who hasn't torn into their front end before - basically, get the frame on jacks and in this general order:
(Spray everything with a good penetrating oil a day before hand)
1) remove tire
2) remove sway bar/link (this step was easy for me, since I took mine off months ago

)
3) remove castle nut and pound tie rod end from lbj
4) mark the positions of caster adjustments. You only need to mark on the outsides
5) loosen the control arm bolts (don't remove). This will allow control arm to swivel down easily for future step
6) put a jack under control arm to take load off the coil/strut assembly and remove 4 lbj bolts. Drop the jack to let the assembly extend
7) remove the coil/strut assembly
8) remove the 4 bolts that mount the steering rack. For this step, I've read some have to it, and other don't. I found it necessary. It will allow you to pull the rack out of the way to access the rear bolt and caster sleeve on the driver side control arm. Even with the rack loose, I still had to jack it up a good inch on the driver side to have enough clearance to pull the bolt/caster parts
9) now with a few taps with a hammer the control arm will drop out (with lbj attached)
And now for the fun part. And by fun I mean fun like chewing on Styrofoam. Fun like having a piece of metal shaving stuck in your eye. Fun like smashing your finger with a hammer. Fun like stubbing your toes on the corner of a wall. Fun like . . . well, you get it.
1) Pressing the bushings out of the a arms.
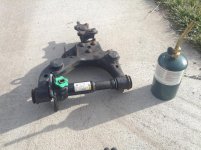
With a press, I'm sure this would have been simple. But I don't have one, so I used the bottle jack method. Position it as shown in picture to press bushing outward. I applied so much pressure on the bushings using the jack that the control arm was literally bending outward, and I still couldn't get them to budge.
Until heating with the torch. Because of RUST, the heat was an ABSOLUTE MUST. Once heated I was able to get the bushing to break, and then slowly press out with increased pressure.
CAUTION: The pressure from the jack can turn the bushings into projectiles! I had one fly across the garage floor. It was awesome.
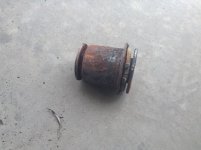
Look at that rust. There was a fair amount of pitting on the outer sleeves as you can see. They were definitely seized in the housings. Again, penetrating oil and heat are an absolute must to tackle the rust.
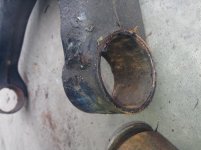 2) Removing the press-fit washers
Only the smaller washer needs to be removed. I was able to use a vice for this, although even with the vice it was difficult. I used a socket that was just the right size to line up with the inner sleeve, and a section of a pipe wide enough to allow the other end to move. The socket (or whatever you use) needs to be the exact diameter of the lip of the inner sleeve, and lined up perfectly when pressing. Once lined up in the vice, I had to use a cheater bar to turn the vice handle, as getting them to break required a lot of pressure. The washers actually bent inward from the pressure, so I formed them back to shape after removing. With a TON of pressure they eventually popped off. It was a tedious process.
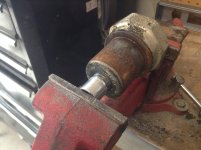 3) Pressing out the inner sleeve/rubber
(I forgot to take a picture of this part, sorry.)
Basically, the bushing sits in the vice just like it is in the last picture, with a socket on the front, and the pipe in the back. For this step, once again, HEAT WAS A MUST. I had so much pressure on the bushing that the vice looked like it was going to break. But once I heated the perimeter of outer sleeve, the rubber broke and the bushing began to move. After getting it about 2/3 out, while the rubber was still hot, I was able to pull the bushing out with a large pair of pliers. It will look like this, with most of the rubber attached to the inner sleeve, and some still stuck in the outer sleeve.
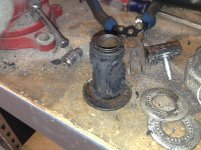 4) Removing the old rubber
This was by far my least favorite part. It messy, and took a while. I would recommend doing this outside using a half face paint mask, as the fumes are really bad. But heating the rubber is absolutely necessary to remove it. My process went - 1) heat the rubber till it start on fire, 2) cut sections off with a knife, 3) heat another section of the rubber and repeat. Once the bulk of the rubber was off, I used a razor blade to scrape the sleeves clean.
Because a flat razor wont fit in the concave outer sleeve to clean out the rubber, I used this guy on a high speed drill.
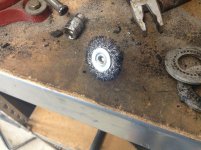
Rubber cleaned out of the outer bushing using the wire brush
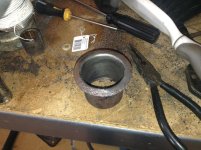 5) Re-assembling with the new bushings
This step is easy. I used my wire wheel pictured above to clean the inner and outer sleeves really well. Then just applied grease on both the metal surfaces and bushing and pressed it all together. I pressed the bushing into the outer sleeve first, and then pressed the inner sleeve into the bushing.
6) Pressing the press-fit washers back on the inner sleeve
This step is a little tricky. Because of how much pressure I had to apply to the lip of the inner sleeve to press the washers off initially, they were a bit marred up and even a little bent in a few spote. So I knew lining up the washers to press back on would be an issue, as the tolerance is very tight and lining them up is difficult. If the washer is not perfectly lined up, when pressure is applied the the lip will be bent or damaged (which I did when pressing them out), and then the washer wont seat properly. So i used a file on the lip to get rid of any burrs, and sharpen the lip slightly to make it easier to line up and accept the washer.
I lined it up in the vice, and then used a combination of pressing and hammering lightly until the washer popped on.
7) Pressing the bushings back into the control arm
This step should have been easy, but once again RUST complicated the process, at least on the first bushing. To start make sure to press the bushings in correctly (the small washer that you just pressed on goes inward for both ends). It took me 45 minutes of torquing the vice, heating, pounding, and repeating over and over again to get the first bushing back in. So after that, I took my file to the surface of the outer sleeves to knock down any high spots, and then cleaned them up with the wire brush. This made the other three bushings much much easier to press in.
Conclusion
So that was my experience. Put everything back together in order. Make sure to line up the marks for the caster. Get an alignment.
The whole project took me and my brother probably around 10-12 hours. Although, because of my illness right now, we spread it out over 3 days. Without rust it would have been much easier. Live and learn. If I did it again I could probably cut the labor time in half.