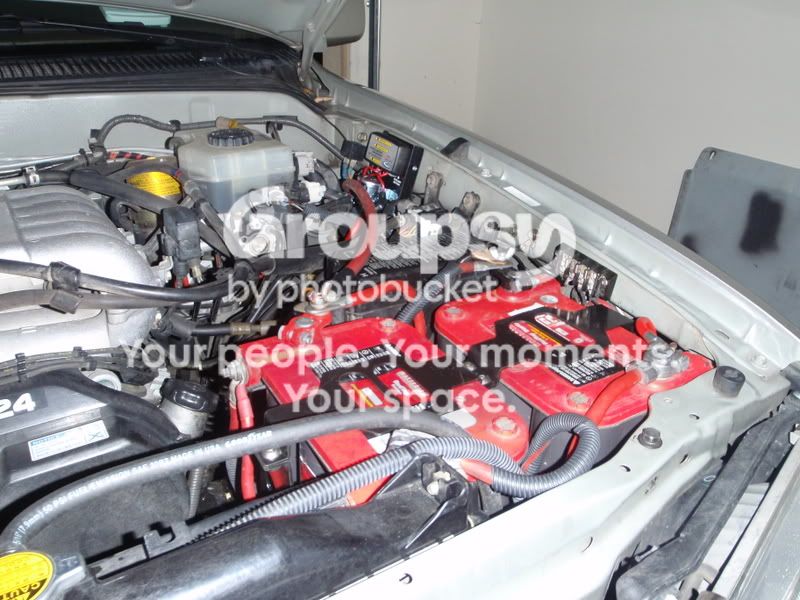
Best Dual Battery Setup for a 5th Gen 4Runner

National Luna intelligent solenoid

After finally installing the Shrockworks dual battery tray, I measured the dimensions of the tray and decided it should fit the desired Odyssey 25-PC1400 Battery.

Battery Specs: 850 CCA, AH - 20 Hr rated capacity - 65 Hours, reserve capacity @ 25 amps is 130 mins, 52 lbs.

Battery dimensions: 9.47" L x 6.85" W x 8.75" H

Shrockworks advertised max battery dimension: 10.1" L x 6.8" W x 6.9" H

Also beginning planning on the location of the sPOD Source 8 channel unit. I am not a fan of any of the left/passenger locations, especially not when the air compressor and aux battery are taking up most of the space there and not a fan of mounting it on top of the air box. I'd like it to place it on the driver's side, behind the fuse box, elevated above the fuse box lid for easy access and plenty of room underneath for accessory cable management. I'll use L brackets mounted to the 2 existing threaded holes on the driver side wall. I will have some accessory lines route down, underneath the sPOD and back toward the firewall and then out to their various locations. For forward accessories, will route wiring down, to driver side wall and forward. The battery cables are too short so I will have to install new, longer wiring to route to the passenger side aux battery.

A quick update on the rig: I just installed the SS Slimline front bumper with 20" RI LED light bar (awaiting sPOD install) and the Warn Zeon Platinum 10-S winch (wired directly to the starter battery), which works great. Very impressive and simple operation with the wireless remote. I was super OCD on wire routing and protection. More coming on that soon in a detailed write up on my build thread.

A couple shots - how the sPOD will look and new bumper. Warn Epic D-ring shackles going on tomorrow with Daystar shock absorbers.

Seeing that you're planning on using the national luna setup in previous post - have you thought about where your going to mount the solenoid? It might be a good idea to use the brackets you plan on using for mounting your sPOD to build a lower mounting plate off of for the solenoid. The engine bay is going to get pretty tight and this would be a good point for serviceability. Plus the national luna instructions state to mount this solenoid close to the main battery.
 
National Luna Isolator and Controller location

Great Idea to piggy back on the sPOD mount. There should be adequate space there. I've got a couple of ideas but need to open the box and take some measurements. More soon.

Seeing that you're planning on using the national luna setup in previous post - have you thought about where your going to mount the solenoid? It might be a good idea to use the brackets you plan on using for mounting your sPOD to build a lower mounting plate off of for the solenoid. The engine bay is going to get pretty tight and this would be a good point for serviceability. Plus the national luna instructions state to mount this solenoid close to the main battery.
 
@Bumbo, great ideas with the Anderson plugs! I like them a lot.

Really digging the idea of having a plug port easily accessible externally for those camping situations, like the heated blanket. Nice thinking!
 
I considered placing the twin compressor in other locations, like the cargo area or under the body in the rear, however, I felt that under the hood offered the most of what I was looking for - with the hood open, it's easy to access and service, easy to wire up, well above water & mud, relatively well shielded from trail dust, will have plenty of clean, cool air to draw from right behind the air box, somewhat mutes/muffles the noise. Also, when not in use and while wheeling on dusty trails, a simple shower cap will cover it nicely to keep it clean. With all the other planned under-hood items, everything I want should fit nicely.

Is it really that loud? I have never used or been around one. I guess that would suck for passengers to hear that while airing up. Really look forward to what you come up with, please post a detailed writeup when you decide to do it.
 
Really digging the idea of having a plug port easily accessible externally for those camping situations, like the heated blanket. Nice thinking!

I know this is going to sound stupid but integrating those Anderson plugs into my electrical projects was life changing experience... Literally "where you have you been missing all my life type of deals"... but I say that to all my tools...

Not sure if it was mentioned but with a dual battery setup like that in the works, what are you plans for the fridge?
 
Is it really that loud? I have never used or been around one. I guess that would suck for passengers to hear that while airing up. Really look forward to what you come up with, please post a detailed writeup when you decide to do it.

lol... OBA music to my ears.

My passengers can...

latest


...and for those that can't... there is always Dynamat
 
Confirmed! Bandi ARB bracket works with Shrockworks Dual Batt!

Hey guys I couldn't wait to try it out so right after work today I gave it a try and I can confirm that the [MENTION=125603]bandi[/MENTION] ARB dual air compressor bracket works with the Shrockworks dual battery tray kit. The Bandi mount clears the relocated smog air pump beautifully. I'm stoked!
 

Attachments

  • IMG_0508.jpg
    IMG_0508.jpg
    129.2 KB · Views: 6,182
  • IMG_0507.jpg
    IMG_0507.jpg
    133.1 KB · Views: 4,922
Fridge?

I'm not quite sure about the fridge yet. I'm on the fence about actually going with a trailer with RTT and fridge. If I do go the trailer route, I will likely forgo the fridge inside the 4Runner to save space for everyday use, ski gear, mountain bike, etc. This whole thing is still pretty fluid as I think about things along the way.

I know this is going to sound stupid but integrating those Anderson plugs into my electrical projects was life changing experience... Literally "where you have you been missing all my life type of deals"... but I say that to all my tools...

Not sure if it was mentioned but with a dual battery setup like that in the works, what are you plans for the fridge?
 
Hey guys I couldn't wait to try it out so right after work today I gave it a try and I can confirm that the [MENTION=125603]bandi[/MENTION] ARB dual air compressor bracket works with the Shrockworks dual battery tray kit. The Bandi mount clears the relocated smog air pump beautifully. I'm stoked!

Do you need a custom front leg? I see you used the shockworks tray in lieu of the mount I provided... Nice to know it fits beneath there with shockworks tray...

Do you thing you can get a water bottle under there to replace the oem bumper one (most people do with aftermarket bumper)?
 
Bandi mount

Hey Bandi! Your mount can host the relocated air pump just like the Shrockworks one? I had no idea. If so maybe I can just use yours instead and remove the Shrockworks one, or I'd be willing to buy a custom leg mount from you if you can swing it. I definitely need that leg mount in the middle for rigidity.

Which water bottle are you referring to? The one right next to the powering steering fluid reservoir? I thought the Shrockworks air pump relocator tray would accommodate a water bottle for only the FJs, rendering that section of the bracket useless in the 4Runner. Do you know?

Do you need a custom front leg? I see you used the shockworks tray in lieu of the mount I provided... Nice to know it fits beneath there with shockworks tray...

Do you thing you can get a water bottle under there to replace the oem bumper one (most people do with aftermarket bumper)?
 
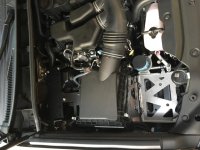
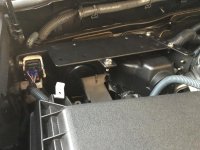
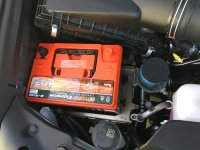
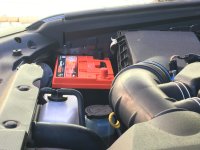
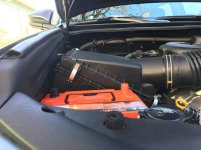
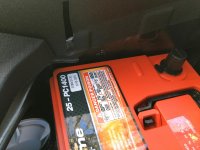
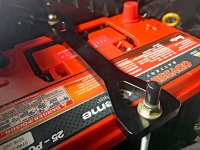
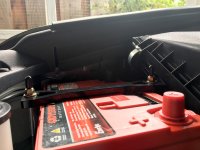
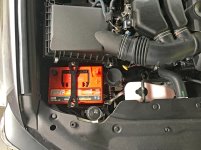
Odyssey 25-PC1400 fits Shrockworks tray

The Odyssey 25-PC1400 battery fits the Shrockworks tray with plenty of room to spare. I wish I had maybe ordered the next size up to see if I could fit it but at least it's easy to get in and plenty of space for air and routing wiring. It weighs less than advertised, which is cool, 47.6 vs. 52 lbs.

Actual Battery Dimensions:
9 3/8" L x 6.75" W X 8.75" H

Advertized Battery Dimensions:
9 7/16" L x 6.75" W X 8.75" H

Actual Weight: 47.6 lbs

Here are some pics of the fitment from different angles to give a sense of scale relative to components in the engine bay.

If you're wondering where the ARB air compressor bracket went, it's in for powder coating since I made some holes larger, along with a bunch of other brackets I made over the weekend for the sPOD, Isolator, and ARB rear diff breather.
 

Attachments

  • IMG_0925.jpg
    IMG_0925.jpg
    133 KB · Views: 8,402
  • IMG_0930.jpg
    IMG_0930.jpg
    126.4 KB · Views: 4,702
  • IMG_0932.jpg
    IMG_0932.jpg
    128.1 KB · Views: 4,605
  • IMG_0927.jpg
    IMG_0927.jpg
    130.1 KB · Views: 4,616
Looking good so far... I like the way the terminals orientate towards in the inside of the engine bay.

Everything I wire is like that... ill change a battery to make it happen too.

Every time I see a positive battery terminal sharing wall with a fender or front grill area I cringe because I can't help but think about getting into an accident where the body was hit hard enough to create an electrical short. Solid way to have an engine fire on an already bad day.

Even a loose battery tray might do this one in... No thank you...
P2050354.jpg~original
 
Last edited:
[MENTION=138432]Liquidmantis[/MENTION] -
...depending on sale of some guitar gear.

... I know that song. lol :guitar2: I've collected so much guitar gear over the years that the sale of it will likely cover most, if not all, of my mod expenses. I G.A.S. HARD. lol

All,

Great write ups and discussion going on here - thank you all for your contributions! I'm just now planning my attack for a DBS and this is a great resource!
:nicethread:
 
The Odyssey 25-PC1400 battery fits the Shrockworks tray with plenty of room to spare. I wish I had maybe ordered the next size up to see if I could fit it but at least it's easy to get in and plenty of space for air and routing wiring. It weighs less than advertised, which is cool, 47.6 vs. 52 lbs.

Actual Battery Dimensions:
9 3/8" L x 6.75" W X 8.75" H

Advertized Battery Dimensions:
9 7/16" L x 6.75" W X 8.75" H

Actual Weight: 47.6 lbs

Here are some pics of the fitment from different angles to give a sense of scale relative to components in the engine bay.

If you're wondering where the ARB air compressor bracket went, it's in for powder coating since I made some holes larger, along with a bunch of other brackets I made over the weekend for the sPOD, Isolator, and ARB rear diff breather.

Have you got around to installing the Odyssey 25-PC1400 in the stock location yet? Great thread keep up the great work buddy.
 
I called up Paul Mayes at Equipt Expedition Outfitters, a legend & knowledge king and all-around great guy in the off road community. He suggested to wire up the winch directly to the main starter battery, with everything else I'm planning to the Aux battery. Josh at sPOD Source suggested the same. NO FUSES between the winch and battery and no fuses necessary between the batteries and isolator.

Why winch from the main battery? The isolator prioritizes alternator charging to the starter battery first. While winching, the starter battery will drain quickly but will simultaneously be charged by the alternator, so essentially, the winch will run off the alternator. If the winch is connected to the Aux battery, it will drain quickly and if it drops below a certain point, will connect to the starter battery via the isolator for more power, thus routing current through the main battery, through the isolator, through the Aux battery, to the winch. If winching amperage draws are too high, it puts risk of fault and failure on the isolator. The National Luna isolator, and most others, are about 80-85 amps with peak load of about 400 amps. With a winch working hard, it can exceed 400 amps, although this is rare. Better safe than sorry.

Here's the new diagram. I'll begin installing items over the next few weeks, then will estimate wiring lengths, will then calculate the wiring gauge needed based on those lengths and individual accessory max amperage draws.

[MENTION=81106]Cytronus[/MENTION] >>did Paul from Equipt tell you "No fuses necessary between the batteries and isolator" ? I ask b/c I just put in my National Luna system today & the instructions cleary said to put in (2) 100amp fuses. One between the main and the solenoid and the other between the solenoid & the auxiliary. I'm troubleshooting a lower idle & stall ever since putting in the dual battery system.

cheers!
 
Isolator and fuses between batteries

Yes, Paul said no fuses are necessary between the isolator and batteries. He's never seen an Isolator short out.

The Isolator, specifically the National Luna, can handle a continuous current of 85 Amps and up to about 100 Amps for short bursts. I plan on running the winch and air compressor directly off the main battery so the high Amperage current draw from those 2 items will never traverse the controller. Since the winch can draw in excess of the controller's 85 Amp continuous rating, up to 300-400+ Amps, it is unwise to connect the winch to the aux battery, where that kind of current demand could short out the Isolator. A fuse there could help protect the Isolator but that would result in a low reliability rating of winch use when really needed since often, winching demands more Amperage than the Isolator and its fuses of 80-100 Amps.

I'm planning to run well bellow 100 Amps worth of combined accessories off my aux battery and sPOD Source, however, I am still going to protect the sPOD with a 100 Amp circuit breaker, since the sPOD's max load is 100 Amps. For high Amperage protection, I prefer a circuit breaker to a fuse because it can be reset by hand quickly and can be an advantage vs. an event you have a fuse blow where you don't have a replacement fuse available.

The instructions for the National Luna isolator actually says the 100 Amp fuses are "optional" and also states - "WINCHING (Dual Battery Controller required) Should a winch be fitted to the vehicle, power draws in excess of 300 Amps can be expected. In this case fuses 1 and 2 (between the Isolator and both batteries) cannot be fitted."

Strange that you're encountering low idle and stalling. Let us know if you figure that one out. What accessories are you running and how much total Amperage do they draw continuously? Are any accessories powered on at vehicle start up? After market stereo/amp/sub?

You may consider upgrading your alternator for increased/faster charge to the main and aux batteries. I went with the DC Power Engineering high output 270 Amp alternator which adds about 100 Amps over the stock alternator, more than enough to power accessories, charge the aux battery and handle winch and air compressor.

Their website shows 4Runners up to 2009 but they do in fact have a direct bolt-on for our 2010 to 2017 4Runners. Give Anthony a shout. He's very knowledgeable and may be able to help you solve the problem.

Here's the link to the unit I picked up: https://www.dcpowerinc.com/fit/Toyota~4Runner~2009~4.0L-V6-1GR-FE/11139-270-xp.html

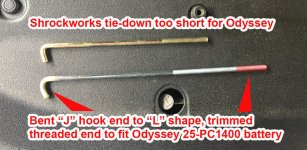
I've been really busy with work and travel so haven't much time to focus on my dual battery set up. I had to order new battery tie-down hooks to accommodate the Odyssey battery since the Shrockworks tie-down hooks were too short. I had to heat u p the ends of the new hooks and bend them to match the Shrockworks style hook which is more "L" shaped than "J" shaped. The "J" shape doesn't fit in the Shrockworks tray hole.

Next up, I have to wire a new controller connector to my ARB dual air compressor that will enable control via the sPOD Source touch screen as opposed to the physical ARB switch in the cabin. More on that when I get to it.


solednoi
[MENTION=81106]Cytronus[/MENTION] >>did Paul from Equipt tell you "No fuses necessary between the batteries and isolator" ? I ask b/c I just put in my National Luna system today & the instructions cleary said to put in (2) 100amp fuses. One between the main and the solenoid and the other between the solenoid & the auxiliary. I'm troubleshooting a lower idle & stall ever since putting in the dual battery system.

cheers!
 
Odyssey 25-PC1400 & tie-down hooks for Shrockworks tray

I had a silly time suck customizing new battery tie-down hooks that would work on the Odyssey since the Shrockworks dual battery kit tie-down hooks were too short for the Odyssey.

I cut the new 10" hooks down to 8 7/8" total length, heated up the "J" hooks red hot with MAPP gas and then bent the hooks into more of an "L" shape to match the Shrockworks hooks and thus fit into those tiny holes on their battery tray. The "J" hooks don't fit into those little holes on the battery tray.

Have you got around to installing the Odyssey 25-PC1400 in the stock location yet? Great thread keep up the great work buddy.
 

Attachments

  • IMG_1176edit.jpg
    IMG_1176edit.jpg
    143.5 KB · Views: 4,317
  • IMG_1181edit.jpg
    IMG_1181edit.jpg
    142.4 KB · Views: 5,133
  • IMG_1184edit.jpg
    IMG_1184edit.jpg
    134 KB · Views: 4,659
  • IMG_1182edit.jpg
    IMG_1182edit.jpg
    139.3 KB · Views: 5,748
weird. maybe we have different instructions.
a8c162b830f766c2ace5553827a7f8ae.jpg
I read about hooking the winch up directly to the main- smart move. Yeah I may replace my existing main battery before resorting to high-output alternator- I was planning on staying on top of charging the Aux. with the Ulitimizer charger, before dropping money for the new alternator.

However, I may do the Big3 upgrade and see if I get anything different.

I have no aftermarket accessories currently hooked up to the main or auxiliary- I was planning on putting in my switchpros-8100, but delayed that to troubleshoot the low idle. No stalling issues as of today- but still low idle at stops sometimes.


Now you've got be wondering about circuit breaker between Aux. & switch-pros. [emoji106][emoji362]


Yes, Paul said no fuses are necessary between the isolator and batteries. He's never seen an Isolator short out.


The Isolator, specifically the National Luna, can handle a continuous current of 85 Amps and up to about 100 Amps for short bursts. I plan on running the winch and air compressor directly off the main battery so the high Amperage current draw from those 2 items will never traverse the controller. Since the winch can draw in excess of the controller's 85 Amp continuous rating, up to 300-400+ Amps, it is unwise to connect the winch to the aux battery, where that kind of current demand could short out the Isolator. A fuse there could help protect the Isolator but that would result in a low reliability rating of winch use when really needed since often, winching demands more Amperage than the Isolator and its fuses of 80-100 Amps.


I'm planning to run well bellow 100 Amps worth of combined accessories off my aux battery and sPOD Source, however, I am still going to protect the sPOD with a 100 Amp circuit breaker, since the sPOD's max load is 100 Amps. For high Amperage protection, I prefer a circuit breaker to a fuse because it can be reset by hand quickly and can be an advantage vs. an event you have a fuse blow where you don't have a replacement fuse available.


The instructions for the National Luna isolator actually says the 100 Amp fuses are "optional" and also states - "WINCHING (Dual Battery Controller required) Should a winch be fitted to the vehicle, power draws in excess of 300 Amps can be expected. In this case fuses 1 and 2 (between the Isolator and both batteries) cannot be fitted."


Strange that you're encountering low idle and stalling. Let us know if you figure that one out. What accessories are you running and how much total Amperage do they draw continuously? Are any accessories powered on at vehicle start up? After market stereo/amp/sub?


You may consider upgrading your alternator for increased/faster charge to the main and aux batteries. I went with the DC Power Engineering high output 270 Amp alternator which adds about 100 Amps over the stock alternator, more than enough to power accessories, charge the aux battery and handle winch and air compressor.


Their website shows 4Runners up to 2009 but they do in fact have a direct bolt-on for our 2010 to 2017 4Runners. Give Anthony a shout. He's very knowledgeable and may be able to help you solve the problem.


Here's the link to the unit I picked up: https://www.dcpowerinc.com/fit/Toyota~4Runner~2009~4.0L-V6-1GR-FE/11139-270-xp.html


I've been really busy with work and travel so haven't much time to focus on my dual battery set up. I had to order new battery tie-down hooks to accommodate the Odyssey battery since the Shrockworks tie-down hooks were too short. I had to heat u p the ends of the new hooks and bend them to match the Shrockworks style hook which is more "L" shaped than "J" shaped. The "J" shape doesn't fit in the Shrockworks tray hole.


Next up, I have to wire a new controller connector to my ARB dual air compressor that will enable control via the sPOD Source touch screen as opposed to the physical ARB switch in the cabin. More on that when I get to it.


solednoi


Sent from my iPhone using Tapatalk
 
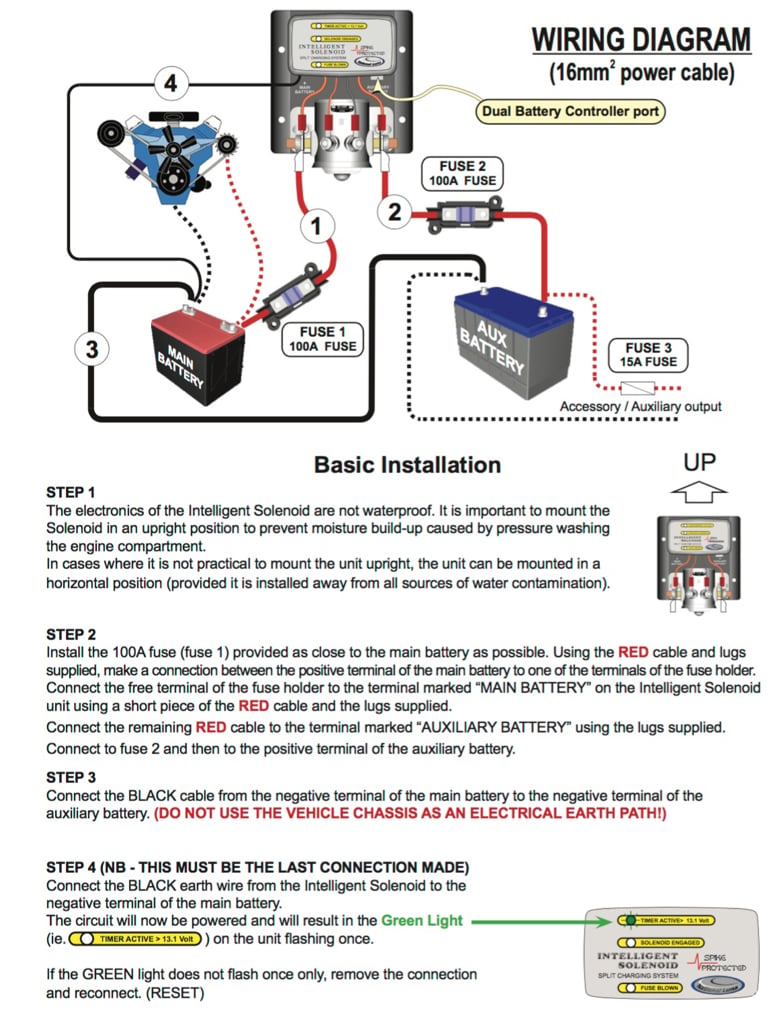
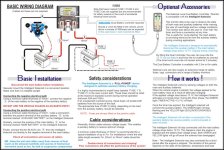
@N.Alvarez here are the instructions I had with my Isolator

[MENTION=144206]N.Alvarez[/MENTION] here are the instructions I had with my Isolator...
 
National Luna Isolator installation instructions

National Luna Isolator installation instructions
 

Attachments

  • Screen Shot 03-26-17 at 10.03 PM.jpg
    Screen Shot 03-26-17 at 10.03 PM.jpg
    143.6 KB · Views: 5,238

Members online

Forum statistics

Threads
278,316
Messages
3,554,113
Members
248,016
Latest member
Advally Service

Trending content

Back
Top