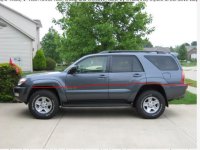
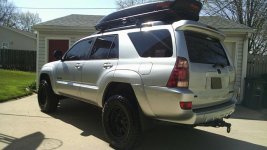
Compiled: FJ Springs Lift Info for 4th gen

For the most part yes in how they feel, but I don't think the oem rear bilsteins are a true 0"-2" lift shock to where as the new one you purchased are. Plus your better off with the new ones imho cause used rear shocks aren't the best they carry all the weight and take a beating, you could always put the used ones in drive around for a few days to get a feel for them then install the new 5100's just so you can feel it's the better option and know you didn't waste your money.
Good luck and enjoy your new set up

Thanks for the quick reply and ease of mind. I'll just keep the 5100's for the longer travel and load bearing
 
This thread was invaluable for me. Thanks to all who have contributed. I finished my FJ spring/Bilstein 5100 swap just last week and here are some of my observations:

I used the no spring compressor method and it worked up to a point, which I will get to later. First, installing the rear FJ springs (4x4 version new from MOOG) and shock was pretty straight forward. If at all possible for those who are yet to attempt this swap, get a helper! I was able to do one side by myself, but just could not get the other spring in without having my very helpful wife push down on the axle so there would be enough clearance for me to muscle it in.

Second, the front went well except for two points. The first was that with the rear already 2" higher than the front and a V8, I set the Bilstein 5100 shock to the 2.50" position, the highest one. With that setting I was unable to push the LCA low enough to get the everything in there. Perhaps the no spring compressor method works for those setting it at 0.85" or even 1.75", but not for me at the 2.50" setting. So, I took it to a Firestone auto care and half an hour and $30 later the springs were compressed on the upper mounts, which I had also bought new to replace the old ones. With that done putting the strut in its mount was actually not that hard! The second point was that I absolutely, positively, could not loosen one of the upper mount nuts on the driver side. After spending an eternity on the stuck nut over an afternoon and the following morning (AGHHHH!!!!) with PB Blaster and even a blowtorch and bending out some sheet metal from the wheel well into the engine compartment (yes, that actually had to happen) to get enough space to get a 10" breaker bar (the biggest one that would still fit in the wheel well) and 14 mm socket onto the nut, it came off. Bad luck for sure, because otherwise the front, once the strut was preassembled by the auto shop, was also pretty straightforward.

The upper mount and bushings looked no worse for the wear once I had them out, so my advice would be if you are not setting the 5100's to 2.50" then just leave the old mount in there (and not have to worry about a potentially stuck nut in an inaccessible position!) and use the no spring compressor method. Save the money and the hassle of removing the mount. For me, I would have had to get the springs mounted on the strut at an auto shop anyway because of the higher setting, so it's a good thing I already bought the new mounts.

The measurements I got before and after, both on level ground and with a full tank of gas are as follows (with the after on new Cooper AT3 265/70/R17's):

Before -- front from ground to top of wheel well fender 33", rear 35"
After -- front 37 1/4", rear 37 1/2"

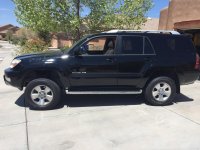
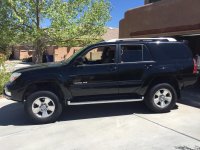
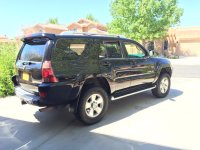
I am VERY happy I set the 5100's to 2.50". The ride is great, the best I can describe it is exactly like in the OP's post, like stock when the car was probably new, but better. Less roll when cornering, but not overly stiff or harsh. Very smooth ride. I love that it's "lifted" without "lifting" it. Nothing other than new springs and shocks. I also love that it is very close to level front to rear. Goal accomplished.

Here are some pics to prove my limited mechanical acumen. The first is after the swap but still with my terrible Bridgestone 265/265/R17's and the last two are with the new Cooper AT3 265/70/R17's:
 

Attachments

  • IMG_1309.jpg
    IMG_1309.jpg
    131.9 KB · Views: 809
  • IMG_1310.jpg
    IMG_1310.jpg
    136.3 KB · Views: 870
  • IMG_1311.jpg
    IMG_1311.jpg
    135.3 KB · Views: 812
Two tips that help with the no spring compressor method...

This thread was invaluable for me. Thanks to all who have contributed. I finished my FJ spring/Bilstein 5100 swap just last week and here are some of my observations:

I used the no spring compressor method and it worked up to a point,...
I set the Bilstein 5100 shock to the 2.50" position, the highest one. With that setting I was unable to push the LCA low enough to get the everything in there. Perhaps the no spring compressor method works for those setting it at 0.85" or even 1.75", but not for me at the 2.50" setting. ...

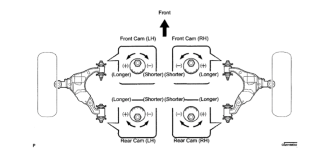
Glad you had success. The trick with the no spring compressor method, is you have to loosen the eccentric cams that connect the lower control arms to the rest of the truck. (See figure below)

lowerControlArms.png

First, mark the cams and the truck itself with a paint pen or sharpie, so that you can put them back to where they were before you started. Then loosen them. Once they are loose, and everything is disconnected, they can literally go down as far as you need... by that I mean a full 90 degrees so that they point directly at the ground, instead of pointing at the tires, and it doesn't require any force, pressure or prying. Once the cams are loose, the lower control arm will move freely as much as you want it to move.

Also, after you're done, GET A FOUR WHEEL ALIGNMENT.

Changing the suspension, changes the geometry, so your truck WILL be out of alignment. Even if it seems to ride well, if you don't get a 4 wheel alignment done, you'll see the result down the road as you prematurely wear out your tires... which will cost you a lot more than having the alignment done. Plus, I'm told if it's really off, there could be a safety issue too.

Sorry to hear about the rusted / stuck nut on the top. I have no tips there, but I'm glad you got 'er done!

I didn't change the top hat for the struts. I only changed the shocks.

Here's a tip for others. I found a set of ratcheting closed end wrenches to be invaluable to loosen and later tighten the top nut on the shock. I couldn't fit a regular socket and ratchet in the space, so I first used a crescent wrench, and it took FOREVER. Later, after I bought the ratcheting closed end wrenches, it went SOOOOO much faster, and was much easier too.
 

Attachments

  • lowerControlArms.png
    lowerControlArms.png
    113.3 KB · Views: 1,157
Last edited:
Tips and video for replacing struts without using a spring compressor...

The trick with the no spring compressor method, is you have to loosen the eccentric cams that connect the lower control arms to the rest of the truck. (See figure below)

Search youtube for videos. Here's a link to a great youtube video for this method on a tacoma. It's the same on the 4Runner.

This youtube video series (parts 1, 2 & 3) are also good. They are more thorough, and have a real person speaking, and showing you what to do and how.

Here's a second figure that shows more parts with more clarity.
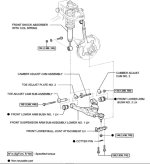
aaSuspension2.jpg

This image also specifies torque settings as N*M (kgf*cm, ft*lbf).

From this image, you may even be able to visualize how the no spring-compressor method works.

Look for a complete description about jacking up the truck, and supporting it on jack stands, and removing the tires.
I'm assuming you've already done that in this write up.

Next, you remove the two bolts at the very bottom of the picture, and move the brakes out of the way.

Then you support the lower control arm near the "front lower ball joint attachment" using a floor jack or a bottle jack. Jack it up a little bit, so it really supports it, or even compresses the spring a little more (a 1/2 inch to 1 inch is fine. Don't measure... it's approximate).


Now mark the settings (on the cam and the frame) for the "toe adjust cam assembly" and "toe adjust plate No. 2", and the "camber adjust cam assembly" and the "camber adjust cam No. 2".
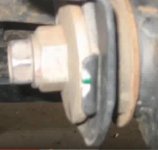
aaa2_markingTheCam.jpg

Then loosen all four of the cam nuts and bolts. This part loosens up the lower control arm, so that it will be able to swing freely.
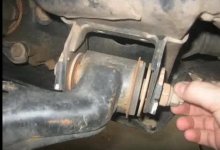
aaa1_looseningTheCam.jpg

Now, remove the nut from the top of the shock absorber. Just the 1 nut on the very top.
The shock absorber (or part of it) may start to spin, instead of the nut turning. If this happens, you will find a place on
the shock itself that is shaped so that you can hold it from spinning using a open ended wrench (or possibly large pliers in a pinch, but
the large pliers will mar the metal).

Next, SLOWLY lower the jack that is supporting the lower control arm. As you do this, the spring around the shock will decompress, letting all of the pressure off of it.

Now you can remove the nut and bolt that hold the bottom of the shock absorber to the lower control arm, and remove the shock and coil spring completely.

The lower control arm can now move freely and go down as far as you need it to. aaa3_lowerControlArm.jpg
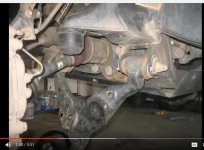
Reassembly is the reverse. note how the coil springs sit, and don't forget that FJ cruiser springs have different springs for passenger and driver side in the front. (the rear springs are the same).

Also, as you install the new shocks with springs, you may have to guide and "aim' the top of the shock to make sure that it's aligned with and actually passes through the hole in the center of the top hat, so that you can put the bushing, washer and nut back on.

Hope this helps.

-Phil

 

Attachments

  • aaSuspension2.jpg
    aaSuspension2.jpg
    64.2 KB · Views: 4,794
  • aaa1_looseningTheCam.jpg
    aaa1_looseningTheCam.jpg
    37.7 KB · Views: 1,287
  • aaa2_markingTheCam.jpg
    aaa2_markingTheCam.jpg
    22.9 KB · Views: 1,282
  • aaa3_lowerControlArm.jpg
    aaa3_lowerControlArm.jpg
    46.6 KB · Views: 1,358
Last edited:
Fwiw I have a cheap set of spring compressors I bought from Sears many years ago. I had absolutely no problem compressing the springs far enough to assemble the coilover before installing. It's safe and easy if it's used properly
 
Thanks for posting those pictures pj. They really help to visualize the whole suspension assembly. Do you need to support the hub after you lower the LCA?
 
Glad you had success. The trick with the no spring compressor method, is you have to loosen the eccentric cams that connect the lower control arms to the rest of the truck. (See figure below)

Pjbrownva, thank you. People on this forum are so knowledgable and helpful. I wouldn't have even known about this swap if it wasn't for them (and you!). I read the advise about loosening the eccentric cams but dismissed it because of my fear (now unproven) that I would irreparably damage the front suspension since I had no previous experience with it. Your write up, diagrams and pictures are going to be very helpful for others since as you point out, it is pretty simple and the LCA will swing all the way down. Great advice. And Bromeo, I supported the hubs with a 20" piece of 2x4 I had cut for me at Home Depot for $1.75. Worked just fine.

I did get an alignment when I took it in to get the new tires and they told me that the "toe" alignment (new to me at the time, they kindly explained it to me) was way off and fixed it. I've been going to this shop for years and trust them and they said everything else looked good. But you are correct, the alignment was an absolute must.

I did persevere on that stupid nut and yes, I got 'er done! However, with your advice on the eccentric cams and after taking the upper mounts out and seeing that they looked pretty much new (surprising, but I suppose that's Toyota quality for you), if I had to do it again I would not get the springs pre-compressed at a shop, save the $56 on new mounts and would simply lower the LCA all the way down and keep the upper mounts in there. WAAAAY easier. But it's done now and I'm happy and my wife thinks I'm some kind of manly superman for doing all this work myself (who am I to inform her how wrong she is?), so it's all good. :)
 
Fwiw I have a cheap set of spring compressors I bought from Sears many years ago. I had absolutely no problem compressing the springs far enough to assemble the coilover before installing. It's safe and easy if it's used properly

Also, some the big chain auto parts stores (like Autozone around here),
will loan you spring compressors & strut compressors for free.

The way it works is they charge you the price purchasing the tool (about $100, IIRC). Then when
you return it, they refund your money.

This isn't some buy-it, use-it, return-it scheme that you're running on the store.

It is intended to be a free loaner tool from day one.

That's just how they handle it. So if you don't return the tool within the specified time frame,
they don't worry, because you already bought it!
However, the time frame is generous (although I don't remember exactly how long they gave me).

Even given that option, I prefer the no spring-compressor method for the front.

However, I will confess that when I later went to remove a 1.5" daystar spacer from the rear passenger's side, I had difficulty removing the spring (I didn't have a helper available), so I borrowed and used a spring compressor. I only slightly compressed the spring, and I wasn't fully comfortable (you can get seriously hurt or even killed if they pop off of a compressed spring), but I got it done, and no-one was hurt. However, I would strongly recommend a second person to help over using a spring compressor, if you can get that to work for you.

And if you can't get it to work, a professional mechanic is worth the money. They are trained and use these tools regularly (plus, they may have higher quality spring compressors than the loaners that you get). It's not worth risking life and limb if you're not familiar with how to safely use a spring compressor, or by using an inexpensive one that might fail or slip off during use.

Just my $0.02.


Also, regarding the rear 1.5" spacer. I initially had the rear 1.5" spacer on both of the rear coil springs.
Because the driver's side has extra weight from the driver itself, I read on this forum that some people like to put the 1.5" rear spacer in ONLY ON THE DRIVER'S SIDE, and leave it out on the rear passenger's side.

I tried this, and low-and-behold, it leveled out my truck in terms of left-to-right height. Now, the hight is exactly the same when measuring from the ground to the fender well on both the rear passenger and rear driver's side.

Just another tip, both regarding coil springs, and regarding rear spacers.
-Phil
 
Last edited:
When I did my rears with the Daystar and fj spring I had a buddy helping push down the hub while the opposite side was jacked up and I still BARELY got them in with the springs being compressed. I have no idea how you guys do it without compressing the rears lol
 
You have to pull the shocks off and also disconnect the sway bar so there is enough free play. Then you can push down on one side while someone slides them in. I've done mine a couple times and I have my 15yr old son stand on the hub and slide them in. Usually I have to pull down slightly with one hand on the axle tube for that last little push to get it in all the way.
I also let the whole axle hang, I don't put anything under the opposite side to hold it up.
 
You have to pull the shocks off and also disconnect the sway bar so there is enough free play. Then you can push down on one side while someone slides them in. I've done mine a couple times and I have my 15yr old son stand on the hub and slide them in. Usually I have to pull down slightly with one hand on the axle tube for that last little push to get it in all the way.
I also let the whole axle hang, I don't put anything under the opposite side to hold it up.

Ditto.,,,minus the 15yr old, lol.
 
I'm sure this has been discussed before so just point me to that thread. Those of you who are "leveling" your ride, what point of references are you using for this task? Another words, how do you know when you're actually level?

At a distant glance, it looks like the front and rear wheel well openings have the same amount of opening. This is not the case on my landcruiser, where the opening of the front wheel opening arch is way higher than the rear opening arch in order to accommodate the front tires going up/down while turning.

Is this an accurate assessment?

edit: a uploaded a crude representation for illustration purposes.
 

Attachments

  • 4runner.jpg
    4runner.jpg
    61.3 KB · Views: 1,010
Last edited:
When I did my rears with the Daystar and fj spring I had a buddy helping push down the hub while the opposite side was jacked up and I still BARELY got them in with the springs being compressed. I have no idea how you guys do it without compressing the rears lol

I did what t-man said and had my wife put literally all of her weight on the hub to get the second spring in and I barely got it in. But it did work.
 
I'm sure this has been discussed before so just point me to that thread. Those of you who are "leveling" your ride, what point of references are you using for this task? Another words, how do you know when you're actually level?

At a distant glance, it looks like the front and rear wheel well openings have the same amount of opening. This is not the case on my landcruiser, where the opening of the front wheel opening arch is way higher than the rear opening arch in order to accommodate the front tires going up/down while turning.

Is this an accurate assessment?
Most measure the wheel well opening. Some the frame. I feel the wheel well is closer and the look will be right. If you measure the frame so it's the same front and rear it will look nose high IMHO. The stock rake is pretty drastic. I aim for the rear to be 1" higher personally because then if you put weight in the rear it's sitting level.
 
I'm sure this has been discussed before so just point me to that thread. Those of you who are "leveling" your ride, what point of references are you using for this task? Another words, how do you know when you're actually level?

At a distant glance, it looks like the front and rear wheel well openings have the same amount of opening. This is not the case on my landcruiser, where the opening of the front wheel opening arch is way higher than the rear opening arch in order to accommodate the front tires going up/down while turning.

Is this an accurate assessment?

alia, on the 4runner, the point of reference for me and most of us is to measure from the ground (level, of course) to the center top of the wheel well fender. That gives an apples to apples comparison of if your vehicle is slanted towards the front or the rear and disregards any difference in space in the wheel well above the tire (which may be arbitrarily higher in one or the other but has nothing to do with which direction your vehicle is raked) .

In my case the before measurements showed that the rear center top of the fender was 2 inches higher than the front. After the FJ spring swap and setting my Bilstein 5100 front shocks to the 2.50" setting the same measurement showed that the rear was 1/4" higher than the front. Looking at it in person it looks level.
 
[MENTION=119796]alia176[/MENTION] On the 4th Gens the rear wheel well is actually bigger. To truly "level" the vehicle measure either the running boards right behind the front tires and right in front of the rear tires to the ground. If you do not have running boards, measure the straight lip right under the doors under the kick panel. Here is a "worksheet" of my truck for reference when when I was trying to level it out and replace the rear springs.

Screenshot_1.jpg~original


I have now added new rear springs and the vehicle looks level, but my measurements are actually RF = 38 3/4" and RR = 40 1/4". Not a great pic on a slightly sloped driveway.

100_3286.jpg~original
 
ahhh, got it. I still have my running boards on the rig and will use them as a point of measurement. I'll level the rig with a floor jack and a 4' level on the running boards then see how things look. Thanks for the info.

Normally, I don't measure from the ground up to the fender lip but use the center of the axle to the fender lip. This way doesn't rely on the tire sidewall bulge/air press/etc to mess up my spring lift measurements.

Thanks again for the info.
 
Last edited:
Here is my latest pic. Details in signature.

Wow, great looking rig, slvr. It looks nice and level with the spacers in the rear. Good to see someone else with the 2.5 Bilstein setting. I still don't know why I got such a high lift in the rear without using spacers (maybe because I used Moog FJ springs and not OEM FJ springs and they're not exactly the same), but mine without spacers and the 2.5 setting looks level. :wacko:
 
Last edited:

Members online

No members online now.

Forum statistics

Threads
278,316
Messages
3,554,121
Members
248,016
Latest member
Advally Service

Trending content

Back
Top