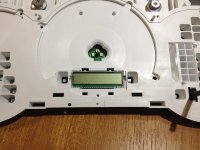
DIY: Interior LED swap (cluster, HVAC, switches, window, *steering wheel)

Awesome! Thanks for the help. Just ordered some. About how long did it take for yours to show up?

10-12 days I think, have ordered a few times with him. Bases or soft, and a tight fit. Take time when installing. Again, when you insert if proper side, you barely have to turn them.
 
10-12 days I think, have ordered a few times with him. Bases or soft, and a tight fit. Take time when installing. Again, when you insert if proper side, you barely have to turn them.

Finally got them and seems like some work and some don't. Should I try flipping the ones that didn't work around? I didn't think it mattered which way they went in?
 
Finally got them and seems like some work and some don't. Should I try flipping the ones that didn't work around? I didn't think it mattered which way they went in?

Yes flip the ones that don't work, led's need to be with the correct polarity. That's why I attached a pic with positive sides!
 
airbag LED in the center console and cautions

The Air Bag / Passenger & Security lights in the HVAC cluster are 5MM Red LED's and can be desoldered and swapped without removal of the LCD.

I permanently removed the Passenger LED, and changed the Security to Blue.

Biggest danger in swapping out the lamps & LEDS in the HVAC panel is the 3 ribbon cables that connect the switch clusters to the circuit board. The cables are narrower than the edge connectors that they plug into, they are centered in the connector by a blue/clear piece of plastic glued to the backside of the ribbon cables. I suspect the glue dried up over the years (2004 model) and if not plugged in correctly, you will fry boards. 1st fried the center control, second error fried board holding the main connector. I await a new panel from ebay.


QUOTE=darkie3495;375287]
Also, to replace the airbag LED in the center console, you need to get this one 0603 SMD LED - Sapphire Blue UT-692NB UT-692NB for $1.35. I haven't done this yet because once you open it up, you'll see why. the only way i can see to do this is to desolder the temp LCD from the PCB and i haven't had time to do this. plus screwing it up will cost big time.[/QUOTE]
 
Word! Thanks dude, yeah I had really no idea on the resistors. BTW do you kno what bulbs are in the cup holders an the gear box? And the arrows for the HVAC, are they the same as the gauges?
Cup Holders and Center Console Shifter were both 74's, as are the directonals, and glove box
 
I want to do my cluster on my 2006 Sport so bad, I'm just scared I'm gonna order the wrong bulbs. I need to do the Check engine and all of those bulbs too, and from the 30-40 pages I read I didnt see anything on those.
 
I want to do my cluster on my 2006 Sport so bad, I'm just scared I'm gonna order the wrong bulbs. I need to do the Check engine and all of those bulbs too, and from the 30-40 pages I read I didnt see anything on those.
Seriously?! The entire cluster uses plcc - 2 LEDs, the info is all over this thread.

Sent from my Pixel 2 XL using Tapatalk
 
Seriously?! The entire cluster uses plcc - 2 LEDs, the info is all over this thread.

Sent from my Pixel 2 XL using Tapatalk

I mainly meant quantity. Should have specified. I know 15 of the White for the backlight/etc. But not sure for the red/yellow for check engine and such.
 
I was a little worried about pulling the screen out. i was scared it was going to break. mine was a little tight, but it pulls straight out.
 

Attachments

  • IMG_1953.jpg
    IMG_1953.jpg
    133.1 KB · Views: 925
Last edited:
Finished my full LED conversion this weekend. Got the final piece in which was the new head unit.

22490124_10155865954882990_1231273147163150473_n.jpg


WMOcO1Ss3tXAz5BBKOw7rjltJL63b9gEOWcweRWbAxW8pdi0y21mP1lGVsFwZxfvhOJ_rx9bzCyjyTdlmeBhy1wbRBu0ooYuWB_yEWAAeLlgCAlijvgueU3-HyZuUMcu8Ho_xFUfd7J46pFjGc_U_n3YbVh5cW2UKhanKoTkXtQe-fQQfijCv-9waXHEcImA2_TvYW17vwvy9ZAmRtkkTDZwbs2fJ3j3wRSe9ok1CKcc6R8q1XFiU37h_zeG1Pa7dQXkr7xnejWQAmsfWv0cCLugTRHx1kasDxP1pxroy_CbzfHy21lsNqFTtCKgC3sGkqnKPBwPrup46RsQk9dqFSaEWkGzz98KDm_RkdmYRfPJMQqClZyV5VUqCLjgHFPux9EwfoI9_I-8PpoU0ZllGs3b55oSQoKfRf-MZg505eCJoF6UGrE4LadJ-V14rM44fF8b1zGw2DI1G4uCf5jofr2MTL1A0o56RtqkZ0JIJbovJTja0gE8OB7BVLAsmVi02iu3jmnHAv5_6gWDOIBEopVVXmQKZNiTDMyIwVCRcJ0BqoVk-qd9RLUoJDKzBdY4zcYHS2W3NAlLvuTAFTB7L0JlYNsmrRVRxXHss4cKnzQ=w1117-h556-no


0V9Yz6rgH6Kl7TBcpM1Kg6Bp2JsE2aLENoiwlUviWwQ9VCY2ol00YVk1h0ryalt6MbuS_wACFwSdVhbRGDPwVo904bIpmNo3P0uZWW1FOYFzybxw_2FmSKtXZsRtONuGCN-jl36g0odkbgg_VcTYnefxqCNQBb-uVbmgT423dkDsmGFAPdl_KjcBE9Jbtevg2l0ZUxNOm2DACPta_bSRRlqRaG-gm7c_AVAldDQFU6WOJ0YogUWlyREkC3sb0y7UShjjLTXNKeROcEaEdvQBpY_64xWVuqLkTCKSS9plzopdI5loh86VmQ02P5WEZd1eJrj92-JBwMt-69ZR2NaUKNJvmm7OuZ2ww8PHrpFRNHKsDumb7zWwMLY1E_eMOiR-RLZuOqW8ihkvsFnSCHJB1s7mON5jfPEyMuLS7U74Z7u_x-7C-lPxhxTgC79w5r7mp12_IidUjiWvz6MA7-S1U3RN8FrjNPD_EXfQePoZiuLb1aQWvpofa2n8lwEMDP-HaU6DFfAb6nIjIcJGY54P0eK_NlOxjzeeiCgKXjYXcaSxhVAG_t2aorfRwkVoDl0_ZJCit3kb3Y9dnTlCyNaC8XAopntYEh-SqF1H0zQrgOM=w486-h789-no


Make sure you clean and polish the plastic cover while its off. I don't know why but all the ones I've seen are pretty scratched up.

before
22539890_10155865954917990_5731847814682065193_n.jpg


after
22549731_10155865954897990_1242406658700261514_n.jpg
 
Finished my full LED conversion this weekend. Got the final piece in which was the new head unit.

Cluster looks awesome! I was going to a mod that keeps the cluster at FULL brightness (when the lights are turned on) and just replace the clear lens. Mine isn't as bad as yours, but I hear it scratches up easy.

Nice job!
 
Cluster looks awesome! I was going to a mod that keeps the cluster at FULL brightness (when the lights are turned on) and just replace the clear lens. Mine isn't as bad as yours, but I hear it scratches up easy.

Nice job!

Thank you and yes they do scratch very easily. I wished I would have clear coated them while they were out.
 
Awesome write up. I've got a few questions...

1. Are we able to touch the guage face without damaging it? I was planning on sticking a piece of painters tape to line up the needles, prior to removing the needles.
2. Is there a trick to pushing the LCD ODO back in? I'd imagine the border of the ring is very thin...
3. For the HVAC... My temp up bulb has gone out, but every tutorial i've read through so far says that there's only 1 bulb??? That just doesn't make sense, as the other buttons (down temp, auto,) work.Found my answer!

Edit:
Since LED's use less power, does the dimming function still work?

Thanks
 
Last edited:
Awesome write up. I've got a few questions...

1. Are we able to touch the guage face without damaging it? I was planning on sticking a piece of painters tape to line up the needles, prior to removing the needles.
2. Is there a trick to pushing the LCD ODO back in? I'd imagine the border of the ring is very thin...
3. For the HVAC... My temp up bulb has gone out, but every tutorial i've read through so far says that there's only 1 bulb??? That just doesn't make sense, as the other buttons (down temp, auto,) work.Found my answer!

Thanks

I have a similar issue, the up and down aren't lit, what is the answer you found?
 
I have a similar issue, the up and down aren't lit, what is the answer you found?

From what i've gathered, we'll need to remove the actual "ball" that has the buttons on it from the HVAC unit to access the LED's. My only question know is whether the bulbs are soldered onto the PCB or just tied on like the NEO3 bulbs.

Here's a list of bulbs...

And....

This thread has the info about what i'm talking about. Check the first page for removing the "ball" with the buttons, and second page with the PCB and LED's for the individual switches.
 

Members online

Forum statistics

Threads
278,316
Messages
3,554,120
Members
248,016
Latest member
Advally Service

Trending content

Back
Top