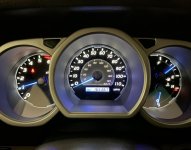
DIY: Interior LED swap (cluster, HVAC, switches, window, *steering wheel)

[MENTION=143921]Obi Wong Kenobi[/MENTION]

Thanks Brian! It was a pleasure working with you!
[MENTION=312727]dahveeed[/MENTION]

David I’m assuming! Just shoot me a PM and we can talk!


Hi Sparky.I am very interested in swapping my ugly yellow leds with white and add blue arrows.Can you please PM me,i have no idea on how to PM you since i havent been on the forum for quite a while and a lot of interface changed so i can not understand where if the option to PM(im sure its simple lol).My old nick name was (Beliy25)I made those rubber fender flaps inside wheelwell.A lot of members from here got them from me.

Thanks for your time.
 
That’s strange, I can’t PM you either. I am taking a little break from the jobs. Have a few people in line. Work is kinda crazy, get a few posts in and we should be able to start PMing
[MENTION=487925]WhiteSteam[/MENTION]
 
Instrument Panel Gauge Dashboard Colored Led Bulbs Lights Lamps

These guys have them, several to choose from and a little pricey.

I think I ran warden out of led’s.

So any of the short T3/T4 bulbs on this page should work? 2x T4 for the display and 6x T3 for the HVAC controls, right?

Neowedge Instrument Panel Gauge Colored Led Bulbs Lights Lamps | Autolumination

I tried the superbrightled bulbs from this link and none of them are working for me in any of the spots.

NEOx LED Bulb - High Power Instrument Panel LED | Super Bright LEDs

I really want to avoid doing the 12v mod if at all possible. Just looking at doing the HVAC controls for now as I really don't want to pull the gauges out and I don't have the skill to replace the soldered in bulbs.
 
So any of the short T3/T4 bulbs on this page should work? 2x T4 for the display and 6x T3 for the HVAC controls, right?

Neowedge Instrument Panel Gauge Colored Led Bulbs Lights Lamps | Autolumination

I tried the superbrightled bulbs from this link and none of them are working for me in any of the spots.

NEOx LED Bulb - High Power Instrument Panel LED | Super Bright LEDs

I really want to avoid doing the 12v mod if at all possible. Just looking at doing the HVAC controls for now as I really don't want to pull the gauges out and I don't have the skill to replace the soldered in bulbs.

Did you turn the ones from superbright 180 degrees and try again? They should work in the hvac controls. all of those connections are 12v. if you have a 9 volt battery you can test the leds to make sure they work. (use some wire) The "high" power that you bought only work 12v

I haven't used the ones from autolumination yet. But thats who i will start buying from once I start the business back up. My last supplier doesn't sale them anymore. I would buy the ones with the acrylic tops on them. Thats what used to work in display without the 12v mod. These

Neo - Wedge LED Instrument Panel Bulbs Type A, B & C

(Note to choose the correct bulb, measure the diameter of the base) 79609-S5A-003
 
Did you turn the ones from superbright 180 degrees and try again? They should work in the hvac controls. all of those connections are 12v. if you have a 9 volt battery you can test the leds to make sure they work. (use some wire) The "high" power that you bought only work 12v

I haven't used the ones from autolumination yet. But thats who i will start buying from once I start the business back up. My last supplier doesn't sale them anymore. I would buy the ones with the acrylic tops on them. Thats what used to work in display without the 12v mod. These

Neo - Wedge LED Instrument Panel Bulbs Type A, B & C

(Note to choose the correct bulb, measure the diameter of the base) 79609-S5A-003

Your links didn't work.

I did flip the bulbs around for the HVAC controls but they still didn't work. I'll check them with a 9v later tonight.

Thanks for the help.
 
Your links didn't work.

I did flip the bulbs around for the HVAC controls but they still didn't work. I'll check them with a 9v later tonight.

Thanks for the help.

Those aren't links, just title of which bulb to try. So many on the page hard to describe which to use.

That's strange they didn't work, definitely test them. Do you have a voltage meter to test the HVAC?
 
Those aren't links, just title of which bulb to try. So many on the page hard to describe which to use.

That's strange they didn't work, definitely test them. Do you have a voltage meter to test the HVAC?

Gotcha. I tried the superbrights again and still no luck. Tested them with a 9v like you suggested and they do work. I have a multimeter so will check the board this weekend. Order some halogen replacement bulbs in the meantime so I can hopefully see everything again while I try to figure out the LED part.
 
Those aren't links, just title of which bulb to try. So many on the page hard to describe which to use.

That's strange they didn't work, definitely test them. Do you have a voltage meter to test the HVAC?

Seen some of your work. Looks great! I will definitely be reaching out when the time comes!
 
I tried to attach a pic so hopefully it shows up. I’m trying to see what model comes with this cluster. Instead of the background being all black this one also have some grey rings.
 

Attachments

  • 34A4EE34-401C-45C3-B101-2C09E1C8A81B.jpeg
    34A4EE34-401C-45C3-B101-2C09E1C8A81B.jpeg
    122.2 KB · Views: 1,536
I tried to attach a pic so hopefully it shows up. I’m trying to see what model comes with this cluster. Instead of the background being all black this one also have some grey rings.

Not sure why you are interested in which model comes with that cluster. I'm sure you know that is not how they come from the factory. That looks to be an SR5 or Sport. Limited clusters are a little different. IN any case, whatever color you want it to light up is completely up to you regardless of whether it is an SR5, Sport or Limited. The way they come from the factory is kinda dated (orange/yellow light) looking, and changing it refreshes it bigtime.

Good luck
 
Wow i just finished reading all 111 pages, or at least mostly, that was a feat in of itself.

I am interested in having someone do my cluster in the next month or so. I see that sparky is taking a break. Is there anyone else actively taking orders. Yosh are you still doing it?

I am in California.

Also, for the LCD screen. I see that some of these LED's may work. Does anyone know which one in particular will work, i know it needs to be T4 and not 12v.

Neowedge Instrument Panel Gauge Colored Led Bulbs Lights Lamps | Autolumination
 
Wow!! Hella gravedigging on this post haha! Been a min! Get this done tho, it was my favorite upgrade I did in my 4G! It COMPLETELY changes the look and feel inside! My buddy did mine and it seemed super simple! Granted it was about 14 years ago haha! The ac and temp knobs are super simple too! You will love it for sure!
 
Wow i just finished reading all 111 pages, or at least mostly, that was a feat in of itself.

I am interested in having someone do my cluster in the next month or so. I see that sparky is taking a break. Is there anyone else actively taking orders. Yosh are you still doing it?

I am in California.

Also, for the LCD screen. I see that some of these LED's may work. Does anyone know which one in particular will work, i know it needs to be T4 and not 12v.

Neowedge Instrument Panel Gauge Colored Led Bulbs Lights Lamps | Autolumination

Hey man! I have not tried these, but I think they may work on the 6v. Not 100% on that Instrument Panel Gauge Dashboard Colored Led Bulbs Lights Lamps go to the 33rd section down. Has an acrylic top.

I have been taking a break. Considered coming out of retirement, but COVID luckily has me working a lot. One day I’ll come back. When the mod bug starts back I may. [MENTION=30225]yosh2000[/MENTION] and I have helped each other at times, with either questions or customers. He may still be doing it, not sure.
 
HVAC assembly tear down.

I hate my life, but whatever.............

In my never ending quest to have what I want, I finally got some time to rip apart the HVAC assembly that I butchered years ago. I got a doner HVAC assembly about a year or so ago b/c I knew that by completely gutting the plastic base for the lighting (in order to accomodate the LED strips I put in), I would need an untouched one. WELL, I got one from an '03 hoping it would be identical, but it wasn't. Remember that in '05, Toyota installed "smart airbags" and so the circuitry of the passenger airbag light was slightly different and so was the circuit board on which it shares with the HVAC controls. Yay (stab me in the eye please)

I want to share this with anyone who wants to tear it apart like I did. IT'S NOT FOR THE FAINT OF HEART. Lots could (almost did) wrong.

Not going to go into how to take it the back side apart, it is self explanatory.

BUT, here is a great thread on how to do so (helped me): How to take apart the 4th gen A/C controls

After taking the backside off, you need to take off 3 screws that secure the circuit board in place. Then look to the 3 ribbon cables that need to be detached from the board. Very easy, on the sides there are locks that need to be lifted, then carefully lift the ribbon cable itself. They are very ridged, but still be careful (break these and it's game over).

MX5UMp4l.jpg


Another angle
GDwI2Ejl.jpg


There is a ribbon cable that runs down the toward the bottom of the assembly, there are 2-3 screws that secure it. Remove them (no pics).

You will then observe the pins that run to the display screen. Yep, those pins are secured by (surrounded) white plastic that need to be dremeled out. Again, be careful, BUT they are ridged as well (I hit them with my small attachment but nothing happened. If you don't have a steady hand, don't even try this).

cNPiOrkl.jpg


After dremeling the plastic tabs out of the way (took me 5 minutes), you can carefully bend the pins so that the screen can be pushed slightly aside. While doing this, the buttons of the "mode/reset" will come apart AND you need to be careful of the LEDS that are in "ridges" (on the opposite side of the clock controls) in the assembly. If you are not careful, you will rip them off the board.

After/Before
d7xDn7Jl.jpg


AS you can see what I did, I gutted the back side of the assembly so I could lay down some LED strips. I glued a rectangular piece of plastic (I had a ruler that was the perfect size) that I used as a based for the strips. Doing this permanently altered the assembly so I couldn't bring it back to normal.

Back side: (observe they are nearly identical, but have slightly different back side toward the passenger airbag light, I had to shave off some plastic so the white plastic wouldn't hit a chip on the board when fully installed. Also, you loose a screw that secures it to the board, no biggie really)

zslXYwml.jpg


A look at the difference between an 03 and 05 (note the left side of the board, it is different). Also note the top one (from my 4R, the display screen is darker due to the polarization film)

1g7SJN0l.jpg


when the board is laid down and screen popped in. As I mentioned, you loose a mounting screw, but it IS secure.

cSR1U68l.jpg


After you screw and tighten everything up, proceed to install stock bulbs or 12V LED (me). I got these from [MENTION=210043]Johns06yota[/MENTION]. Practically plug n play, but do notice that the wired part of the base (LED) has a wire on it, this is the negative (99% sure). This part has to come into contact with the negative part patch of where the stock bulb goes or it won't turn on (LEDs are polar sensitive remember). I haven't reinstalled it yet, b/c my bases are covered in solder from the last time I had someone reled them. Very messy. Anyway here are some pics:

PqbhSErl.jpg


Positive/Negative:

This wire on the base is the negative:

v4KlKBgl.jpg


Base polarity (this picture is before the assembly was reledded. Person who did this was very sloppy......urghhhhhh)

Xc54JO2l.jpg


So to sum up, if you want to install LED strips in the back of the display, please don't. It will look like this (crap):

BARF
Vc99JZGl.jpg


If you do the reverse polarization mod, be sure to get a 12V LED to light it up, b/c if not, the display will be barely noticeable during the day. I'll post pics when she is all installed and sorted out.

 
Last edited:
Figured I’d post this here hoping somebody can help me solve this problem...

My HVAC LCD screen has been out for a while. I thought it was just the bulbs. I pulled it apart today and it looks like just the LCD part is not getting any power to the lights. The LCD does display i to, both the lights aren’t getting power. (Tested with a multi-meter to verify)

The controls on both sides and the HVAC controls all light up find and are getting power.

Any ideas why just the LCD lights aren’t getting power???

Not sure if you are still working this so many months later. I'll share a short story here. I found the same issue with the backlight bulbs not getting ANY juice to those twin holes with the copper pads. All of my other LEDs (a SuperBright kit) with the NEO3s worked fine once the polarity was found out.

I ended up running a hot and neutral jumper from the smaller bulb that lights the reset/mode to the twin backlight LCD bulbs. Here is where I may have gone wrong, though:

I assumed the contacts the twin bulbs touch were no longer part of any functional circuit on this board. I figured I had trashed some trace I couldn't see in my disassembly. I now have a really baked resister (R1 on the board) and noted how hot it had become one afternoon. I haven't traced the whole board (anyone have a schematic for this board from the 2003 SR5?) -- before I can put it back into service, I'll fully isolate the wiring of the twin LCD backlight LEDs -- feed them off of that reset/mode lamp.

I'm not sure what that resister does -- I suspect it did the voltage drop from 12VDC to 6VDC that may have fed the original LCD bulbs. If I have time this weekend to trace the board, I'll drop more info here.
 

Members online

No members online now.

Forum statistics

Threads
278,316
Messages
3,554,121
Members
248,016
Latest member
Advally Service

Trending content

Back
Top