Fire's Trooper 2014 Trail TE 4runner

Aurora huh?? I might see you on the road one day. On Sunday's I pick up my son from Oswego I take 88 to eola than that down to Ogden into Oswego.

Nice looking ride man
 
Aurora huh?? I might see you on the road one day. On Sunday's I pick up my son from Oswego I take 88 to eola than that down to Ogden into Oswego.

Nice looking ride man

oh thats awesome! I would laugh if i've spotted you already and you were partly inspiration for me to purchase mine. Because I live a couple minutes off Eola and ogden! So of course anything shiny would have surely caught my attention :)
 
Ok, After a few members gave kudos to this LED interior seller. I snagged some for the 4runner and the Outlander.

18pcs Deluxe White LED Bulbs 2010 2015 for Toyota 4Runner Interior Package Kit | eBay

Just be sure to make sure the Legs of the connectors are straight before insertion.

The Vanity mirror light and rear overhead light both have brackets that utilize a "Lever action" release. I preferred to pop them out and get a firm grasp on the bulb I was pulling.


After pulling each bulb I would then turn ON the light, then lightly touch the LED to the posts and see if it lit up, if it didnt I knew to turn it around and that was the proper install orientation.


This is the door panel light disassembled and the replacement LED already inserted after a polarity test (plug in and it lights up)


im not sure if the cameras color pickup was correct, but I will see tonight. But it definitely seems more blue/purple on the spectrum.


Another thing, If you have two lights next to eachother, make sure you test the LEDs and ensure their color "matches" up. Because LEDs are manufactured in BINs so their colors will shift between production lots. I had one that was lighter blue and one that was a bit more purple hue. I knew that it would annoy me for the map lights so I swapped it out for a different location.
 
So my entune non jbl headunit would occasionally freeze up and reboot or require areboot. While I was at the dealer they then updated the unit for me via their USB system.


ok, so the speaker system in the toyota SUCKS!
its paper cone, muddy rubbish.

I ordered up some 6.5 coax's and some 3.5 JBL Coax speakers.

I used Metra 82-8147 for adapting the 6x9 door area to hold the 6.5s
https://www.amazon.com/Metra-82-8147-Speaker-Adapter-Vehicles/dp/B00IIC60ZG


and Metra 72-8104 for speaker harness adapters.
https://www.amazon.com/dp/B0002BBP7..._m=ATVPDKIKX0DER&pf_rd_r=9JPSFM6WZMBJDM6DFVB1
Except I went to best buy and had them price match them for me.


Old crap paper cone 6x9s in the door.
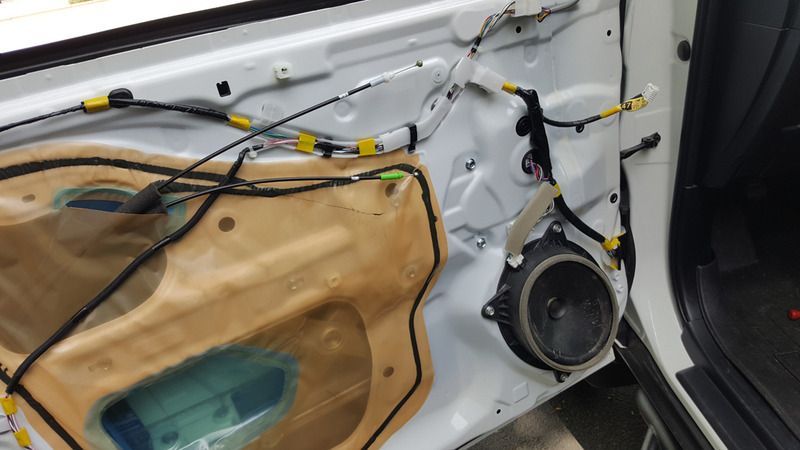

The speakers nor the adapters came with screws, so I grabbed the sheet metal screws I had leftover and was careful not to overtorque them and strip the plastic mount.
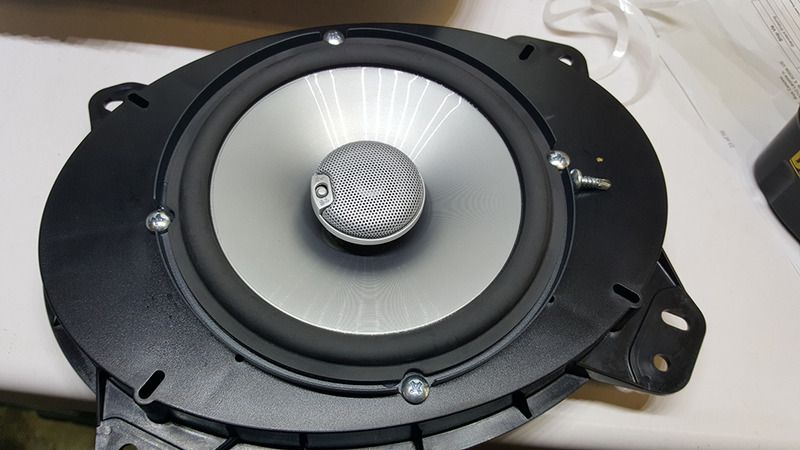

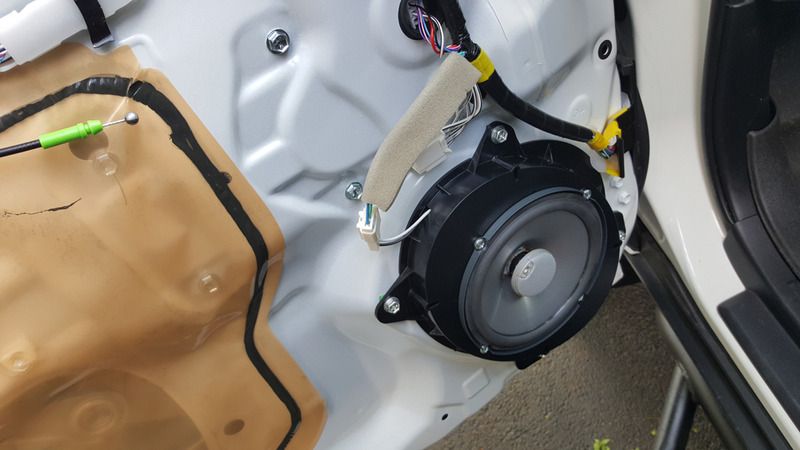
I made sure the speakers terminals were closest to where the harness was on the door.
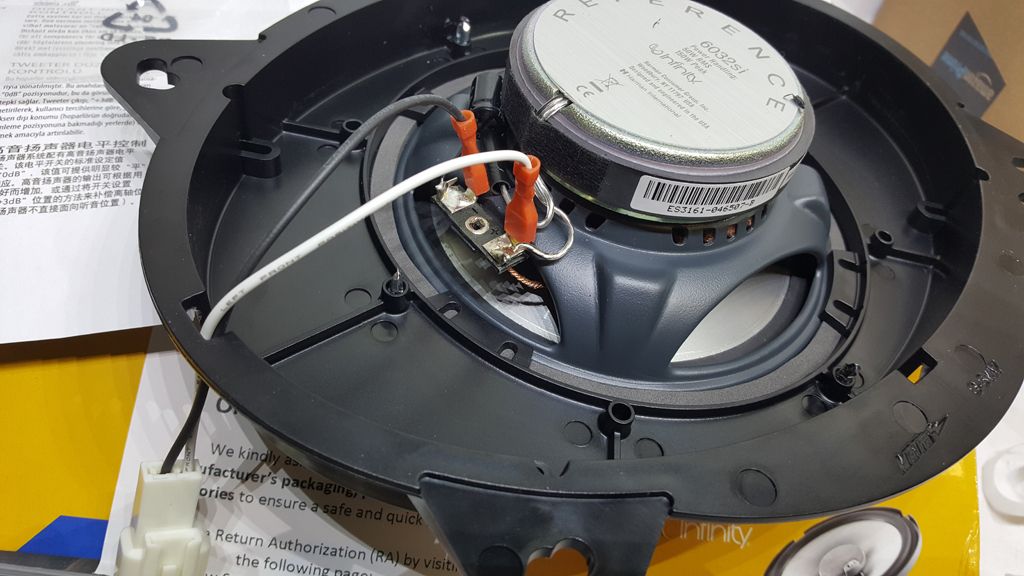

I then fed the harness thru one of the holes
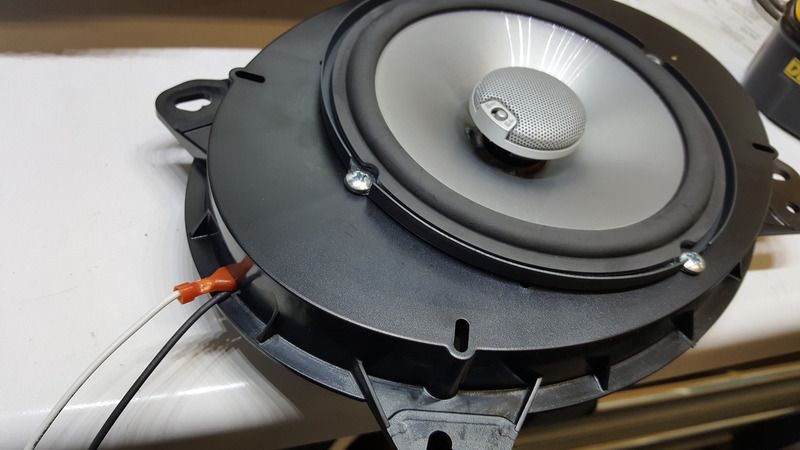


all done and installed!
 
Supplies;
10mm deep well socket
socket wrench.
soldering iron
solder
Speakers
Dremel
Dremel cut off wheel

I went with;
JBL GTO329 Premium 3.5-Inch Co-Axial for the dash
and
Infinity Reference 6032si for the front doors

I will NOT recommend the JBL because the "ring" around the speaker protrudes and if you try to remove it you can rip the surround from the speaker ring.


Be sure to test fit the new 3.5 to ensure that it will fit!


pop off the adapter with a flat head. there is black adhesive holding it on.


now you have the mounting bracket and the old speaker, remove the bracket so you can reuse it. The screws are hard so be sure to loosen the speaker screws BEFORE removing it from the car. They are all 10mm bolts.


On the speaker covers you popped off your dash, you will need to cut off that "ring" that protrudes from it. Nothing fancy, just cut it off and clean off the debris from it.

on the first speaker I used terminals, on the second I I just soldered them on.


I should have grabbed photos from the second, but I viced the blue harness, then heated up the wire's soldering point and removed the old short white and black wires and replaced them with longer leads and then resoldered those points up.
 
Last edited:
Wow pretty sweet speaker system you got going, how long did it take you to install it? It looks like it wasn't too difficult, and how much did you pay for the whole thing if you don't mind me asking
 
Wow pretty sweet speaker system you got going, how long did it take you to install it? It looks like it wasn't too difficult, and how much did you pay for the whole thing if you don't mind me asking

Ill add more info later tonight, But ill say that the second door install took me exactly 6 minutes. I was in my garage and installed the speaker onto the ring with the screws, threaded the wire harness and then did the install that took 6 minutes for the door. Also, the rain started coming down so I was on a time table for sure.

More info tonight!
 
Great looking truck and I really like your updates.

Sooner or later I am sure we will run into each other as your only about 20 minutes from me.
 
Great write up on the speaker replacement. This upgrade is on my todo list and your post will be useful. Thanks! [emoji1360]


Sent from my iPhone using Tapatalk
 
Nice Truck and thread! I live in Sugar grove and I'm going to be trying to install a CB this week. I hope to change out the speakers also somtime soon.
 
ok, so the speaker system in the toyota SUCKS!
its paper cone, muddy rubbish.

I ordered up some 6.5 coax's and some 3.5 JBL Coax speakers.

I used Metra 82-8147 for adapting the 6x9 door area to hold the 6.5s
https://www.amazon.com/Metra-82-8147-Speaker-Adapter-Vehicles/dp/B00IIC60ZG


and Metra 72-8104 for speaker harness adapters.
https://www.amazon.com/dp/B0002BBP7..._m=ATVPDKIKX0DER&pf_rd_r=9JPSFM6WZMBJDM6DFVB1
Except I went to best buy and had them price match them for me.


Old crap paper cone 6x9s in the door.


The speakers nor the adapters came with screws, so I grabbed the sheet metal screws I had leftover and was careful not to overtorque them and strip the plastic mount.


I made sure the speakers terminals were closest to where the harness was on the door.


I then fed the harness thru one of the holes


all done and installed!

Why did you go w 6.5 instead of replacing w same 6x9 size?

Sent from my SM-N910T using Tapatalk
 
typically 6.5s are shallower so easier to ensure fitment and then normally 6.5s are found to be better SQ than most manufactured 6x9s.
Oh gotcha. I didn't think we had paper cones. Now looks like something for me to replace. How's the upgrade is it much better than stock?

Sent from my SM-N910T using Tapatalk
 
Oh gotcha. I didn't think we had paper cones. Now looks like something for me to replace. How's the upgrade is it much better than stock?

the stock sounded, "muddy" like the clarity was not there. Now of course with the replacement the "bass" isn't there as much but the SQ is so much greater I am pleased and can listen to music whereas before it sounded like it was clogged
 
So I was getting tired of the silver in the front of the truck so I decided it was time to plasti dip it.
I know some folks do it while mounted, but I felt it was less work to pop it off and spray it on some paper.

I took off the top cover piece in the engine bay via the pop clips & single 10mm bolt.
I then pulled forward (forward not up) on that top bumper piece to un pop it.

After removing the single screw you then need to pop the two retaining tabs to release the front emblem
(I put the screw back in to show where it was attaching to the emblem piece)


Retaining Tabs


The actual emblems tabs are pretty stiff so I would recommend using a small flat head to slowly apply pressure to release the tab. Be careful so you dont snap it.


Remove the emblem and clean it up and degrease it.

lay it on some paper and go to town on it, make sure to hit it from different angles and clean the nozzle in between coatings.


throw it back on and admire how good looking it is.


Members online

Forum statistics

Threads
278,310
Messages
3,554,079
Members
248,016
Latest member
Advally Service

Trending content

Back
Top