paddlenbike's Build Thread

Wow. It's awesome you got to see some snow. When I went in Jan. there was no snow.

I didn't make it to Dante's View when I visited the park. Thanks for the suggestion.
 
Time for some preventative maintenance. Here's the parts list and prices for new Toyota lower ball joints (LBJs), bolts, LBJ protectors and outer tie rod ends for a 2000 V6 4WD.

43340-39465 - LOWER BALL JOINT 4-Runner; Left - $88.64
43330-39585 - LOWER BALL JOINT 4-Runner; Right - $88.64
43346-60011 - Lower ball joint dust cover (newer design) $14.47/ea
90080-10066 - Lower ball joint bolts $0.91/ea x 8
45047-39215 - Outer tie rod Left - $48.18
45046-39335 - Outer tie rod Right - $48.18

I found a decent video on TRE replacements here.

My steering still feels tight so I will not be replacing inner tie rod ends, the steering rack guide or rack bushings at this time, but you may want to consider it if your truck is high mileage or feels a bit loose.
 
With 59,000 miles on my SS 7.1 lift, I finally wore out the original Tokico shocks. The right one was blown and the left one was close behind. I ended up buying the custom valved Bilsteins from Steve at Sonoran Steel. They cost more money than off-the-shelf Tundra Bilsteins, but the lift has worked so well for me that it seemed worth the money to have them valved for the coils.

DSC_0026.jpg


With the new Bilsteins, the 4Runner has a far better ride both on and off road than it ever did when new. It is smooth enough to receive comments from passengers on how nice the truck rides, which I think speaks volumes for how well this lift works.

Are you still running the tundra coils on this?? I keep reading that the ride is too hard on the tundra coils
 
Are you still running the tundra coils on this?? I keep reading that the ride is too hard on the tundra coils

Yes, still on the Tundra coils. It is stiffer than stock but it rides better than the Performance Products springs or the OME 880/881 setups. Personally, I wouldn't change a thing.
 
Glad to hear you're enjoying the lift, I think it looks great, not too big or too small. What's the difference between your lift and Speedy's Garage 2"? Apologies if it's been answered before, I'm relatively new here.
 
Glad to hear you're enjoying the lift, I think it looks great, not too big or too small. What's the difference between your lift and Speedy's Garage 2"? Apologies if it's been answered before, I'm relatively new here.

I am going on 12 years with this setup now. The only thing I have changed is the front Tokicos blew and I replaced them with the Bilstein 5100s.

Not sure what setup Speedy has. I bought a Sprinter van this year and have been putting my time into building it out, so not much time on T4R lately. Still love the 4Runner though; it's an amazing vehicle.
 
Hey by any chance do you have any pics of rubbing on your flares and where you trimmed.

I’m looking to do the same lift bu i have the limited flares since it’s the 02 sport. Any chance you could help out
 
My wife does crash injury potential work for a consulting firm and she tells me stories about car accidents where loose cargo is the cause for injuries and deaths as opposed to the actual car accident itself...........vy cargo.

I always feel the need to comment when I read these because of what I experienced with my son at the age of 4. I just got off work, did my physical therapy and had my bags just sitting in the front seat. Picked up my son and strapped him into the booster seat. As we merged onto the freeway a vehicle didn't speed up, i was trying to get over and ended up flipping the truck 4-6 times along the freeway at 60mph. Long story short we walked away, still had him closely examined by the hospital for safety but my bag went flying during the accident and actually hit me, cutting/bruising me up pretty good. Just wanted to chime in that it is a common issue unfortunately :(

But we walked away from this......
photo 2.jpg
 

Attachments

  • photo 2.jpg
    photo 2.jpg
    137.2 KB · Views: 733
Last edited:
Hey by any chance do you have any pics of rubbing on your flares and where you trimmed.

I’m looking to do the same lift bu i have the limited flares since it’s the 02 sport. Any chance you could help out

Your 02 Sport should have the same flares as mine. I did not do any trimming on the back of the fenders, just the very bottom of the flare that attaches to the front bumper. I had a picture of it but that went away with the Photobucket/Picasa nonsense. The trimming is barely noticeable.

Kotrin...dang. Glad you two walked away from that! Amazing.
 
Look who's back. I've been focusing on another project the past two years, building a Sprinter van for taking long summer trips.

If you're not sure what a Sprinter is, it's likely FedEx is driving one to your house everytime you order a fun mod for your 4Runner.
44151109312_6963c6d8f0_b.jpg


42210586540_ff12eed0f0_b.jpg


This is how it looked inside the day I bought it:
33456287330_01e7d38cf1_b.jpg"


And after a few mods:
44992781512_6a9cf3b50e_z.jpg

41367747460_151fe357f8_b.jpg


42773468004_2ac65dd1a4_b.jpg

28603307047_edf86bfc18_b.jpg


But you guys don't care about vans, so next post will include 4Runner content.
 
According to my maintenance log the last time I did a mod or even turned a wrench on the 4Runner was 2013. That's a 3rd gen for you. The 4Runner has been my daily driver for a 37-mile commute the past couple of years and I've put another 40,000 miles on it with nothing but oil changes.

Last month a CV boot opened itself up and I got in there and rebooted the driver's side. I hadn't turned a wrench so long on the 4Runner that I forgot how good it felt.

Here's how she looks these days. Exactly the same as in 2005 when I did all my initial modifications:
44061975090_b76c03697b_b.jpg


So I did some light wheeling with friends last weekend and my interest in 4wheeling was completely renewed.
30939422167_760f4b35a5_b.jpg


So here I am, back to surfing T4R. :)
 
Paddlenbike, glad to see you back on here. Nice Sprinter. Did you build cabinets and storage or pay someone? Either way it turned out great.

Your 4runner still looks amazing. What tires are you running?

Cheers

Durwin
 
Paddlenbike, glad to see you back on here. Nice Sprinter. Did you build cabinets and storage or pay someone? Either way it turned out great.

Your 4runner still looks amazing. What tires are you running?

Thanks Durwin! I built them myself. I used 80/20 extruded aluminum to frame them, then used bamboo drawers and cabinet doors to cover the aluminum. I have more info on my website if you're interested. https://ourkaravan.com

Tires are 275/70R17s on Tundra/Sequoia wheels.
 
Thanks Durwin! I built them myself. I used 80/20 extruded aluminum to frame them, then used bamboo drawers and cabinet doors to cover the aluminum. I have more info on my website if you're interested. https://ourkaravan.com

Tires are 275/70R17s on Tundra/Sequoia wheels.

Paddlenbike,

I just glanced at your build...very nice job...I'm impressed.

What brand and model of tire is actually what I meant?

Thanks

Durwin
 
Paddlenbike,

I just glanced at your build...very nice job...I'm impressed.

What brand and model of tire is actually what I meant?

Thanks! Tires are Cooper Discoverer S/T. I think they've been replaced with the ST Maxx. Mine are louder than BFG A/T KO's, but slightly more aggressive.
 
Quick question, what was your process for painting the rear badges.

Also, if you don't mind, do you have a P/N for the front coils? I really want to drop my front from 3" down to 2ish for 265/75s
 
Quick question, what was your process for painting the rear badges.

Also, if you don't mind, do you have a P/N for the front coils? I really want to drop my front from 3" down to 2ish for 265/75s

Sorry, just seeing this. My badges were plastidipped. So far my roof rack, badges and the wheels on my Sprinter all have plasti dip and it's holding up pretty well.

Front coils were part of the Sonoran Steel kit. That kit is now called the "System 7.2"
 
Current Status: 160,000 miles and the most everything on the engine is original. It's time for a complete timing belt and valve cover job.

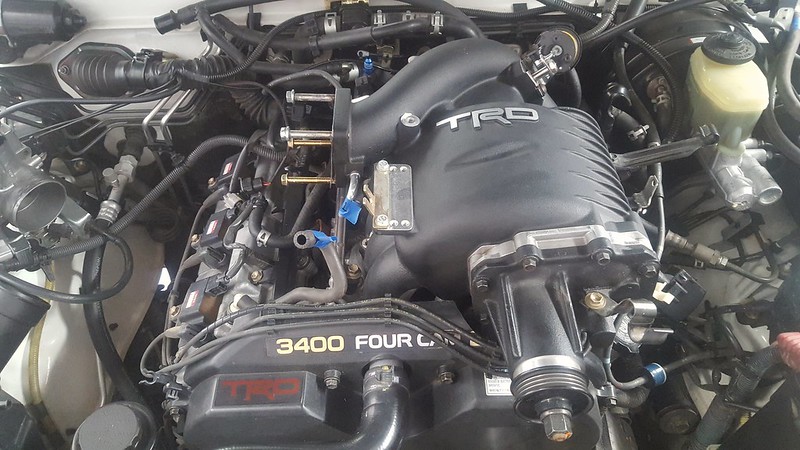
It took me nearly a month to get all the parts together and find time to get this big project started. There are a lot of parts that should be replaced, and ones you wouldn't even think of such as the crankshaft pulley bolt. I am not known to be the fastest worker but it took me about 2.5 hours to get the skid plates off, the coolant drained and the supercharger off the top of the engine.

48806533583_62a6873c53_c.jpg


You can see that the starting point was pretty clean. For being an original 160,000 mile engine there really wasn't much in the way of an oily mess. I found some oil near the bottom of the engine in the vicinity of the oil dipstick tube, otherwise it looked pretty good.

48806535883_2114539602_c.jpg


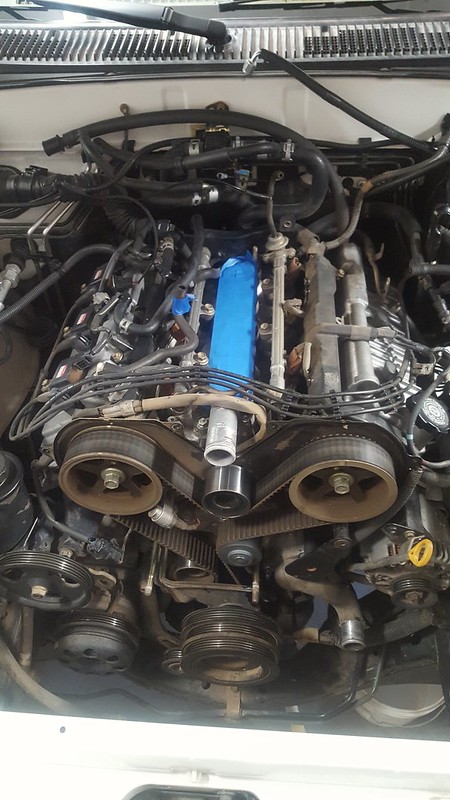
I am finding that the valve cover gasket job is nearly as time consuming as the timing belt job. Most of that is taking the time to clean up the valve covers, install the spark plug grommets and mostly cleaning up and re-sealing the half-moon washers and the rear cam plugs.

48807031002_4bb78c071d_c.jpg


Other than some initial confusion about where to place the FIPG on the half-moons and the cam plugs, the valve cover gasket job was fairly straight-forward. I simply followed Toyota's recommendation on where to put the FIPG, although I know some people add it in other places too.

Beyond the items I mentioned above and the valve cover gaskets, I also did a new PCV valve and grommet, new spark plug tube gaskets, new valve cover rubber washers, new Denso Iridium IK22 plugs and new Toyota plug wires. I will be cleaning the throttle body on reassembly. I'll leave the IAC alone because it's working fine and is reasonably accessible if it does foul up.

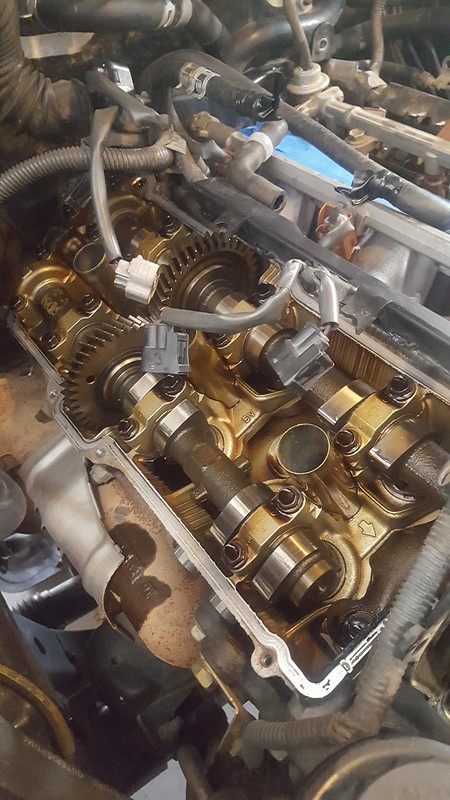
Everything internally looked really good.

48807031767_a7b8c64dfd_c.jpg


As for the timing belt job, removing the crank pulley bolt (217 ft lbs) is often something people struggle with. I had no issue. I borrowed my buddy cool tool he made to align with the pins in the crank and allows you to wedge it under the frame rail while you reef on the breaker bar. Worked perfect. All the timing covers, idler bearings, hydraulic tensioners, water pumps, etc removed relatively easily. I did fight the cam sprockets a bit. Even with a friend's help, we didn't have the right tool to lock the cam sprockets into position while we loosened the bolt. He ran home and grabbed his impact wrench and it did the trick almost immediately. I don't own air tools but it goes to show that the impact action is invaluable at times.

48806892136_40338d628e_c.jpg


I got the cam seals replaced as well as the crankshaft seal. I used an inexpensive tool that proved invaluable. The new water pump went back on. It's amazing, the internals of the original water pump look so new that I was afraid I would confuse the parts with the brand new one, it looked that good. Same with the thermostat--it was dated 2000, so it was original but looked completely fresh like the new one. Amazing.

I don't have the full day to work tomorrow but hope to get the idlers and hydraulic tensioner on, timing belt set with everything at TDC and start getting the front covers reinstalled. I plan to change the oil in the supercharger and may have to button up the front and the top of the engine another day.

Successful first day of my "maintenance sweep!"

 
I got the job done, but not without doing the timing belt job twice. More on that later. I watched a bunch of youtube videos and read some write-ups on getting the timing belt aligned on the cam and crank pulleys, and it seems as though everyone struggles with this step, and now I see why. Essentially you get the cam and crank pulleys all lined up at Top Dead Center (TDC). Put the belt on, aligning the marks on the belt labeled left and right cam with the marks on their respective pulleys. When you attempt to stretch the timing belt on to the crank pulley, you can't pull it tight enough to get it on the proper teeth. It often goes wrong here. From the moment the crank spins the first time it takes up the slack on the non-tensioner side and now you're off a tooth. After three tries I finally decided to spin the crankshaft and purposely have the crank timing set almost 1-full tooth before TDC. That means you can easily get the belt on and by the time the slack is taken up, the timing is correct. I spun the engine over by hand several times and triple-checked the alignment of cam and crank timing remained correct.

Everything else went back together smoothly. I left the radiator out to make sure the engine fired up and ran normally. Except it didn't. It would idle very rough and touching the throttle would kill it. There was no check engine light but it showed a pending code P1300 for ignition igniter circuit 1. Because I had replaced the spark plugs and wires I thought I'd check that first. I swapped ignition coils around and after several tries it wouldn't run as well on the backup coil. Swap it back and it would at least idle. I thought I was on to something.

One thing I have left out of this discussion...when attempting to remove the crankshaft timing sprocket (photo below), one of the small teeth broke off. The crank position sensor is pointed right at the teeth. I googled how a CPS sensor works and most of them work by the sensor counting a reluctor (magnet) embedded in the sprocket. There's a spot cast into the sprocket where there are no teeth, so I came to the conclusion that was the location of the reluctor and that's where the counting occurs. I put it back on with 100% confidence it was okay.

48821887976_3d252c98ac.jpg


After the rough idle thing happened, I walked away from it for the night. The next morning I did a google search on the crank sprocket and it didn't take me long to find a couple of threads where something similar happened to others. Replacing the broken sprocket with a new one resolved the problem. Toyota had it in stock, picked it up and proceeded to dismantle the front of the engine again. With my newly discovered trick of purposely setting the crank timing back one tooth, I was able to diassemble and reassemble the engine, get the radiator reinstalled and coolant flushed over the next 5 hours.

I learned a lesson here. If you're this deep into an engine and there's any question at all about a part, replace it.

Overall, the job was pretty straight forward. I watched some videos on youtube to see what I was getting myself in to, took notes so I would have an order and torque specs, and after a lot of research ordered all my parts. Just take your time and be sure everything is clean and properly torqued. Overall, not bad.

I need to replace the rear diff breather, change the xfer case, transmission and diff fluids, flush the powersteering, brake and clutch hydraulic systems with new fluids and change the oil in the SC (I forgot to do it while it was off), and that will conclude the maintenance sweep.
 
The whip gets a new Sherpa rack.

48927282336_6896a57001_c.jpg


48927282371_e4bacaa396_b.jpg


48927282426_8b08c179a9_c.jpg


I love that this rack is based on 80/20 extrusions. I have worked with the stuff extensively in my Sprinter van build and knew I wanted the flexibility with my rack too. I'm looking forward to making various brackets and attachments to make loading up for a trip much easier than in the past.

I'm also happy to report that it is quieter than I was expecting going down the road. :thumb:

This is the first modification I have made since 2005 that changes the look of the vehicle. :violin:
 

Members online

Forum statistics

Threads
278,307
Messages
3,554,055
Members
248,016
Latest member
Advally Service

Trending content

Back
Top