Papabeach's Mod Thread

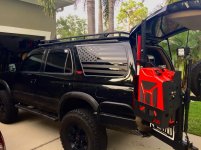
Not much work on the truck lately...more fishing than anything but I finally got around to replacing my dead FOB battery (CR2016) and added some vinyl letters in the recessed letters on the back. Pretty simple...it’s the small things .


Yassssss . Love your build dude. Dem key fob injection molds from AJT designs are clutch! I have a couple already.
 
Bittersweet day today...sold my 4Runner's big brother, out built 80 Series. That thing was fun to build, a complete beast off road and just wasn't getting used and abused the way she should since I relocated to Florida. She is now owned by a cool Marine pilot and and wife in Pensacola.
 
Gave in and joined the decal club. I like it for now but not sure if this will last long term.
 

Attachments

  • E1601D8E-1C79-475F-A737-CF733E1AFF44.jpg
    E1601D8E-1C79-475F-A737-CF733E1AFF44.jpg
    135.9 KB · Views: 1,162
3D printed Flare End Cap!

Been awhile since I worked on my truck...fishing has been great on the gulf coast of Florida this summer and I have spent most of my free time on the water. Alas, the north moving Red Tide has arrived and given me opportunity to get back to my list of 4Runner to-do's.

Before the Red Tide arrived I took my oldest daughter (5yo), and my brother and his sons out on the bay...funny how the bucket of bait fish get the kids attention...upside down, right side up...whatever :-)
Ky4nhSWm.jpg


Beach Snook!
5tE4ERXm.jpg


Big Thanks [MENTION=147936]marcus clarkus[/MENTION] http://www.toyota-4runner.org/3rd-g...r5-mudflaps-flare-end-caps-free-download.html for providing the 3D file for the End Caps. The design is spot on and looks like it came from the factory! I had the End Caps printed by Sam at 3D Hubs https://www.3dhubs.com, then took the end caps to Line-X LINE-X of South Tampa*|*LineX for coating to match the rest of my trim. It then took me a quick trip to O'Reilly's for some screws/grommets and Voila!

Before
6kofkyom.jpg


After
PMaV7icm.jpg


This is a mod that makes me happy...completes a look that probably is only important to me and a select few from the T4R crowd but hey...its my ride and I like it! It would look better if I washed my truck and added the flare trim but I kinda forgot about that...maybe in the future, but I don't really care that much right now.

Only problem is I somehow bent one of the M6 bolts screwing in the End Cap so I only have the drivers side installed....will finish up tomorrow!

 
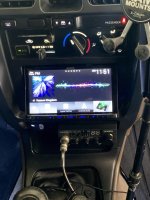
New stereo and backup camera installed!

—KENWOOD Excelon DDX9905S
—KENWOOD CMOS-230

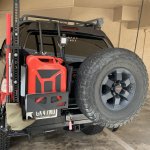
Wasn’t sure about the camera placement at first but with dual swing arms loaded with a tire and fuel cans this seemed reasonable and it worked out great, no glare with light on either.
 

Attachments

  • 594C9D0B-4F39-4B49-9AAE-72E0C2DC818F.jpg
    594C9D0B-4F39-4B49-9AAE-72E0C2DC818F.jpg
    130.9 KB · Views: 962
  • 4589AB3D-9C26-467D-A2D1-9EEE80306CEB.jpg
    4589AB3D-9C26-467D-A2D1-9EEE80306CEB.jpg
    134.6 KB · Views: 962
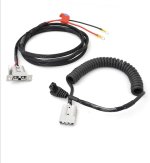
Acc plug in cargo area has been a little finicky and my ARB fridge/freezer hasn’t been working well. I plugged it in,in the house...works fine. So I thinks let’s upgrade the power supply to the cargo area. I went with a nice premade wiring harness (10ga using improved connectors) from Wits’ End. Well known to the Landcruiser crowd...and totally had the Landcruiser price. I ran it down the passenger side and out through the main wiring harness grommet in the firewall. It works great and I am very pleased and the ARB fridge/freezer now runs fine in the cargo area. Anderson SB50 ARB/Engel Fridge 2-PIN to Battery Complete Wiring Kit (APC-3)
 

Attachments

  • 7BDB6C30-7D89-4EDA-A582-185D57B83F98.jpg
    7BDB6C30-7D89-4EDA-A582-185D57B83F98.jpg
    68.3 KB · Views: 911
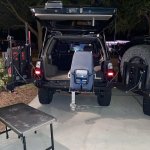
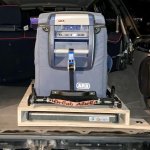
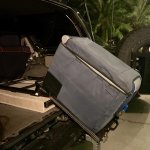
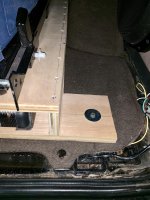
Just test fit my camp table/refrigerator slide setup. I didn’t want a full set of drawers, at least not now and wanted to keep it simple...can always add more later.

-3/4” birch plywood 4x8 sheet (Home Depot for the win!)
-Super custom steel shank for rear d-ring brace (still need to screw in place)
-Spare bolt/washer for front brace
-Alu-Cab tilting fridge slide
-Eezi-awn table and drawer slides
-Upgraded accessory wiring harness from Wit’s End
-ARB 50qt refrigerator/freezer

Still deciding on if I want to make a face plate for the table slide and how I want to finish the wood...paint or carpet...
 

Attachments

  • 2CC84A1E-4EF9-4717-B3F5-468AF63F629F.jpg
    2CC84A1E-4EF9-4717-B3F5-468AF63F629F.jpg
    129.3 KB · Views: 936
  • 94145026-529F-4255-915D-5492E30288E1.jpg
    94145026-529F-4255-915D-5492E30288E1.jpg
    132.7 KB · Views: 886
  • 91E2CE64-CDCC-47FC-BE9C-E1E2B6EEED20.jpg
    91E2CE64-CDCC-47FC-BE9C-E1E2B6EEED20.jpg
    130.5 KB · Views: 883
  • D37C0219-092E-4512-95A4-45D64796899D.jpg
    D37C0219-092E-4512-95A4-45D64796899D.jpg
    137.8 KB · Views: 876
  • 0EF6E66D-0B34-45B4-B158-D654B447BDFA.jpg
    0EF6E66D-0B34-45B4-B158-D654B447BDFA.jpg
    137.6 KB · Views: 865
Added a fold down front cover, magnet switch triggered backlight and some Toyota bling! Pretty happy with how it turned out.

FpXDpWh.jpg

u9hDcb1.jpg

B33SZ85.jpg

XbZ1Vth.jpg
 
Filler panel 6” led bar

Rigid Industries 906213BLK / Filler panel Mod

I wanted to mount a led bar behind the headlight filler panel...some have done this with smaller bars, 3D printer panels, or simply placed individual LED bolts. I haven’t seen any threads where a larger bar is mounted to the existing panel (though I am sure someone else has likely done this). Or perhaps people with more brains than me know this is a bad idea and didn’t attempt, either way I wanted additional light and not a turn signal or DRL and I wanted a project so here goes. If all goes well I am going to have to find some more space for a switch in the cab...another project lol.

Some of the threads that helped me...
https://www.toyota-4runner.org/3rd-gen-t4rs/227870-3rd-gen-4runner-filler-panel-lights.html
https://www.toyota-4runner.org/3rd-gen-t4rs/70298-bandit-runners-build-thread-43.html#post2401541
https://www.toyota-4runner.org/3rd-gen-t4rs/232724-new-filler-panel-light-bar-design.html


I have only made one so far for test fit..

Cut filler panel (face/top/bottom) with dremel/thin cutting disk, modify mounting bracket for led bar (drill hole for rivet, cut new slot for bolts to mount to with angle grinder, rivet with backing washer (I replaced the rivets in the pic below with wide flange rivets that were a bit bigger...no pic), covered back of rivet and bracket in JB weld (no pic), coat in bedliner (Line-X premium-to hide the rivets, add strength, and match the rest of my truck that has been coated). Install straight forward, remove grill, unscrew filler panel, remove clip on outside edge of panel...I replaced the 18 yr old 3M tape holding clip on with a new piece and additional adhesive...if this mount fails it will likely be here. Will drive around for a while and see how it holds up before making the other one. Might need to add some additional support...we’ll see. Curious what others have done, maybe an extra tab that ties into the bolt holding the fender on (right behind filler panel)?

tfMiv0O.jpg

INfju37.jpg

uzGcc85.jpg

zE14Mt1.jpg

nfsIsEw.jpg
 
Love your truck, you have great taste. Looks an awful lot like mine, just a little cleaner and less rusty.. Maybe try the frame rust add mod next to make me feel better?
 
Cargo drawers/shelf evolution

Well...my cooler didn’t fit in the back after the fridge slide/table drawer, so...here we are...far from perfect but perfectly functional...best part the only thing I had to buy was a new hinge! In the future perhaps a strut to open would be nice but not necessary for now.
aavCibh.jpg
 
Lined box with toolbox liner (not that anyone can tell but will hopefully keep carpet underneath a bit cleaner), added gas lift struts, latch and decals, loaded gear...and a new headliner patch for more HP! Will start on the right side soon...

TzQzMUN.jpg


eL1lRxm.jpg


lnTph05.jpg
 
Modded driver side headlight filler panel for led bar mounting..couple pics of the 3/8” rivets I used to secure, the pile of JB weld covering the back of the rivet/backing washer and mounting tabs and a quick coat of primer prior to dropping off at Line-X for spraying.

zjjeubf.jpg

nxk6JMg.jpg

lYEv2RG.jpg
 

Members online

Forum statistics

Threads
278,307
Messages
3,554,048
Members
248,016
Latest member
Advally Service

Trending content

Back
Top