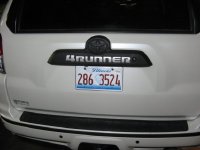
Planning to plastidip? .... aka what I did wrong.

philsey

New member
I read every post on here I could find, plus I watched a bunch of U-tubes. But I still learned a couple things to pass along.
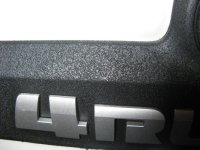
- Don't paint with heavy coats. (like I did) P-D gets a rough/gritty texture if applied too heavily, and you can't paint it out. Many thin coats is best.
- The biggy that I learned was on the raised letters. First time I painted with the nozzle MOL straight at the target. This is wrong because it doesn't get enough paint on ALL the edges of the letters, and the P-D won't peel, it just tears. Aim each pass at an angle to the letters so you will paint each of the 4 edges; top/bottom/left/right. This stuff peels great if done right.

Pretty neat stuff really. I could do a really great job next time.
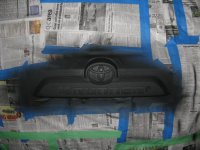
IMG_0001.jpg
 

Attachments

  • IMG_0001.jpg
    IMG_0001.jpg
    87.2 KB · Views: 12,989
Register to hide this ad
there is a snarky comment in here somewhere, just have to find it. help from you high post count people?

anyway thanks for the insight.
 
Was it cold where you were working? I've always read that thick coats were better because it self levels. I.e. "Spray it on as thick as possible without running". Where as thin coats get all pebbly because there's not enough material to lay out flat.

My one Plastidip job I layed it on relatively thick and it came out fairly smooth but not perfect. Was thinking I was to cautious about runs and should have gone thicker...
 
Dip tends to even/smooth out when it has time to really cure, more so than just appearing dry. I noticed that it continues to look better, even a few days later.

The main thing that I noticed, is you really, really have to shake the cans well, and keep shaking them throughout. It really helps with even application, and preventing dripping. Dripping is very difficult to paint out with dip. Also, if you are taping off, its best to pull the tape immediately after your final coat. If it starts to cure before you pull the tape, your lines will be bad, and you risk pulling up the entire edge w/ the tape.
 
Put the cans in some hot tap water and let them sit there a bit before shaking thoroughly and painting.

Warm paint lays down nice and smooth cold paint will leave a texture.
 
Dip tends to even/smooth out when it has time to really cure, more so than just appearing dry. I noticed that it continues to look better, even a few days later.

The main thing that I noticed, is you really, really have to shake the cans well, and keep shaking them throughout. It really helps with even application, and preventing dripping. Dripping is very difficult to paint out with dip. Also, if you are taping off, its best to pull the tape immediately after your final coat. If it starts to cure before you pull the tape, your lines will be bad, and you risk pulling up the entire edge w/ the tape.


He is dead on. I take an razor knife and make a quick pass along the edge when I pull the tape off even if it is still wet just in case some of it is holding onto the tape. That happened once. I learned. Never again.
 
I think I did the same dip job as [MENTION=51186]philsey[/MENTION] just a few months ago and since then, I've helped a few friends dip their whole cars (a Mazda 3 and a BMW 335, I try not to judge too much).

Everyone else has just about covered the big points but I'll go through and reiterate. This comes from a lot of research, a little experience, and plenty of mistakes (obviously all opinions), but I'm sure the guys who have done their whole 4Runner will chime in eventually for more data.

  • The dip that's been packaged for spraying already (spray cans and gallon cans from dipyourcar.com) is meant to be really thin (think slightly more viscous than water). On a cold day it's going to come out of the can thick and splotchy. Like [MENTION=65614]Antman[/MENTION] said, keep it warm.
  • This depends a lot on the weather/humidity at the time you're spraying, but the DYC forums all note to lay an ultra light tack coat first (<50% coverage), then start going heavy on the coats (wet but not drippy).
  • My experience with the spray cans, or any rattle can, is that the tips aren't very durable. Usually for 1 in 3 cans I've used, the nozzle will crack or unseat and it will start pouring dip into the spray path on the nozzle and all over the side of the can. Maybe it's just me, but keep an eye out for this as it'll mess up the job.
  • You're using tape as a cutting edge, do not let the dip set (see [MENTION=108915]F1scher[/MENTION] 's post above). Pull the tape when it's wet (immediately after the last coat). If you do get a rough edge, a very light dab of paint thinner will help re-liquefly the dip and a let you press the edge back down.
  • In some cases, it's okay if it sprays with a slightly grainy texture. I've noticed the bumps on my rear garnish (the surface I messed up the most) have seemed to rub or get weathered off, and it looked pretty smooth a week later.
  • The more coats you use, the easier it will be to peel off later. At around 5 bucks a can, it's relatively cheap, so go for a lot more coats than you think you need. A razor, toothpick, and bamboo skewer will be your best friends when it comes time to peel.
OA
 
Last edited:
I don't know what I did wrong. This was down in my parking garage, 73*, I shook the piss outta the can, blew the paint out each time, wiped the nozzle each time. Just assuming I applied it too thick - don't know what else. :wtf:

Close up.

IMG_0002.jpg

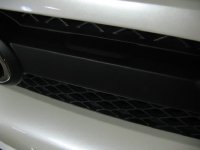
Same can, same day, same everything - front came out perfect. So did the chrome strip in the rear bumper.
Did I say :wtf:

*EDIT* Be sure to read posts #14 & #16. I think [MENTION=50186]adio3x[/MENTION] has the answer to what I did wrong.


IMG_0001_1.jpg

Ah well, it looks OK from >5' away. Don't think I'll peel/repaint.

IMG_0003.jpg
 

Attachments

  • IMG_0002.jpg
    IMG_0002.jpg
    87.1 KB · Views: 15,958
  • IMG_0001_1.jpg
    IMG_0001_1.jpg
    41 KB · Views: 12,128
  • IMG_0003.jpg
    IMG_0003.jpg
    50.3 KB · Views: 12,238
Last edited:
I had a similar issue - though not as bad. If it's any consolation, that's the part that has weathered nicely and gotten a lot smoother since day 1.

14670260174_03d71e3e23_c.jpg


OA
 
Last edited:
I had a similar issue - though not as bad. If it's any consolation, that's the part that has weathered nicely and gotten a lot smoother since day 1.

14670260174_03d71e3e23_c.jpg


OA

I want to do this. Did you take the letters and emblem off, or mask them somehow?
 
I want to do this. Did you take the letters and emblem off, or mask them somehow?
Dip over everything then peel off the letters and emblem (see the first post of this thread). The letters are tough to get started, so use a toothpick/razor blade to get the edge started for peeling.

[EDIT] Here are some pics, sadly none of actually peeling the emblem or letters, but you'll get it.

14669554631_984842103a_c.jpg


14670432954_18d0052d2c_c.jpg


OA
 
Last edited:
Gritty textures can happen by a number of different reasons, here's a couple:

-Prepping- the most important part. Clean it thoroughly.

-humidity- high humidity can alter the way the dip cures, it can get cloudy or I've heard that even while using cans, it can partially dry as it comes out of the nozzle, leaving a gritty texture.

-Sun- do not dip in direct sunlight, it can cause streaking or fading.

-Make sure the cans are kept in room temp. Even if you shake the crap out of them, if they're left in a cold area, you can still have particles at the bottom.

-Spray in ventilated areas: Spray in a garage but keep the door open.

-Build up your coats- your first coat should look like a zebra. Next apply a light and even coat. Stay about 6inches away, lock your wrist in place, and make smooth even passes. Heavy coats can cause build ups, also never spray in one spot for more than a second, always keep your arm moving. After 6-8 light coats, your last coat should be medium to heavy.

If you plan on doing a bunch of dipping, I suggest buying the DYC spray gun, its worth it. It makes it easy to get smooth and even coverage. Also if you get the gallon size dip, you'll always know that there isn't any crap at the bottom of the bucket, cause you shake it up yourself using a mixing wand.
 
....it can partially dry as it comes out of the nozzle, leaving a gritty texture.

Interesting Andrew. This has got to be it. I'll bet I made a few of my later passes too far away from the target - because "gritty" describes it perfectly, and the other trim I painted at the same time is perfect. Plus, it looked really nice up until the last few coats.

Soooo tempted to do over. Must ... resist ....
 
Thanks Omar and Andrew! Humidity is a problem here in Florida, I think I'll wait until Fall. I want to dip the rear hatch cover under the logo's and the front bumper (where the TE is grey) black. Is there a brand of plastidip that's considered the best quality (looks like just one brand)?
 
Last edited:
me being the lazy/easy way out person, wouldn't it be easier to just get the rear bright trim from a SR5 and put that on? isn't the SR5 "4Runner" emblem assembly already blacked out?
 

Members online

No members online now.

Forum statistics

Threads
278,315
Messages
3,554,104
Members
248,016
Latest member
Advally Service

Trending content

Back
Top