Steering Rack and Front Sway Bar Bushing Replacement

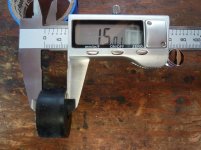
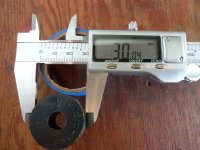
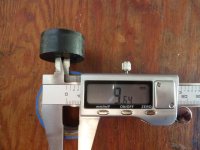
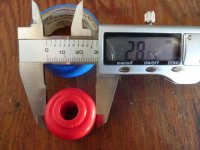
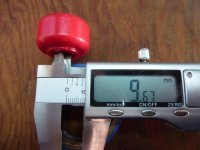
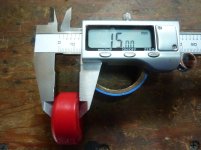
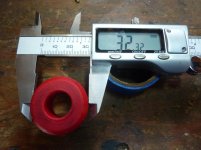
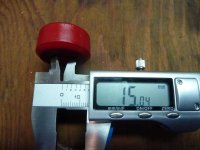
Ok, I finally got some replacement bushings from the Energy Suspension Kit #8.5118 that many recommended on this forum. I installed them and they are a good fit. The outside diameter is a tiny bit narrower than OEM but I don't think that is a big deal. As a comparison, I took measurements from OEM end link bushings and compared them to the bushings from the Prothane 18-1115 and Energy Suspension 8.5118 kits.

The part number for the OEM end link bushings is the same for all 3rd Gen years 1996-2002 (Part #90948-01003). This tells me the end links themselves must all be the same which puts a very huge hole in Prothane's claim that there are different end link sizes amongst the 3rd Gen years.

The Energy Suspension kit #8.5118 has the correct end link bushing size for all 3rd Gen years but only has the correct sway bar bushing size (27mm) for the 96-97 years. I haven't confirmed it myself, but supposedly the 96-97 years require a 27mm bushing while the other years require a 26mm bushing.

I tried to get all my pictures into one post, but I reckon we're limited to 8 attachments, so I'll have to post the pics of the Prothane bushings in another post.

The following three pics show the measurements for the OEM end link bushings.

OEM #1.jpg
OEM #2.jpg
OEM #3.jpg


The next three pics show the measurements of the bushings from the Energy Suspension kit #8.5118

Energy Susp #1.jpg
Energy Susp #2.jpg
Energy Susp #3.jpg


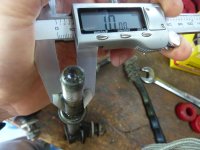
And here's a picture showing the diameter of the end link post.

End Link.jpg

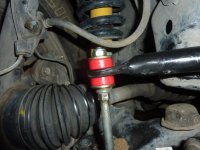
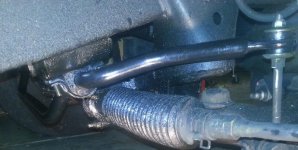
This is what the new bushings look like installed on the truck.

New Bushings.jpg
 

Attachments

  • End Link.jpg
    End Link.jpg
    123.2 KB · Views: 1,079
  • OEM #1.jpg
    OEM #1.jpg
    131.1 KB · Views: 1,080
  • OEM #2.jpg
    OEM #2.jpg
    127.5 KB · Views: 1,136
  • OEM #3.jpg
    OEM #3.jpg
    123.3 KB · Views: 1,104
  • New Bushings.jpg
    New Bushings.jpg
    131.3 KB · Views: 2,027
  • Energy Susp #1.jpg
    Energy Susp #1.jpg
    126.3 KB · Views: 1,056
  • Energy Susp #2.jpg
    Energy Susp #2.jpg
    128.4 KB · Views: 1,047
  • Energy Susp #3.jpg
    Energy Susp #3.jpg
    123.9 KB · Views: 1,064
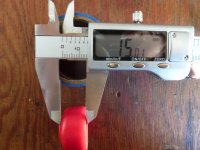
As promised, here is the pics of the end link bushings from the Prothane kit #18-1115. If you compare the inner diameter measurement from these with the OEM and Energy Suspension kit #8.5118, you can see how poor of a fit these are. Basically a 5mm difference with results in a VERY sloppy fit on the end link post.

Here's the pics of the measurements.

Prothane #1.jpg
Prothane #2.jpg
Prothane #3.jpg


I will be submitting all this information to Prothane and Energy Suspension in hopes that they will put together correct bushing kits for our rigs so future 3rd Gen owners get the right bushings the first time.
 

Attachments

  • Prothane #1.jpg
    Prothane #1.jpg
    124.6 KB · Views: 1,045
  • Prothane #2.jpg
    Prothane #2.jpg
    125.3 KB · Views: 1,243
  • Prothane #3.jpg
    Prothane #3.jpg
    127 KB · Views: 1,044
Last edited:
Ok, I checked the Camelback Toyota Parts website and I looked up the swaybar bushing part number for all the 3rd Gen years. They all take the same bushing, part #4881535100. So, this tells me there isn't a different sway bar size on the 96 and 97 4runners unless somebody else has some compelling knowledge to contradict this.
 
Well, I think all this discussion and research might be leading to a positive result for future 3rd Gen owners looking to purchase poly bushings for their sway bar and end links. Greg at Energy Suspension and Dominick at Prothane are working to figure out a correct kit to offer us.

I haven't been logging in but Domenick has been in email contact with me over the past few days (latest email was today) where he asked me to clarify my vehicle particulars because he has (at least) my measurements; so, at least that shows that Prothane is (finally) taking an interest in this discussion.

I told him a few days ago that nobody can recommend his kit with a clear conscience when there are at least two other kits that fit as well as the OEM bushings do, where his kit is off by a whopping 5mm on a 10mm diameter and where those two other kits are spot on.

Luckily for the people here, you tested one of those (Energy Suspension) and I tested the other (Daystar), so we now know what fits and what doesn't fit.

Let's hope they go further than just email and actually fix the kit so that everyone else doesn't have to go through what we're going through just to get parts that fit like OEM on the first try.

I am curious if there indeed is different end link post diameters out there in 3rd Gen Land though and that's why Prothane is claiming the kit works for some and not others.

If people just MEASURED their endlink diameters, we'd have a good survey with just a few people taking measurements instead of wasting our time like half the trolls in this thread did, constantly contributing absolutely nothing of value.

As I reported elsewhere, they don't have to actually remove anything; they just measure at the midpoint like I did as shown below.


EDITED: See correction from mtbtim in the response post below.

Using calipers, I measured the midpoint diameters to be:
1. Sway bar midpoint diameter was 1.042 inches (roughly 26.5mm)
2. Endlink bar midpoint diameter was 0.395 inches (roughly 10.0mm)

Note: My swaybar diameter corresponds roughly midway between 26 & 27 mm, where 27mm = 1.063 inches & where 26mm = 1.024 inches.

If we assume the bushing is 20 thousandths smaller, then:
a. The Prothane 26mm bushing should be something like 1.024 inches - 0.020 = 1.004 inches
b. The Energy Suspension 27mm bushing should be something like 1.063 inches - 0.020 = 1.043 inches
.

It may be useful to note that I measured the swaybar to be about 20 thousandths of an inch smaller (0.5mm) at the actual bushing contact point, which I presume is due to the heating and stretching that occurred during the manufacturing process, since the cleaned up swaybar was in pristine shape with respect to the original paint (zero rust, for example).

The unpainted endlink metal under the bushing contact area was much rougher than was the smoother swaybar metal, and therefore the endlink diameter measurement at the bushing contact area was less accurate, but it was about 20 thousandths larger, which I attributed to the crud which I didn't bother to clean up.
 

Attachments

  • wheeler.jpg
    wheeler.jpg
    105.6 KB · Views: 1,003
Last edited:
@foo, I don't think anyone has to measure their end links to help with this. Like I found out, if the the part number for the end link bushings is the same for all the 3rd Gen years, that means they are all the same size. Prothane got some bad information at some point, because as we know, their inner diameter size is 5mm to big for our end links.

I've sent Prothane and Energy Suspension the links to my posts so they now have everything they need to put together accurate kits for our 3rd Gen 4runners. I just hope all this work didn't go to waste and they are actually going to sell an accurate kit.
 
@foo, I don't think anyone has to measure their end links to help with this. Like I found out, if the the part number for the end link bushings is the same for all the 3rd Gen years, that means they are all the same size. Prothane got some bad information at some point, because as we know, their inner diameter size is 5mm to big for our end links.

I just caught up on the three related threads and I see now that my initial hunches were correct, based on the information from you and from the folks who sold me the Daystar bushings kit, that all the 3rd-gen 4Runners are the same.

I measured the Daystar bushings in the bushings-size thread with calipers, similar to how you measured yours above, and my numbers closely match yours, as we would both hope and expect.

I've sent Prothane and Energy Suspension the links to my posts so they now have everything they need to put together accurate kits for our 3rd Gen 4runners. I just hope all this work didn't go to waste and they are actually going to sell an accurate kit.

Both you and I put a lot of effort into getting everyone the right kit. Kudos to you for CARING that everyone get the right kit. I, for one, much appreciate your efforts. As I noted elsewhere, I sent Domenick a letter a few days ago intended for his Marketing people to see, which basically says that nobody can recommend their kit.

He asked for clarification of the vehicle measurements and particulars, which is a good sign that they're finally taking note of the situation. As you know, Dave at Energy Suspensions also took note of the situation. And, as you know, Daystar ALWAYS had the correctly fitting kit, as shown by my measurements below.

It's 3am, so I'm just going to post the dimensions I measured on the daystar bushings:

Inside Diameter:
- Daystar DAY MO3464 Body Bushing ID = 1.045 inches (26.5mm)
- Daystar DAY MO2233 End Link Bushing ID = 0.395 inches (10.0mm)

Outside Diameter:
- Daystar DAY MO2233 End Link Bushing = 1.143 inches (29.0mm)

Height
- Daystar DAY MO3464 Body Bushing saddle height = 1.457 inches (37.0mm)
- Daystar DAY MO3464 Body Bushing ridge height = 1.700 inches (43.2mm)

Length
- Daystar DAY MO3464 Body Bushing length 1.810 inches (46.0mm)
- Daystar DAY MO3464 Body Bushing saddle length 1.1 inches (28mm)
- Daystar DAY MO2233 End Link Bushing lip height = 0.685 inches (17.4mm)
- Daystar DAY MO2233 End Link Bushing shoulder height = 0.625 inches (16.0mm)

Bracket saddle length:
- Daystar DAY MO3464 Body Bushing saddle lenth
 

Attachments

  • daystar_part_numbers.gif
    daystar_part_numbers.gif
    108.4 KB · Views: 1,020
I hope I'm still wrenching when I'm 50. Good job! You guys are putting out great material.
37.gif

39.gif
68.gif

One advantage we retirees have over the potty-mouthed and last-word young'uns is that we've long-ago embraced incrementalism where we've never stopped learning and where we never stop trying to help everyone with every action we take.

In stark contrast, the annoying know-it-all childish trolls stopped learning in the 4th grade (judging from their clear lack of grasp of the English language and the lack of value added to this thread alone, in addition to their obvious inability to comprehend the importance of seemingly minor details such as a glaringly disproportionate 5mm slop on a 10mm bushing).

While they have already shot their load in this thread by posting the most they can possibly offer, we still have a lot of value left to add to help others (including the bushing suppliers and web-site operators) get to the point where we are now, with much less effort with each incremental improvement.

For example, we still need to ensure that Autozone and other lookup engines are corrected, and that Prothane fixes their kits and that Energy Suspension cleans up their two kits, and that Daystar is easier to find for noobs running their first search, etc., so there is still a lot to do to make it easier for others.

To that end, here's my incremental improvement of the original post's video transcript of just the DIY for the swaybar bushing, so others can start with the Mbttim's video and my text description and improve further from there.

Torque:
12mm Sway bar body bushing bracket nut & bolt 19 ft-lb
14mm Stabilizer bar links top nut 14 ft-lb

Preparation I followed:
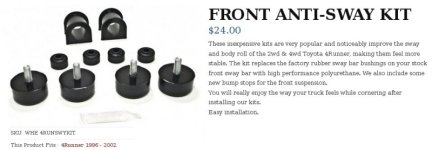
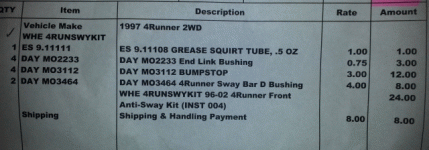
I bought the Daystar bushing kit for $24 + $8 shipping (in "my" situation, I would have been better served had they removed the $12 of unused bump stops and included, instead, $4 of concave endlink washers).
I set the emergency brake & chocked the wheels prior to jacking.
I loosened the front wheel lug nuts (the truck I worked on had 15-inch wheels with 13/16ths lug nuts).
I jacked up the truck from both ends and placed it on four 6 ton 15-inch jack stands.
I removed both front wheels and looked around.

Observations I made:
This is an OEM setup as the owner bought the truck new and never had the swaybars or endlinks worked on.
I noticed the OEM swaybar had red paint from the factory showing where the edges of the body bushings lie.
I noticed the remaining D bushing has the slit opening facing the rear of the truck.
I noticed the sway body brackets are clearly stamped L (left, driver) & R (right, passenger).
(In my hands they look absolutely identical though. Go figure.)
I noticed L & R stamped on the body bracket is only viewed correctly when lying parallel to the axle, feet at the driver side wheel and head toward the passenger wheel.
I noticed the body bracket had one welded on bolt (for a nut) and one hole (for a bolt), both of can only be accessed from above.
Both body brackets had the nut in the front and a bolt in the rear (because the brackets have a corresponding welded-on stud in the front and a threaded hole in the rear).
I made a note of the number of threads protruding above the endlink nut (useful for reinstall due to the fact that I tightened the endlink nuts after dropping the vehicle back to the ground).
I noticed the top and bottom endlink washers are not flat, but concave (and, once removed, I noticed small oblong indents, indicating that the washers are what "centers" the endlink bushings - so be prepared to replace them when you do the job if they are likewise damaged).
I noticed that a deep socket is most useful for the endlinks and that the shortest socket and thinnest ratchet is necessary for the body bushing nuts (particularly under the exhaust system on the passenger side).

Procedure I followed:
After marking, I removed the top nut of each swaybar endlink with a 14mm deep socket.
I didn't have spare concave washers because none of the DIYs I read mentioned that they can easily be damaged, so I reused them - but if I were to do the job again, I'd buy new washers beforehand (or find a kit that comes with them instead of those bump stops).
After noting the orientation of the one-way bushings, I removed both upper swaybar endlink bushings.
After removing the upper bushing, I noticed the swaybar eyelet is much larger than the endlink so the only thing centering the endlinks are the metal plates and bushings.

I didn't bother with safety glasses, but certainly crud fell in my face and eyes.
I didn't bother to spray the body bushing bolts with PB Blaster as they didn't need it, this truck having essentially zero rust and never having been offroad.

From above, for each body bushing, I loosened the 12mm nut at the front of the sway bar body bushing bracket bolt using a shallow socket and the thinnest ratchet I owned.

From above, for each body bushing, I loosened the 12mm bolt at the back of the sway bar body bushing bracket bolt using a shallow socket.

Once thoroughly loosened, I removed the front nuts and rear bolts with one hand as I supported the sway bar with the other hand.

Once the sway bar was off, and after nothing their orientation, I removed the lower bushing from both endlinks.

With calipers, I measured the midpoint on the swaybar and compared it to the bushing surface, where the bushing surface was only 20 thousandths of an inch smaller in diameter (probably due to the way the swaybar was heated, stretched, and bent when it was manufactured).

Likewise, I measured the midpoint and bushing surface on the endlinks, again, they measured favorably similar, although this was harder to measure accurately because the bare metal under the bushings had corroded a bit so it was roughly about 20 thousandths (0.5mm) larger.

Mtbtim has since verified that all the 3rd-generation 4Runners have the same measurements as the truck that I worked on, so if yours are different, then your sway bar or endlinks may not be stock.

After inspecting for oblong wear, I left the bottom washer in place on both endlinks.

Out of the truck, after cleaning and making measurements (to be posted separately) I greased both the ID and OD of the sway bar body bushings and just the ID of the endlink bushings with the 1/2 ounce of silicone (non petroleum) grease supplied, which was marked "Energy Suspension Formula 5 Prelube PN 9.11108".

I didn't bother, but some DIYs recommend removable locktite for the bolts and nuts upon reassembly.

Reassembly procedure I followed:
I replaced the D body bracket bushings with the opening facing backward (as per observation of the OEM bushing).
I replaced the now-greased bottom endlink bushings in the proper orientation.
I loosely installed the forward nuts and rearward bolts by hand into the two swaybar body brackets.
I realigned the swaybar red factory marks to the bushing inside edges & tightened the body bracket nuts and bolts.

Without the suspension weighted, I just put the nuts on the endlinks and tightened until the top of the nut was flush with the top of the endlink post.

I then reinstalled the wheels, tightened the lug nuts by hand, and dropped the truck on the wheels and torqued the lug nuts to spec.

Turning the steering wheel full stop to each side, I tightened the sway bar endlinks until the bushing slightly bulged out, and left it at that setting.

During my final inspection, I realized I was slightly off in aligning the swaybar perfectly centered on the two factory red lines painted clearly on the swaybar on the inside edge of the brackets. What must have happened is that the swaybar shifted an eighth of an inch while I was tightening the bolts and holding it up at the same time.

Probably as a result, I felt two quick shudders seemingly coming from the bowels of the body, which I, at first, being in an unfamiliar garage, thought I had hit something as I was backing the truck out into the pitch-black rainy night - but it seems to have been the swaybar sliding ever so slightly into perfect position with the initial movement of the truck.

When I went back down below into the now soaking-wet truck, I saw that the red marks had aligned themselves perfectly during the test drive.

Having said all of the above, if, when YOU do the job, you find mistakes, please post the incremental improvements, so that with every action, we all make it easier for everyone else to find the information we wished we had in the beginning.

 

Attachments

  • swaybar_bushings.jpg
    swaybar_bushings.jpg
    53.2 KB · Views: 1,171
Last edited:
This video is great despite what this thread devolved into. I used it to swap my steering rack bushings. I also did front and rear sway bar and endlink bushings. Dollar for dollar, swapping these bushings was probably the best upgrade I have done.

I used all energy suspension parts off of amazon. Here is my part list if anyone wants to do it this:
Energy Suspension 8.10103G Rack and Pinion Bushing Set for 4WD
Energy Suspension 9.5156G 3/4" Greasable Sway Bar Set
Energy Suspension 9.5161G 1" Greasable Sway Bar Set
Energy Suspension 9.8105G End Link Grommet
I also used some spare nuts, bolts, and washers for the front sway bar brackets.
For grease, I used "green grease" from Autozone (make sure to use synthetic grease).
Notes:
-One problem I ran into was that the slots on the rear sway bar bushing brackets weren't close together enough that the bolts fit easily. So if you get this set, either have a dremel/file ready or be prepared to struggle threading the bolt on the rear bracket.
-The washers that come with the sway bar bushings are not very wide, I would recommend using different ones for the front. For the rear, a bigger washer interferes with the ability to thread the bolt.
-You don't need the Honda adapter set in the video. I only used the ball joint press and the medium sized 4wd adapter.
-Autozone rents out a tie rod end puller that is less likely to damage your tie rod end boot: part# 27276
-I reused my endlink washers on the front.
-The endlink bushings were a tight fit on the front. I forced them on with light taps from a hammer using another bushing as a buffer to avoid hitting the end link.

I'll post more if I remember anything else. Cheers! :thumb:
 
This video is great despite what this thread devolved into. I used it to swap my steering rack bushings. I also did front and rear sway bar and endlink bushings. Dollar for dollar, swapping these bushings was probably the best upgrade I have done.

I used all energy suspension parts off of amazon. Here is my part list if anyone wants to do it this:
Energy Suspension 8.10103G Rack and Pinion Bushing Set for 4WD
Energy Suspension 9.5156G 3/4" Greasable Sway Bar Set
Energy Suspension 9.5161G 1" Greasable Sway Bar Set
Energy Suspension 9.8105G End Link Grommet
I also used some spare nuts, bolts, and washers for the front sway bar brackets.
For grease, I used "green grease" from Autozone (make sure to use synthetic grease).
Notes:
-One problem I ran into was that the slots on the rear sway bar bushing brackets weren't close together enough that the bolts fit easily. So if you get this set, either have a dremel/file ready or be prepared to struggle threading the bolt on the rear bracket.
-The washers that come with the sway bar bushings are not very wide, I would recommend using different ones for the front. For the rear, a bigger washer interferes with the ability to thread the bolt.
-You don't need the Honda adapter set in the video. I only used the ball joint press and the medium sized 4wd adapter.
-Autozone rents out a tie rod end puller that is less likely to damage your tie rod end boot: part# 27276
-I reused my endlink washers on the front.
-The endlink bushings were a tight fit on the front. I forced them on with light taps from a hammer using another bushing as a buffer to avoid hitting the end link.

I'll post more if I remember anything else. Cheers! :thumb:


You're right about the Honda adapter set and we should have mentioned that in our video at the end that we didn't need it after all. At the time, it seemed better to have more tools than less so we didn't have to make another trip if we didn't have the right size adapter.

I thought the washers on my Energy Suspension kit where a little narrow too and I was thinking of reusing my OEM end link washers because of it. But, if you don't tighten the bushings down too much causing them to bulge a lot, I think the washers they provide work ok. I did keep my OEM washers though if I ever decided to go back. It was a fairly tight fit with the bushings but there was enough post coming through to get the nuts started. When I had my bushings tightened down to where there was a slight bulge in the bushing, their was 2-3 threads showing above the nut.

When I finally got some end link bushings that fit properly, I found my driver side end link had some rough threads so I bought a metric tap and die set at Harbor freight for $16 to clean up the threads. Then I went to ace hardware and bought some new lock nuts. By the way, the end link posts are 10mm with a 1.25 thread pitch.

Glad you found the video helpful.
 
I did keep my OEM washers though if I ever decided to go back. It was a fairly tight fit with the bushings but there was enough post coming through to get the nuts started.

With the suspension unloaded, and the new bushings on, catching the first few threads with the 10x1.25 nut took a bit of force. Your suggestion in the video to let the truck down to complete the tightening task was a good one.

It is important to note that the metal washers are what centers the endlinks, so, they take a beating. I would recommend new washers at all times, especially if the old washer holes were oblong (as mine were).

I didn't have washers so, I put the old ones back, but had I known what I know now, I would have ordered new washers.

If we can get the Daystar or Energy Suspensions kit to just come with washers, that would be best.

I think Prothane's kit can't be recommended at all, at least not until they get their act together on the endlink bushing dimensions.

PS: I haven't heard from Domenick in the past couple of days.
Have you?
 
With the suspension unloaded, and the new bushings on, catching the first few threads with the 10x1.25 nut took a bit of force. Your suggestion in the video to let the truck down to complete the tightening task was a good one.

It is important to note that the metal washers are what centers the endlinks, so, they take a beating. I would recommend new washers at all times, especially if the old washer holes were oblong (as mine were).

I didn't have washers so, I put the old ones back, but had I known what I know now, I would have ordered new washers.

If we can get the Daystar or Energy Suspensions kit to just come with washers, that would be best.

I think Prothane's kit can't be recommended at all, at least not until they get their act together on the endlink bushing dimensions.

PS: I haven't heard from Domenick in the past couple of days.
Have you?

I emailed them with the link to the thread on Friday so they could have the measurement information I provided and discoveries from talking to the parts guys at my local Toyota Dealership. So, I don't think I'll hear anything back from either Dominick at Prothane or Greg at Energy Suspension until some time this week.

The kit I bought, Energy Suspension 8.5118 did come with 4 washers. I agree it would be nice if these kits all came with new washers since there's a good chance people will need them especially in the rust belt of the country.

I would never recommend anyone buy the Prothane 18-1115 kit unless they change it and put correct fitting end link bushings in it.

I have a good feeling that these companies will do something about it and get an accurate kit put together soon. At least I hope they do after all the time we put into it.
 
I need the rack bushing kit I've been holding off until someone had a kit with the right sizes. Please keep this updated so we can be up on top of it
 
I need the rack bushing kit I've been holding off until someone had a kit with the right sizes. Please keep this updated so we can be up on top of it

The steering rack bushings were never a fit problem. It was the end link bushings for the sway bar people have issues with when buying the Prothane 18-1115 kit.

Here's a link to the steering rack kit that works.
Toyota Tacoma and 4Runner Steering Rack Bushings Kit

You can order it either in red or black. Use our video as a reference. If you have any questions, just ask.
 
The steering rack bushings were never a fit problem. It was the end link bushings for the sway bar people have issues with when buying the Prothane 18-1115 kit.

Here's a link to the steering rack kit that works.
Toyota Tacoma and 4Runner Steering Rack Bushings Kit

You can order it either in red or black. Use our video as a reference. If you have any questions, just ask.

At one time, the ES kit was missing a bushing. Most of us used the Wheeler kit--worked great for me.

http://wheelersoffroad.com/product/toyota/tacoma/1995-5-2004-tacoma-4x4-and-prerunner/suspension-steering-and-chassis/energy-suspension/steering-rack-bushing-kit-for-95-00-tacoma-and-96-02-4runner/
 
Thanks guys just ordered the kit 25 bucks shipped from energy

Which part number from Energy Suspensions did you order?
How was the fit?

Yeah, I'm fairly new to the 3rd Gen family so I reckon things have evolved quite a bit before I came around. With my experience with the end link bushings, it's not hard to imagine there were issues with the steering rack kits as well at one time in the past.

Have you heard anything on the fix to the Prothane kit yet?
(I haven't heard anything from Domenick myself.)
 
Which part number from Energy Suspensions did you order?
How was the fit?


Have you heard anything on the fix to the Prothane kit yet?
(I haven't heard anything from Domenick myself.)

I haven't heard anything.
 
I haven't heard anything.

Thanks for the quick reply.

While you and I have solved "our" problem (by getting the right-sized parts) and you figured out that all the stock 3rd-gen front swaybars are 26mm and all the endlinks are 10mm, it would be too bad if people are still getting improperly fitting parts today since this is easy math for the three most common folks who make the bushings:

How does this look for a summary recommendation for to make it easier for others than it was for us?
Code:
[b]Toyota OEM buna:[/b] (same size for all 3rd-gen 4Runners, 2WD & 4WD)
- Toyota 10mm ID Endlink bushings (Part #90948-01003)
- Toyota 26mm ID swaybar body bushings (#48815-35100)
Code:
[b]Daystar polyurethane:[/b] daystarweb.com +1-800-595-7659 tech at daystarweb dot com
- Daystar DAY MO3464 Body Bushing ID = 1.045 inches (26.5mm)
- Daystar DAY MO2233 End Link Bushing ID = 0.395 inches (10.0mm)
Code:
[b]Energy Suspensions polyurethane:[/b] energysuspension.com +1-888-913-6374 (Dave)  dlewis @ energysuspension dot com
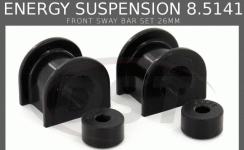
- Energy Suspensions kit 8.5141{R,G}, endlink bushing ID = 9.64mm, swaybar body bushing ID ~= 26mm <=== do we have an accurate measurement yet?
- [s]Energy Suspensions kit 8.5118{R,G}[/s] (Do not buy this kit as the swaybar body bushings are a bad fit at over 27 mm)
Code:
[b]Prothane polyurethane:[/b] prothane.com +1-888-776-8426 (Dominick)  dominick at prothane dot com
- [s]Prothane kit #18-1115[/s] (Do not buy this kit as the endlink bushings are a bad fit at 15.04mm ID)
 

Attachments

  • bushing.gif
    bushing.gif
    104.5 KB · Views: 492
Last edited:
Thanks for the quick reply.

While you and I have solved "our" problem (by getting the right-sized parts) and you figured out that all the stock 3rd-gen front swaybars are 26mm and all the endlinks are 10mm, it would be too bad if people are still getting improperly fitting parts today since this is easy math for the three most common folks who make the bushings:

How does this look for a summary recommendation for to make it easier for others than it was for us?
Code:
[b]Toyota OEM buna:[/b] (same size for all 3rd-gen 4Runners, 2WD & 4WD)
- Toyota 10mm ID Endlink bushings (Part #90948-01003)
- Toyota 26mm ID swaybar body bushings (#48815-35100)
Code:
[b]Daystar polyurethane:[/b] daystarweb.com +1-800-595-7659 tech at daystarweb dot com
- Daystar DAY MO3464 Body Bushing ID = 1.045 inches (26.5mm)
- Daystar DAY MO2233 End Link Bushing ID = 0.395 inches (10.0mm)
Code:
[b]Energy Suspensions polyurethane:[/b] energysuspension.com +1-888-913-6374 (Dave)  dlewis @ energysuspension dot com
- Energy Suspensions kit 8.5141{R,G}, endlink bushing ID = 9.64mm, swaybar body bushing ID ~= 26mm <=== do we have an accurate measurement yet?
- [s]Energy Suspensions kit 8.5118{R,G}[/s] (Do not buy this kit as the swaybar body bushings are a bad fit at over 27 mm)
Code:
[b]Prothane polyurethane:[/b] prothane.com +1-888-776-8426 (Dominick)  dominick at prothane dot com
- [s]Prothane kit #18-1115[/s] (Do not buy this kit as the endlink bushings are a bad fit at 15.04mm ID)

As long as the kits have 26mm inner diameter sway bar bushings and 10mm inner diameter end link bushings, they will work. Maybe I'll send out an email to the usual suspects, Dominick at Prothane and Greg at Diverse Suspension Technologies (they sell Energy Suspension parts) see if they have any information for us to pass on.
 

Members online

Forum statistics

Threads
278,312
Messages
3,554,089
Members
248,016
Latest member
Advally Service

Trending content

Back
Top