Timing Belt DIY, specialty tools needed!!

... but that's the system flushing the air out of the system and since the water pump is dry( no coolant there until it starts cycling...!


After filling the radiator, fill the block too, using the upper hose to pour into the block until it is full.


Then run the engine with the cap off for a bit. That will help get more air out. To get the rest of the air completely out, use a spill-free funnel and burp the entire system.
 
79d7fde58bcd663c5540c9be593b6e65.jpg
5fed819bccf3f27b510fcf513cc0162d.jpg


Here is my pulley holder. Parts are from ACE hardware.
 
To make the crank pully holder, I used a piece of scrap 2x4 I had in the garage and two drill bits. Had to order a new torque wrench though. 217 ftlbs is a lot.
 
Thanks again for all the input. I intend to remove the radiator to make more room. I seriously hope I can get it done this coming weekend...Time will tell.
 
I got started on this job today and everything is going pretty smooth. One problem...
I'm unsure about how to proceed with the TB tensioner replacement...I removed the old timing belt and water pump (new water pump is installed)
I tried to get to the bolts that hold the AC compressor bracket on and I just can't get to the ones below the exhaust manifold. At this point can I still use the compression tool to use the old tensioner?
How in the world do people claim to be able to get the tensioner off without removing the ac bracket?
I feel like I'm in a bit of a jam right now...
Any tips would be appreciated.
I read through several DIY procedures, but none of them are very clear about how to get the tensioner off.

Thanks
 
I just read through timing belt section of the toyota FSM. I was trying to take the ac compressor and the bracket of together, it looks like I have to take the compressor off THEN take the bracket off...makes sense.
 
Yes that's how I had to do it. Be careful and spray the long bolts holding the compressor to the bracket where they go through the aluminum. I broke a bolt and played holy he** getting the compressor off it literally sucked. Took hours and then I had to troll the junkyards looking for a bolt.
 
You may need a steering wheel puller to pull the crank pulley off.

Crank pulley is off, I thought I was going to need a puller, it certainly didn't "come right off" like some say it will, I patiently wiggled it back and forth while pulling at the same time and it slowly came off.
 
I wanted to wrap this thread up with an after project report...

The runner is all back together and running great and I had no nuts or bolts left over afterwards!! All in all the job was pretty simple and straightforward. For anyone planning this job in the future I have a couple of tips:

-I used the starter method to break the crank pulley bolt loose. What I failed to realize is that I would need some way to hold the pulley when I reinstalled it...For that I used a 2x4 and two #2 phillips screwdrivers (pretty hokey, but it worked) With the pulley off the car, you can use it as a template to mark the hole locations on the 2x4, no need for a tape measure. My torque wrench only went to 150 ft-lbs, so I used it to get to that point, then I used a 1/2" breaker bar to tighten it until the 2x4 cracked...Hopefully it's sufficient.

-When putting on the new timing belt I was unable to get it on the tensioner pulley, as described in other DIY's I read. To get it on I had to loosen the upper idler pulley just enough to get a little wiggle, with that I was able to get the belt on.

-If you are replacing the hydraulic tensioner, I think it might be easier to get the timing belt on if you leave the tensioner off until after the belt is in place. Putting the tensioner on first may have played a part in not being able to get the belt on as described above. I removed the AC compressor and bracket to get the tensioner off.

-The crank pulley didn't "come right off" as some describe. I had to wiggle to it back and forth while pulling to get it off, but I didn't need a puller.

-The belt kit I bought didn't include a thermostat, I would have purchased one to put in while I was in there.

-The project took me about 8 hrs total, but I'd say I spent about two hours on things like figuring out how to get the crank pulley off, and rereading certain steps to make sure I was doing things right.

Thanks for all the advice, it helped out tremendously!

 
I would STRONGLY suggest renting a 250 ft/lb torque wrench to ensure that you're at the right torque setting. 217 is a LOT, and without having the ability to know for sure, you could still be well under the spec. I kept fearing I would break the bolt as I worked my way up to 217. Once above like 160 or 170, I worked up in 10 lb increments so that I knew exactly where I was at on the torque range.


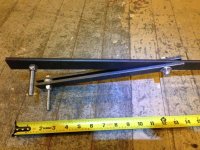
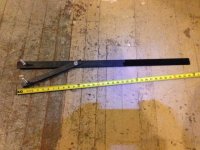
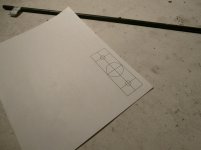
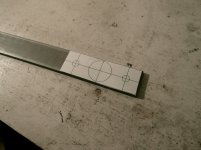
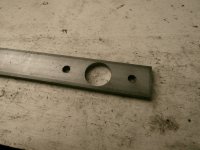
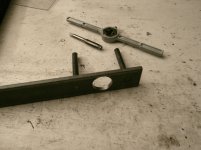
For my crank pulley tool, I measured and made a template to print out for my home-made SST. I got a 4' long piece of steel from Lowes or somewhere. Printed a template and bonded it to the steel. Cut pilot holes, then cut full sized holes. Tapped the holes and threaded corresponding steel bar to thread in. This is where I would use hardened bolts as opposed to soft steel. For a one-time deal, they worked great. To use it again, I'll need bolts or something a bit more stiff.


It worked very well. The only modification I would make to it is to use hardened bolts instead of soft metal, as they bent a bit when the torque got up into the 200s.


My pics aren't the best....
 

Attachments

  • SST-01.jpg
    SST-01.jpg
    88.2 KB · Views: 1,126
  • SST-02.jpg
    SST-02.jpg
    128.1 KB · Views: 1,417
  • SST-03.jpg
    SST-03.jpg
    133 KB · Views: 1,372
  • SST-06.jpg
    SST-06.jpg
    123.3 KB · Views: 1,988
Last edited:
Yep. (Only pull the pin AFTER it and the belt are installed, obviously.) You can leave the A/C on if you are artful with a long 1/4" drive wobble extension. But you will need a pulley holder to tighten the crank bolt--217 ft-lbs on a critical part is not to guess at or just hit with an impact and call it good. You could lose your engine if it backs out--it has happened more than once.

I have both tools, but I'm a little over 90 min. from Philly. I'll be down there in two weeks. Not sure yet of exact date.

[Underline and bold added.]

Well, I warned you you would need a tool to tighten the bolt. So glad I took the effort to write that since you ignored it. Now read the second part. 217 ft-lbs has vanquished many a 2x before the torque got close to spec--although not mine. Key is to put the holes on the diagonal, avoid knots, and leave plenty of wood PAST the hole. Otherwise they fly apart in the wind.

PLEASE confirm you have full spec. torque, you really will not be happy if that effer backs out.

IMG_1466.JPG


I don't mind that the soft bolts warped a little, it kind of makes them self-adjusting.
 
Last edited:
I wanted to wrap this thread up with an after project report...

The runner is all back together and running great and I had no nuts or bolts left over afterwards!! All in all the job was pretty simple and straightforward. For anyone planning this job in the future I have a couple of tips:

-I used the starter method to break the crank pulley bolt loose. What I failed to realize is that I would need some way to hold the pulley when I reinstalled it...For that I used a 2x4 and two #2 phillips screwdrivers (pretty hokey, but it worked) With the pulley off the car, you can use it as a template to mark the hole locations on the 2x4, no need for a tape measure. My torque wrench only went to 150 ft-lbs, so I used it to get to that point, then I used a 1/2" breaker bar to tighten it until the 2x4 cracked...Hopefully it's sufficient.

-When putting on the new timing belt I was unable to get it on the tensioner pulley, as described in other DIY's I read. To get it on I had to loosen the upper idler pulley just enough to get a little wiggle, with that I was able to get the belt on.

-If you are replacing the hydraulic tensioner, I think it might be easier to get the timing belt on if you leave the tensioner off until after the belt is in place. Putting the tensioner on first may have played a part in not being able to get the belt on as described above. I removed the AC compressor and bracket to get the tensioner off.

-The crank pulley didn't "come right off" as some describe. I had to wiggle to it back and forth while pulling to get it off, but I didn't need a puller.

-The belt kit I bought didn't include a thermostat, I would have purchased one to put in while I was in there.

-The project took me about 8 hrs total, but I'd say I spent about two hours on things like figuring out how to get the crank pulley off, and rereading certain steps to make sure I was doing things right.

Thanks for all the advice, it helped out tremendously!

Personally I did the same and reinforced mine with gorilla duct tape to prevent splitting and it worked. I would going back and retighten if î were you since mine split around 170ft and my pulley was wobbling. I dont know what kit you went with but I wish I would've been able to tell you to get the line I used. It came with everything including cam seals and thermostat for 299.

Go double check every thing next week so you don't destroy anything
 
Edited
-I used the starter method to break the crank pulley bolt loose. Unfortunately, I'm a moron and forgot that I would need some way to hold the pulley when I reinstalled it...For that I used a 2x4

[Underline and bold added.]

Well, I warned you you would need a tool to tighten the bolt. So glad I took the effort to write that since you ignored it.

Don't feel bad, I forget all kinds of stuff. I honestly do appreciate ALL of the advice I get here.
I'll talk to our mechanic at work today about a bigger torque wrench.
 

Members online

Forum statistics

Threads
278,312
Messages
3,554,085
Members
248,016
Latest member
Advally Service

Trending content

Back
Top