Tire Rub On Front Fender Lining

WaySlowWhitey

New member
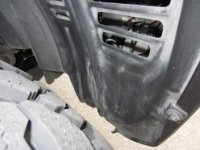
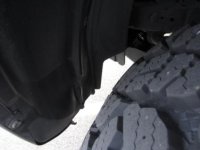
I've searched and found a number of comments on cutting or otherwise "moving" the fender lining to prevent rubbing when backing up. I would prefer not to cut the fender-lining but can't find more details on how to "move" the lining. Can anyone share some pictures of how to do this? If not, how has everyone cut theirs? BTW it's on a '12 SR5 with 2.5/1.5 Toytec with 265's and Black Rhino wheels.
 
Register to hide this ad
You're rubbing with 265s? From what I recall is the SR5 bumpers are different from the Trails. I remember for mine, it wouldn't even move forward. So I just ruled that out.

Now for cutting the liner. Turn your wheel to the right and if it rubs, mark where it rubs and cut across with a box cutter. Do the same for the left. You can also pop off this little piece by the side rockers in the wheel well. Sorry I don't know what its called, but once you look in there, you'll get what I'm talking about.

My liners looked pretty haggard afterwards, but solved most of my problems.
 
Sometimes the inner fender rubbing can be handled with a heat gun. Wear gloves for this. Heat the liner till its soft and pliable, push and hold it in with your hands till cold. A bag of crushed ice pushing on it speeds things along too.
 
Notwithstanding the wheel issue, the OP does have aftermarket tires. Albeit, 265's but different nonetheless. Also, he has a lift. Who knows how the Castor is set after the lift. Then you look at the wheels/tires and it is not out of the range of possibility that his Castor is above 4.0. Not to say your "back spacing issue" is not a possiabilty, I am just thinking all things considered, it's just a matter of change.

Op, unless you are 300lbs plus, and most of that weight is in your gut, you have more then enough room (with a lift) to crawl under your rig and look at the inner "plastic" inner fender. There are 2 maybe 3 screws that hold it into place against the outer plastic fender. Take your hand and push against the fender, it will flex. Now will see which screws need to come out, then "re-drill" a new hole (after you push in the inner fender), and reset the screw. Very easy MOD.

Good luck and be safe....

 
I used a heat gun on mine, I was to lazy to crawl under the rig. No gloves needed either. Just a heat gun and a screw driver handle to do the pressing.
5 minutes and it's done.
 

Attachments

  • IMG_0038.JPG
    IMG_0038.JPG
    27 KB · Views: 17,348
  • IMG_0043.JPG
    IMG_0043.JPG
    18.7 KB · Views: 14,784
Thanks to all the replies and the pics. To the question of backspacing, I'm running 17x9's with Hankook ATM R10's in 265 so yes, backspacing is off from factory. I'll give the heat gun a try this weekend. Thanks again for all the insights!
 
Thanks to all the replies and the pics. To the question of backspacing, I'm running 17x9's with Hankook ATM R10's in 265 so yes, backspacing is off from factory. I'll give the heat gun a try this weekend. Thanks again for all the insights!

Did you try the heat gun technique and if so, how did it work? Tips?
 
Thanks to all the replies and the pics. To the question of backspacing, I'm running 17x9's with Hankook ATM R10's in 265 so yes, backspacing is off from factory. I'll give the heat gun a try this weekend. Thanks again for all the insights!
Did you get an alignment done after having your lift put in? I got one right after the lift and a second one a little while later after the suspension had settled.
 
Dealer installed the lift as part of the sale and had the alignment done as well (Paperwork included). The heat-gun technique worked well on the drivers-side but note so well on the passenger. Where it rubs on the fender-lining there's a "seam" of sorts that made the heat gun technique more challenging. Would recommend applying heat for 30-45 seconds then shape using a large blade screwdriver or other flat object. Keep sharping with heat application until you've got the clearance you want.
 
Moving the liner is extremely easy. It took me about a minute per side. In front of the wheel, under the bumper there are two (I believe) screws (hex head). Just unbolt them and push the liner forward. Then screw them back through the plastic. You do not have to drill a new hole. I just pressed up on them and they screwed right in.
 

Members online

Forum statistics

Threads
278,309
Messages
3,554,066
Members
248,016
Latest member
Advally Service

Trending content

Back
Top