TonyB66's Ownership -> Build Thread (2000 Limited)

Ash, thanks for sharing that thread. Following.

I almost forgot, but it litterally has your name on it.

35kS6Vx.jpg


Decided to not set-up the corner light as a turn signal, at least at this time. Turn signal wires are done. Both of these lights are for turn signals and flashers.

CVO9kVC.jpg


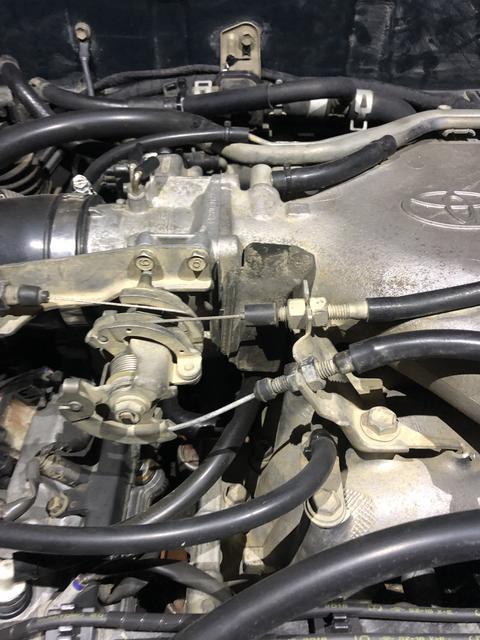
Anyone know what this is? A little over 2 inches long... It was in the engine bay, down by the intake box.

woOMalY.jpg


The rains came, I was done...

ILUmlTn.jpg

It goes over a vacuum line on the side of the throttle body.
 
BTW here are the pics of my sealed sunroof. It's been a month and no regrets. It's now a moonroof, yay! What isn't shown though is my 45 mins of careful, very careful taping with painter tape so that the silicone excess only got on the tape and not my paint. Instead of the tarp, use blue painters tape as a temporary solution. If you do, be sure to get the classic blue painters tape, not the new redesign. The classic works better and leaves no residue. You could leave it in for weeks without issue.

Post #6
Anyone seal their sunroof?
.
 
The last two posts deserve Likes for sure. Thanks much.

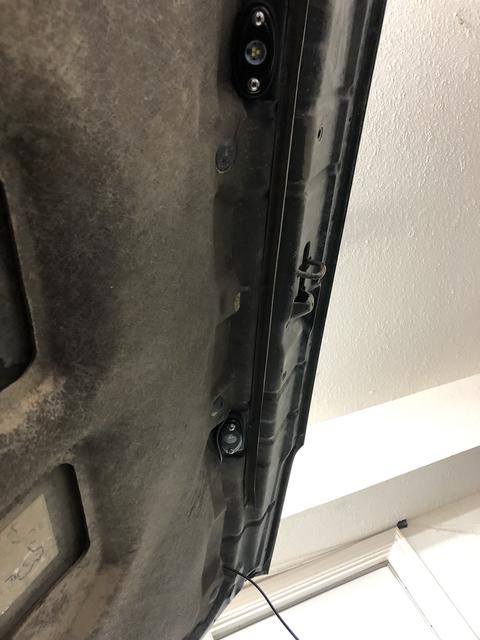
Man it’s nice having hood lights lol, here’s a pic for reference.. guess it’s right behind the TB

0483-B6-BD-914-A-425-C-AAA1-A9240-C59-DC4-E.jpg

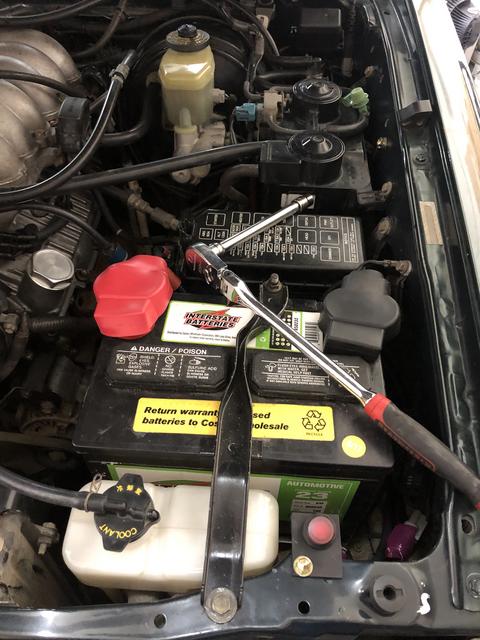
Like your idea with those lights, a lot. My apologies if you mentioned it in your build thread, but are those lights manually switched, or turn-on automatically? I actually think I would prefer a switch, in the engine bay.

I'm usually very good about putting parts back on my wrenching projects, so I think that was done before my ownership. I'm curious what function that part serves. I suppose it will be obvious when I look later... Thanks again.

BTW here are the pics of my sealed sunroof. It's been a month and no regrets. It's now a moonroof, yay! What isn't shown though is my 45 mins of careful, very careful taping with painter tape so that the silicone excess only got on the tape and not my paint. Instead of the tarp, use blue painters tape as a temporary solution. If you do, be sure to get the classic blue painters tape, not the new redesign. The classic works better and leaves no residue. You could leave it in for weeks without issue.

Post #6
Anyone seal their sunroof?
.

I was going to PM you as I couldn't find it in your build thread or other threads. I will read, but I'm already pretty convinced I will seal it. At this time have the green painter's "frog" tape though.

You both have aftermarket bumpers. Did you need to trim or remove any of the wheel well liner material forward the tires, as seen in this image?

ILUmlTn.jpg


I can't do a test fit now as the frame rail end plates need to be removed first... Will be doing the install with Tim so he can get it on video, so the cutting and grinding will be at his place.
 
Last edited:
The last two posts deserve Likes for sure. Thanks much.


Like your idea with those lights, a lot. My apologies if you mentioned it in your build thread, but are those lights manually switched, or turn-on automatically? I actually think I would prefer a switch, in the engine bay.

I'm usually very good about putting parts back on my wrenching projects, so I think that was done before my ownership. I'm curious what function that part serves. I suppose it will be obvious when I look later... Thanks again.


I was going to PM you as I couldn't find it in your build thread or other threads. I will read, but I'm already pretty convinced I will seal it. At this time have the green painter's "frog" tape though.

You both have aftermarket bumpers. Did you need to trim or remove any of the wheel well liner material forward the tires, as seen in this image?

ILUmlTn.jpg


I can't do a test fit now as the frame rail end plates need to be removed first... Will be doing the install with Tim so he can get it on video, so the cutting and grinding will be at his place.

I cut the plastic fender liner flush with the bottom of the fender.

They are manually switched. I had a pin switch on my Tacoma and it was just a hassle, was a crappy pin switch though.
Here’s the little bracket I made for the switch.. (next to coolant overflow)

DD90-FB8-C-FD1-E-4-FD9-BD7-E-2-E0-D99-C812-E5.jpg


Here’s the lights rivnutted to the hood..

B93-C0509-3-A59-4153-BAFA-4320-BEB80-D84.jpg
 
I cut the plastic fender liner flush with the bottom of the fender.

They are manually switched. I had a pin switch on my Tacoma and it was just a hassle, was a crappy pin switch though.
Here’s the little bracket I made for the switch.. (next to coolant overflow)

Here’s the lights rivnutted to the hood..

B93-C0509-3-A59-4153-BAFA-4320-BEB80-D84.jpg

Thanks for sharing those details. A well lit engine bay is so nice, especially when not home with the full assortment of lighting.

Are you happy with the placement of those two lights? Curious if you have any dark spots or areas not as bright as you'd like...

Trying to think where my rivnut tool is from our move a few years ago.
 
Thanks for sharing those details. A well lit engine bay is so nice, especially when not home with the full assortment of lighting.

Are you happy with the placement of those two lights? Curious if you have any dark spots or areas not as bright as you'd like...

Trying to think where my rivnut tool is from our move a few years ago.

No problem man. I think the placement actually ended up perfect. Whole engine bay gets lit up with not much shadowing at all.
 
Ash, thanks for sharing that thread. Following.

I almost forgot, but it litterally has your name on it.

35kS6Vx.jpg

You're awesome Tony thanks! That could potentially really help me a lot. I really hope to avoid taking the rear bumper off to do this. When are you filming the bumper installation with Tim? I assume you will be doing it at his house?

You're welcome I thought you would find it interesting the extent eimkieth is going to. But I think in your case you are on the right track with how lowlinkin did his but I'm just not sure how you go about getting the small section of roof metal. Unless junkyards allow people to cut the roof up on their lot(?). Although I did also read you might actually build something a bit more custom to create a storage area up there. That will definitely be interesting to see.
 
Last edited:
You're awesome Tony thanks! That could potentially really help me a lot. I really hope to avoid taking the rear bumper off to do this. When are you filming the bumper installation with Tim? I assume you will be doing it at his house?

You're welcome I thought you would find it interesting the extent eimkieth is going to. But I think in your case you are on the right track with how lowlinkin did his but I'm just not sure how you go about getting the small section of roof metal. Unless junkyards allow people to cut the roof up on their lot(?). Although I did also read you might actually build something a bit more custom to create a storage area up there. That will definitely be interesting to see.

Sure, np Ash.

Learned a couple days ago that my wife's surgery won't happen next week, but a couple weeks later. I contacted Tim to see if tomorrow (Sun) might work. Late notice, but figured I'd ask... I can't fit both bumpers and the swing-out in the back of my 4Runner though so he was contemplating coming down here to haul some of the stuff too. That might not prove feasible for him, so maybe we'll do front and rear separately. Not sure...

I too wondered about cutting-out a section of roof, if that would be allowed in a salvage yard. I imagine not so in most cases, but once it's been all picked over, maybe... Otherwise, welding a piece of sheetmetal contoured accordingly should do the trick. Would do a template first. Again, I might make something a little different, raised about an inch for added space, slightly larger than the opening, flanged all around to the contour of the perimeter. I envision still being able to use the sunroof shade slider with my ham radio and mic up there...

I removed one sunroof before, and with others that I'm aware (track builds), minimum weight should be about 20 pounds. Most seem to be around 25-35 pounds, and some much more. Added support should not be necessary as what I'll be doing will weigh less...

Pretty cold today, for us at least, but did some touch-up painting of that flap.

FlC6WbM.jpg


One of the negatives is silicone is that it's not paintable, supposedly. I find that if scuffed up a bit, with light coats of spray paint, it can work quite well. If that would have not worked, putting a very thin layer of paintable siliconized caulk over it would have done the trick as a primer of sorts...
 
Last edited:
Looks like Tim and I are tentatively set for an install of both bumpers and the swing-out tire carrier on Sunday.

Did a bit more prep today... Small stuff.

So I don't need to apply a couple coats of paint at Tim's place, slowing us down, I drilled-out the six holes (3/8") for the swing-out on the right side. They were pre-drilled.

UkkO8AP.jpg


After vacuuming and cleaning with rubbing alcohol, a couple coats of paint.

RaAButE.jpg


While those were drying, I wire brushed the inside of the frame rails in the rear. There was just light rust in there. I plan to paint the entire inside the frame rails later, but figured it might be easier do the ends now with no rear bumper.

H6arysu.jpg


lGVz7Ji.jpg


Back to the front, I used the Dremel to remove portions of the wheel well liner.

23RpCju.jpg


tPTn5gX.jpg


Oh, for that hood prop catch, I had a few of these in a drawer, this should work great. Used silicone to secure it.

FHV5QCF.jpg


I solar trickle charge the battery. As seen in that photo, there was sun and charging at 13.3 volts.
 
Tim does indeed want to film the Savage bumper installs, and it's on for tomorrow. Since I can't fit both and the swing-out in mine, he's stoping at my place tomorrow morning, which is on his way home from work.

I got the rear bumper and some supplies in the back of mine today.

Xxt2eJm.jpg


The swing-out, tire carrier.

BGRM2UJ.jpg


Zgjrh8m.jpg


Got the MINI back in the garage, pulled forward enough to stack five tires, five wheels, front and rear Kings, 891 springs, SPC UCAs, the winch, the Cadillac horns and the Eastman internal frame paint... And of course the front bumper which Tim will transport tomorrow morning.

BX4UCTh.jpg
 
Front and rear bumpers, with swing-out tire carrier installed. Tim did a fantastic job and busted his butt. Due to not having written instructions for the swing-out tire carrier, and a lot of hardware involved, that was the most challenging of the three. We went into the night on his driveway. When the late day drizzle turned into hail, that became a good stopping point. It was too dark for photos at that point.

The front bumper, for 99+ models, requires quite a bit of cutting and grinding and the ends of the frame rails. Those pads need to be brought down to the frame rails, notably on the bottom and on the outside, so the Savage bracket sits squarely. I only took one photo at Tim's place, and this is it.

WFHtDd9.jpg


I was pretty busy with holding a camera or light, getting tools and helping with the install at times.... I enjoy wrenching with Tim.

The front bumper was otherwise pretty easy and straight-forward. The rear was even easier and faster.

As mentioned earlier, the swing-out spare tire carrier was quite frustrating. This is what we had, and we watched and paused it countless times! My computer's battery finally died...

YouTube

Roy at Savage is aware and he said that his website will be getting re-done soon and that all instructions for his products will be updated. That said, with Tim and Sean's videos to be released within a week or so, those should be golden, as usual...

Tim wanted to finish the install and came to my place today. "Snowden", a "neighbor" just down-the-road who I had not met, came on very short notice. He has the same Savage rear bumper and swing-out tire carrier. It was very helpful to pick his mind, and of course to see his install for comparison purposes. His 4Runner is damn clean and well taken care of for sure.

So, the install is complete. I might do some minor adjustments on the front bumper so the spacing from the body panels is more consistent, but it's pretty close...

5OWewh8.jpg


hje2g5a.jpg


The turn signals, two pairs, work great... Net weight gain is at 47 pounds. Actually a bit less if I add up the scrap steel that was removed at Tim's place (frame end caps), and those brackets I removed earlier... Oh, also the factory recovery points, which are pretty heavy. I'd say the net gain is closer to 42 pounds.

The rear.

kS18IFz.jpg


G6j9xsz.jpg


Net weight gain for the Savage rear bumper, with swing-out tire carrier, 39 pounds. When I factor-in the that I removed the stock tire carrier at 19 pounds, The rear bumper with swing-out tire carrier added just 20 pounds.

On a side note, while driving to Tim's place on Sunday, the ATF hit a high of 143 degrees.

S9jzYBp.jpg


On the way home, when the ambient temps were a little cooler, ATF temps ran a bit warmer (no photo), I think because the front bumper blocks some of the air flow, which I expected.

I think the fender flares and cladding would look better if they matched the bumper (black).

KsRKpSV.jpg


jZ5gcr4.jpg


A paint job will likely be the last of the "big" projects...

I'm contemplating the install of the rear Kings shocks and the 891 springs next. Any reason I can't or shouldn't do that now, before the fronts a couple weeks later?

 
Last edited:
I'm considering an aftermarket front bumper but my concern is that there's no crush cans / impact absorbers. Minor accidents are going to go straight to the frame and the passenger. A bit of impact absorbance would be nice to minimize possibility of frame damage. I was thinking of making some of my own that I'd mount to the front of the bumper. Then remove them if you need the approach angle or winch. Making them look half decent is the hard part.
 
I'm considering an aftermarket front bumper but my concern is that there's no crush cans / impact absorbers. Minor accidents are going to go straight to the frame and the passenger. A bit of impact absorbance would be nice to minimize possibility of frame damage. I was thinking of making some of my own that I'd mount to the front of the bumper. Then remove them if you need the approach angle or winch. Making them look half decent is the hard part.

I believe, but I'm not sure, the ARB front bumper has crush cans. If so, that would seemingly be a good choice.
 
I believe, but I'm not sure, the ARB front bumper has crush cans. If so, that would seemingly be a good choice.

I have the ARB and it does have a minor crush zone. Generally speaking just try not to get in an accident at all since these trucks are super easy to total-out from a $$$ perspective.
 
Front and rear bumpers, with swing-out tire carrier installed. Tim did a fantastic job and busted his butt. Due to not having written instructions for the swing-out tire carrier, and a lot of hardware involved, that was the most challenging of the three. We went into the night on his driveway. When the late day drizzle turned into hail, that became a good stopping point. It was too dark for photos at that point.

The front bumper, for 99+ models, requires quite a bit of cutting and grinding and the ends of the frame rails. Those pads need to be brought down to the frame rails, notably on the bottom and on the outside, so the Savage bracket sits squarely. I only took one photo at Tim's place, and this is it.

WFHtDd9.jpg


I was pretty busy with holding a camera or light, getting tools and helping with the install at times.... I enjoy wrenching with Tim.

The front bumper was otherwise pretty easy and straight-forward. The rear was even easier and faster.

As mentioned earlier, the swing-out spare tire carrier was quite frustrating. This is what we had, and we watched and paused it countless times! My computer's battery finally died...

YouTube

Roy at Savage is aware and he said that his website will be getting re-done soon and that all instructions for his products will be updated. That said, with Tim and Sean's videos to be released within a week or so, those should be golden, as usual...

Tim wanted to finish the install and came to my place today. "Snowden", a "neighbor" just down-the-road who I had not met, came on very short notice. He has the same Savage rear bumper and swing-out tire carrier. It was very helpful to pick his mind, and of course to see his install for comparison purposes. His 4Runner is damn clean and well taken care of for sure.

So, the install is complete. I might do some minor adjustments on the front bumper so the spacing from the body panels is more consistent, but it's pretty close...

5OWewh8.jpg


hje2g5a.jpg


The turn signals, two pairs, work great... Net weight gain is at 47 pounds. Actually a bit less if I add up the scrap steel that was removed at Tim's place (frame end caps), and those brackets I removed earlier... Oh, also the factory recovery points, which are pretty heavy. I'd say the net gain is closer to 42 pounds.

The rear.

kS18IFz.jpg


G6j9xsz.jpg


Net weight gain for the Savage rear bumper, with swing-out tire carrier, 39 pounds. When I factor-in the that I removed the stock tire carrier at 19 pounds, The rear bumper with swing-out tire carrier added just 20 pounds.

On a side note, while driving to Tim's place on Sunday, the ATF hit a high of 143 degrees.

S9jzYBp.jpg


On the way home, when the ambient temps were a little cooler, ATF temps ran a bit warmer (no photo), I think because the front bumper blocks some of the air flow, which I expected.

I think the fender flares and cladding would look better if they matched the bumper (black).

KsRKpSV.jpg


jZ5gcr4.jpg


A paint job will likely be the last of the "big" projects...

I'm contemplating the install of the rear Kings shocks and the 891 springs next. Any reason I can't or shouldn't do that now, before the fronts a couple weeks later?

Truck looks great man! Which scs rims did you end up getting??
 
Truck looks great man! Which scs rims did you end up getting??

Thanks. For the first time, I'm finally starting to like how she looks. Not putting on the grille just yet as it would come back off for the winch install...

F5_finish_4_grande.jpg


Have those (F5) in 17s.

Reading-up now on rear shock replacement, and a couple of Tim and Sean's videos... The tops look to be hard part due to tight access.
 
Tim wanted to finish the install and came to my place today. "Snowden", a "neighbor" just down-the-road who I had not met, came on very short notice. He has the same Savage rear bumper and swing-out tire carrier. It was very helpful to pick his mind, and of course to see his install for comparison purposes. His 4Runner is damn clean and well taken care of for sure.

My pleasure Tony, glad to finally meet you in person. Although you guys were well on your way to assembled by the time I arrived and it was looking awesome. Throw that lift on and you'll have arrived. The tires and wheels will be a bonus once installed.
 

Members online

No members online now.

Forum statistics

Threads
278,316
Messages
3,554,120
Members
248,016
Latest member
Advally Service

Trending content

Back
Top