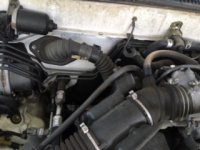
Well this is a pisser b/c no one seems to know what to do now, including me.

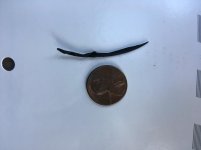
UPDATE: In preparation to do the flush, I pulled off the top rad hose and just inside the hose found this black gasket piece. Does this change any of my testing or just proceed as planned?

The only part of your coolant system that had a gasket like that is the thermostat. You have so many pieces coming out of your coolant, I'm not exactly surprised its overheating.

You really could have a blockage anywhere.
 
JZ, it looks shaved and not sure if its RTV or Oring. How can I determine the diff?

96Red, I will def have all of that done once I get her back on the road. And any beer you want!

I certainly do appreciate the detailed replies and instructions. SO very helpful! Just got back from Lowes, headed outside now to resume testing. Will let you know the results in a bit.

RTV is softer. Usually isn't as smooth as a shaved off oring. Just looks less "formed" than an oring. A piece of oring will look like it was shaved off from the oring that is "hopefully" still in place. Like if you were to lay it on a piece of paper, you could draw the circle it's apart of (assuming it's round)
 
UPDATE:

JZ, that black "shaved off" looking rubber piece is more straight than like the round red pieces I found inside the WP housing. See pics of the red in my first post. It feels like gasket..not as soft/pliable as the red. I checked the old TS gasket and it is entirely intact and still on the old TS, even tho it looks/feels like it could be from there, I don't think it is.


THE FLUSH: After I pulled the TS out, I did the engine flush several times starting w/top hose. The first time I got pale green water, yet relatively clean. No pieces or debris, gasket material etc. The water flow from both hoses seemed normal, didn't trickle whatsoever. I assume there is no blockage in the engine.

I've read your previous posts several times and don't see (may have missed it tho) if I should do the rad that way too. But I guess it can't hurt ayy?

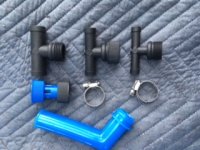
I'm not sure how to flush the heater core even though I've done several searches here and on other sites. I have the flush kit from the auto parts store. Please see the attached pic and tell me where I need to splice this in to do the flush. Do I need to use some sort of de-clog fluid? ie- CLR, etc. The guy in the ap store told me I'd have to cut the heater hoses to splice in this kit...is this correct? I have an air compressor if it will help. In your reply, please "draw me a picture, lol" Thanks! In the meantime, I'll keep googling.

Thanks all!

 

Attachments

  • Heater core hoses.JPG
    Heater core hoses.JPG
    35.7 KB · Views: 412
Last edited:
UPDATE:

JZ, that black "shaved off" looking rubber piece is more straight than like the round red pieces I found inside the WP housing. See pics of the red in my first post. It feels like gasket..not as soft/pliable as the red. I checked the old TS gasket and it is entirely intact and still on the old TS, even tho it looks/feels like it could be from there, I don't think it is.


THE FLUSH: After I pulled the TS out, I did the engine flush several times starting w/top hose. The first time I got pale green water, yet relatively clean. No pieces or debris, gasket material etc. The water flow from both hoses seemed normal, didn't trickle whatsoever. I assume there is no blockage in the engine.

I've read your previous posts several times and don't see (may have missed it tho) if I should do the rad that way too. But I guess it can't hurt ayy?

I'm not sure how to flush the heater core even though I've done several searches here and on other sites. I have the flush kit from the auto parts store. Please see the attached pic and tell me where I need to splice this in to do the flush. In the meantime, I'll keep googling.

Thanks all!

I didn't mention the radiator flush because if all else looked good then I would spend the $100 on a new radiator. Your's looks a little tired anyway.

The heater core obviously has an inlet and an outlet. The inlet is coming from the heater valve. Specifically, the little hose on the left side of the valve. There is a grommet on the 2 nipples (on the heater core) for the 2 hoses. The little hose connects on the right nipple and the outlet hose which is longer and runs along the back of the motor (connecting to that hard tube running along the passenger side of the motor) connects on the left nipple. This all facing the motor. May need some heater hose to connect to the nipples. I can't remember if it was easy or difficult to get the hose of the outlet to connect a length of heater hose. You want to reverse flush first though, that's important. Then once you do that, you can flush through the heater valve on the right side of it by taking that hose off (on the right), disconnecting the cable and manually opening the valve with the little lever. This might help flush out the crap that may be in the valve too as well as giving you away to "pulse" the water pressure in by opening and closing the lever by hand.

Did you check your fan clutch? I mentioned that first in my previous message because it was easiest.

Lay the black piece out and put a coin next to it for scale.
 
Last edited:
So your truck is as old as mine. I ended up disconnecting the rear coolant lines to the rear heater because they crumbled when I touched it. They rust out back where they enter the floor board under the front pass seat. You may be leaking coolant slowly for now back there and running low as you drive.

Also, I found I was running hot using an after market TS. Are you using a Toyota TS?

And you can do a good job of purging the air with the engine off by disconnecting one of the heater core hoses. Its the highest point in the system. IIRC you can also disconnect a hose off the throttle body to let air vent out. You wont lose much coolant that way.
 
Last edited:
UPDATE:

JZ, that black "shaved off" looking rubber piece is more straight than like the round red pieces I found inside the WP housing. See pics of the red in my first post. It feels like gasket..not as soft/pliable as the red. I checked the old TS gasket and it is entirely intact and still on the old TS, even tho it looks/feels like it could be from there, I don't think it is.


THE FLUSH: After I pulled the TS out, I did the engine flush several times starting w/top hose. The first time I got pale green water, yet relatively clean. No pieces or debris, gasket material etc. The water flow from both hoses seemed normal, didn't trickle whatsoever. I assume there is no blockage in the engine.

I've read your previous posts several times and don't see (may have missed it tho) if I should do the rad that way too. But I guess it can't hurt ayy?

I'm not sure how to flush the heater core even though I've done several searches here and on other sites. I have the flush kit from the auto parts store. Please see the attached pic and tell me where I need to splice this in to do the flush. Do I need to use some sort of de-clog fluid? ie- CLR, etc. The guy in the ap store told me I'd have to cut the heater hoses to splice in this kit...is this correct? I have an air compressor if it will help. In your reply, please "draw me a picture, lol" Thanks! In the meantime, I'll keep googling.

Thanks all!

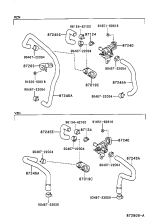
87245E is your inlet hose. 87246A is your outlet hose. 87019C is the grommet where your heater core nipples are coming through. The left nipple is the outlet the right nipple is the inlet. The easiest way (I think) to get the outlet is to disconnect 87246A directly from the heater core and hook up a piece of spare heater hose. I don't know what size it is (it's metric but maybe 1/2" or 5/8") The inlet is easier. Disconnect 87245A from the heater valve and connect you spare hose to it. When you do this have both the inlet and outlet disconnected so you don't push any crap back into the engine block. I assume you can rig your flush kit pieces to accomplish this. If you need help, lay out the pieces to your kit and I can try to rig something up.
 

Attachments

  • 872809A.png
    872809A.png
    11.5 KB · Views: 476
Last edited:
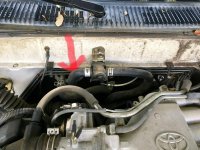
Fan spins as you said it should so I think it’s ok. Sorry for being difficult but I’ve attached a marked up pic as to where I think I FIRST need to install the flush kit. Is this correct?

And ok in the raditor replacement. She’s gonna have complete “spa day” when I get her up and running so all of the needed items will be replaced!
 

Attachments

  • 3E1C425B-1DA1-4FDE-8A97-FD0692FED53F.jpg
    3E1C425B-1DA1-4FDE-8A97-FD0692FED53F.jpg
    125.2 KB · Views: 456
  • BAB3EB1B-44E1-4EC8-A542-C2E51C26EF91.jpg
    BAB3EB1B-44E1-4EC8-A542-C2E51C26EF91.jpg
    138.7 KB · Views: 736
UPDATE: In preparation to do the flush, I pulled off the top rad hose and just inside the hose found this black gasket piece. Does this change any of my testing or just proceed as planned?

My theory on the black silocone. The PO used aftermarket radiator hoses in inch dimentions and could not get the hose to seal under pressure. The oem is metric. They used silicone to stop the leak at the radiator. Kind of looks like there is black residue on the hose end. It doesnt pay to go cheap on the parts. I wouldnt worry about it.

Use a toyota ts, clock the jiggler at 6 o'clock. An air bubble will stop the heater from working and chack the rear heater lines as I mentioned before. You can simply bypass it up at the firewall. Connect the two engine lines and disconnect the two rear heater lines. Cheap fix. Who cares about the passengers feet anyway? Uts a small truck and will heat up quickly through the front vent system.
 
DrCoffee, I think you may be correct. I bought this at 13k miles from a college freshman.

JRZ, diagram is exactly what I needed! Think I can do this w/o extra heater hose? I have none but will get some if u think I need to.
 
Last edited:
Fan spins as you said it should so I think it’s ok. Sorry for being difficult but I’ve attached a marked up pic as to where I think I FIRST need to install the flush kit. Is this correct?

And ok in the raditor replacement. She’s gonna have complete “spa day” when I get her up and running so all of the needed items will be replaced!

The outlet is the one to the left of that one. See the 2 ports tucked under there? May need a spare piece to connect to it.
 
My theory on the black silocone. The PO used aftermarket radiator hoses in inch dimentions and could not get the hose to seal under pressure. The oem is metric. They used silicone to stop the leak at the radiator. Kind of looks like there is black residue on the hose end. It doesnt pay to go cheap on the parts. I wouldnt worry about it.

Use a toyota ts, clock the jiggler at 6 o'clock. An air bubble will stop the heater from working and chack the rear heater lines as I mentioned before. You can simply bypass it up at the firewall. Connect the two engine lines and disconnect the two rear heater lines. Cheap fix. Who cares about the passengers feet anyway? Uts a small truck and will heat up quickly through the front vent system.

The Dr is correct. I actually did this on my 1st truck because the PO never flushed the old coolant out, and the coolant became acidic and ate away the aluminum inlet (at the TS) and I "filled" in the pitting with RTV. Possibly where the red RTV came from on your truck. Maybe the kid used RTV of a different color to make the same repair. Make sure your inlet and outlet housings aren't pitted like mine were. They will leak.
 
Here's the flush kit

Hmmm, not much to work with there. Can't make out what that other blue adapter is. One side looks like a water hose connection what is the other side?

You're gonna need a piece of hose. Disconnect the easiest piece of hose (probably on the right side of the heater valve and insert the the tee that best fits the hose and take that to the parts store and get a length of hose. Get a couple more clamps too so you don't have to keep disconnecting clamps. Technically you'll only need one more but they usually come in packs of 2
 
Last edited:
The first thing I'm doing when I get her running, is replacing the rad, esp since I put K-Seal in it.

OK just read your reply about getting more hose..will do that when it stops raining...Florida in summer Grrrr....

And Dr, yes all replacement parts are and most def will be OEM.
 
The first thing I'm doing when I get her running, is replacing the rad, esp since I put K-Seal in it.

OK just read your reply about getting more hose..will do that when it stops raining...Florida in summer Grrrr....

And Dr, yes all replacement parts are and most def will be OEM.

I would replace the radiator now. If there is crap in it it could end up back in your flushed out engine block and heater core. What the hell, your going to the parts store anyways right? The radiator is fairly easy to replace. The radiator doesn't have to be OEM, although now the AF and the ones from a lot of Toyota online places like Camelback are about the same price. A popular radiator for the Autozones, Adavances and OReillys is Spectre. I had in in my 1st truck for a couple years and didn't have an issue with it.
 
Last edited:
Not yet..I was going in order of your post..maybe you said do wp THEN do heater core? Is it ok to test rad before flushing heater core? I need to put TS back in before wp right?
 

Members online

Forum statistics

Threads
278,315
Messages
3,554,131
Members
248,016
Latest member
Advally Service

Trending content

Back
Top