What Did You Do To Your 3rd Gen Today?

Status
Not open for further replies.
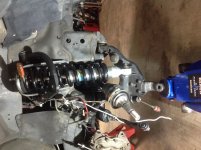
Installed my SPC UCAs - only tool 6 hours working mostly alone lol

Tim and Shaun's video helped, specifically on the removal of the UCA bolts - that was honestly the easiest part. Thanks for that, men!

The most challenging step was pressing the factory UBJ out of the spindle. I did one one the car, big mistake. I removed the second spindle and did the press work on the ground using a loaner ball joint press from the parts store.

The second bugaboo is the snap rings, removing the factory and installing the SPC on the spindle adapter. What a PITA

I did not get to LCA bushings, and I did not install the 333 Fab cam eliminator kit, so I set the UCA ball joints to "D" per the instructions for now. Next weekend, LCA bushings and new LBJ, then an alignment.

Torque on the UCA top nut is 150 LB FT, so I ordered a new 40-250# torque wrench

I also swapped center dash bezels between my 2WD and 4WD, to retain my antenna switch mod, and swapped steering wheels - I actually miss my thicker self-wrapped steering wheel!

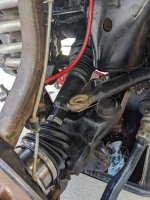
Today I will replace the stock CVs with TO8043ET (TrakMotive) extended/high articulation CV axles. I hope to get this done in 4 hour or less considering all the cleanup I have to do...
 
Last edited:
02a8648ce26d9c8b80ffac53224730cd.jpg


Best I can tell the nut up top just unscrewed itself. Glad I have the bags.


This is very interesting and surprising
 
This is very interesting and surprising


Yeah it was really weird. I was skiing, and when I parked there were no issues, but as I pulled away from the parking spot I could instantly tell something was wrong in the right rear. I could hear/feel it rubbing against something. Very very weird. I just took it off and pumped the bags up a bit more and it feels normal. Will look into new ones when I get home.
 
Replaced both CV axles with TrakMotive extended/high articulation CVs

PXL_20220220_213550177.jpg

The passenger side CV separated when I removed it, leaving the inner share and cut in the diff. Glad I had a catch bucket under it. #nopicture

Replaced swaybar end links, too. 95 4runner rears in the front with poly bushings, my stock fronts in the rear with new rubber bushings.

Updated my build thread!

Sent from my Pixel 4 XL using Tapatalk
 

Attachments

  • PXL_20220220_213550177.jpg
    PXL_20220220_213550177.jpg
    108.7 KB · Views: 645
Filled up the tank and calculated 9mpg :barf:
Went for a drive and found out the trail I planned to visit was closed -_-
Was going to record a timelapse of the sunset but didn't work out.

Also found this littered van as I was driving.

y4mTHEu9shnzyQ5-4DDu-XIA3z4RSH4iXCKslap-z6zVK-EyxmTlipWufcuYuKeypV60ZblFLffTMa7VBeOpHtYFRONLFZhjcQ_j4sn_6Fw3X8gs_eIg1PyRptKxh8vmr_dtV-BPbr9oMWV8ipyC6DVk_U0F5OXVA5_CxqC_4Vfa6dULuCyKGF8nxCZr_S-aAUz


y4mVHEv8bnTY6tN7L4bgaMDlnLkt4XCKZpNrGi3bSpuNiO4zQ9z2f-ns7swX8iSKr7OdKOLcs5Fc7qvEdGjx0M18w3cfHMdVKKUo_gRHIoB0xLV3490g8I_5CRJ6PjK_oLS3idSmu8GQ5UEzse8FB1s6cmqE2-UvXFUTRru9XdW5j2L7lDBCLIlBnUaL5HDj_2y
 
Putzed around with the manual hub swaps. Just stripping down the new manual hubs to the bare minimum. Removed the CV shafts. Took off the little Taco rotors and calipers. Took the Aisin hub part off, removed the finicky little brass bushings inside the hub too. Unscrewed the big pin-driven nut holding the hub in the bearing. Now it's all down as far as it needs to go for the machine shop press work.

I also stripped the donor ABS uprights down as far as I could take them as well. They're from a Sequoia - same part (for some years) between Tacoma, 4Runner, Sequoia, and Tundra. Brakes removed, dust seals off, brake dust shield bolts freed up.

My wife got me a pile of new parts to go with the donor manual hubs, I'm just waiting for a couple more to arrive (Tundra/Sequoia brake dust shields, the Sequoia donors are rusted and bent to bits). And then I'll take it off to the machine shop. I did give the 5 lb slide hammer a try on the Sequoia hubs to see if it could extract them. Lol, after several minutes of hammering at it, exactly zero movement. Yeah... not going to happen.

Once the manual hubs go on I'll raise the ride height a bit more in the front. Sonoran Steel lift with the Radflo shocks. I've kept them a bit lower than I'd like in the front for a few years, keeping the CV boots from eating themselves up.
 
6112's who needs spring compressors

The sixth time since I bought them couple years ago 2nd time in last couple weeks.
See the screwdriver at top hat, stem is in tophat lower bushing screwdriver will fall out if I touch it.
Remove screwdriver half stoke on jack spring makes contact with isolator stem is into tophat steel another half stroke stem is flush with upper tophat bushing, spring starting to load up.
Keep on pumping jack put on washer and nut torque to spec your done.
I figured this out first time I installed them have installed 5100's for friends same way.
Sure more tear down is needed none of us likes spring compressors they don't work on 6112's anyway, I gave away compressors I had fug em.

Edit: tophat spacer with perch 3 & 4 I ran out of Camber adjust changing preload to perch 2 & 3.
 

Attachments

  • IMG_0735.jpg
    IMG_0735.jpg
    132.6 KB · Views: 408
Last edited:
Putzed around with the manual hub swaps. Just stripping down the new manual hubs to the bare minimum. Removed the CV shafts. Took off the little Taco rotors and calipers. Took the Aisin hub part off, removed the finicky little brass bushings inside the hub too. Unscrewed the big pin-driven nut holding the hub in the bearing. Now it's all down as far as it needs to go for the machine shop press work.

I also stripped the donor ABS uprights down as far as I could take them as well. They're from a Sequoia - same part (for some years) between Tacoma, 4Runner, Sequoia, and Tundra. Brakes removed, dust seals off, brake dust shield bolts freed up.

My wife got me a pile of new parts to go with the donor manual hubs, I'm just waiting for a couple more to arrive (Tundra/Sequoia brake dust shields, the Sequoia donors are rusted and bent to bits). And then I'll take it off to the machine shop. I did give the 5 lb slide hammer a try on the Sequoia hubs to see if it could extract them. Lol, after several minutes of hammering at it, exactly zero movement. Yeah... not going to happen.

Once the manual hubs go on I'll raise the ride height a bit more in the front. Sonoran Steel lift with the Radflo shocks. I've kept them a bit lower than I'd like in the front for a few years, keeping the CV boots from eating themselves up.

Since your going full hog with this and retaining ABS, are you also adding spindle gussets (I can't remember if you already have them). Seems like the time to do it if they're not in there.
 
Since your going full hog with this and retaining ABS, are you also adding spindle gussets (I can't remember if you already have them). Seems like the time to do it if they're not in there.

The thought honestly hadn't crossed my mind.

But now it has....
 
Added USB power up front by replacing one of the factory 12v outlets. Hardest part was finding a usb outlet that I liked. Dual-port, non-illuminated, not a bad color, etc...

b2bcd9634545a383cb578aaac2e12e2d.jpg


79262dfd82551c3ad14fec11f189833b.jpg


Also got one step closer to installing my rear power outlets. Super huge thanks to marcus clarkus for designing this outlet cover and making the .stl files available to us.

a9641dae5251d6b3d647a80409b92cff.jpg


d8363d0f768b7ebff8d67c9b57c13ebf.jpg
 
Last edited:
Added USB power up front by replacing one of the factory 12v outlets. Hardest part was finding a usb outlet that I liked. Dual-port, non-illuminated, not a bad color, etc...

Also got one step closer to installing my rear power outlets. Super huge thanks to marcus clarkus for designing this outlet cover and making the .stl files available to us.

Holy carp man, how many things you plan on plugging in? Even in my camper van, that I've lived out of for up to 6 weeks with my wife, I have 2 ports and rarely use more than 1 cable. I can't fathom needing more... enlighten me?
 
Holy carp man, how many things you plan on plugging in? Even in my camper van, that I've lived out of for up to 6 weeks with my wife, I have 2 ports and rarely use more than 1 cable. I can't fathom needing more... enlighten me?


Well I figure two people sit up front, so let’s put a double up there. Two or three people can sit in the back so two back there. I wanted a usb-c outlet and all the ones that were just a single port on an outlet of the same size looked a little silly, so I got the one that included two USB ports.

I actually spent a lot of time trying to think of different things I could put in that hole because I agree, it is a lot. I had to send one of the outlets back because it doesn’t work, so <b>if between now and when they send me the replacement anyone can suggest some other cool idea, I’ll go with that</b>.

I thought about trying to fit the OEM 12v port that I took out of the front into the back outlet but the holes are too big and I never really have a need for one, especially since there are still 2 up front and one in the cargo area.

4a6807e394642a5fed574d781275d482.jpg
 
Well I figure two people sit up front, so let’s put a double up there. Two or three people can sit in the back so two back there.

Ok, so I'm just an old fuddy-duddy... if my wife is with me, my phone isn't (or it's off). On our long trips, I don't think I ever turn mine on and certainly don't have it on my person, has power when we get home without ever getting charged. She uses her phone a little more and it's the one with a couple GB of data so it's the maps phone.

Local trips (home same night)? Phone is in a pocket, I get 2~3 days out of a charge... miss the old flip phones with ~2 Weeks out of a charge on a smaller battery.

I always forget you kids have a screen in your face nearly non-stop. I'll go back to yelling at clouds now....
 
Fixed the play in my gas pedal.

The little rubber bushing at the pedal-end of the throttle cable was hanging on by a thread, resulting in almost a half-inch of play before the pedal would start pulling open the throttle.

I was actually surprised at how short the bushing was because while driving, it FELT like 3 inches of pedal play. (EDIT: This makes sense: the pedal side of the lever is further away from the fulcrum than the cable-pulling side of the lever..)

I ripped off the old bushing, cut a length of rubber hose just little bit longer than the old bushing, cut the new hose lengthwise on one side to slide around the cable, and secured it with a zip tie.

No more play!

How's the vibrations on the gas pedal though? I might steal this mod because I can't get the gas pedal to feel firm no matter how tight the cable is. Also going to have a silicone party with the accelerator cable because I realized how sticky the gas pedal is for my taste. Silicone spray should loosen it up a bit - heck, maybe a little silicone on the TB butterflys would help too!
 
How's the vibrations on the gas pedal though? I might steal this mod because I can't get the gas pedal to feel firm no matter how tight the cable is. Also going to have a silicone party with the accelerator cable because I realized how sticky the gas pedal is for my taste. Silicone spray should loosen it up a bit - heck, maybe a little silicone on the TB butterflys would help too!

The rubber hose seems to absorb enough vibration for my tase (subjective of course).

I also treated the throttle body butterfly and throttle cable with silicone spray. Certainly didn't hurt.

It's really nice to get rid of that pedal play!
 
Filled up the tank and calculated 9mpg :barf:
Went for a drive and found out the trail I planned to visit was closed -_-
Was going to record a timelapse of the sunset but didn't work out.

Also found this littered van as I was driving.

y4mTHEu9shnzyQ5-4DDu-XIA3z4RSH4iXCKslap-z6zVK-EyxmTlipWufcuYuKeypV60ZblFLffTMa7VBeOpHtYFRONLFZhjcQ_j4sn_6Fw3X8gs_eIg1PyRptKxh8vmr_dtV-BPbr9oMWV8ipyC6DVk_U0F5OXVA5_CxqC_4Vfa6dULuCyKGF8nxCZr_S-aAUz


y4mVHEv8bnTY6tN7L4bgaMDlnLkt4XCKZpNrGi3bSpuNiO4zQ9z2f-ns7swX8iSKr7OdKOLcs5Fc7qvEdGjx0M18w3cfHMdVKKUo_gRHIoB0xLV3490g8I_5CRJ6PjK_oLS3idSmu8GQ5UEzse8FB1s6cmqE2-UvXFUTRru9XdW5j2L7lDBCLIlBnUaL5HDj_2y

Why are you getting 9mpg? Sounds like the engine's running super rich.
 
Status
Not open for further replies.

Members online

Forum statistics

Threads
278,316
Messages
3,554,120
Members
248,016
Latest member
Advally Service

Trending content

Back
Top