Zombie Truck 2.0 MPAV Build!

It was pretty slow today so I threw in the wheel bearing assemblies in before I went home today. Its pretty straight forward, it would have taken about half the time it did if I didn't decide to replace the spindle seals as well.

This isn't really meant to be a full write-up but more a brief over-view of how to do it. I believe there are some really good write-ups on the forum and I didn't think I needed to make a new one, so that's why it isn't normally as detailed as my official write-ups are.

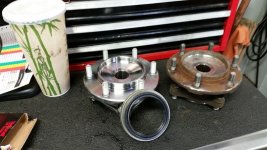
The new vs. the old:
20150204_152116.jpg

First thing is first get the wheel, brake caliper, and brake rotor off the hub. Then remove the axle nut (36mm), then unbolt the hub from the spindle (x4 17mm bolts, they will come off with the assembly so keep that in mind when loosening them), tap the axle out of the hub as you pull it away from the spindle. Installation is just the reverse of what you just did.

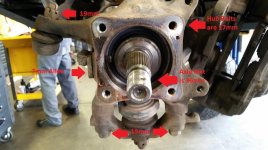
Should look something like this when you've got the hub off (you'll note I show a Allen bolt on the side, I highly recommend you remove the wheel speed sensor from the spindle before removing the hub just to be safe):
20150204_152215.jpg

But wait! I spent money on new spindle seals, where do those go!? That's a bit more work to get to. While you have the hub out, go ahead and pop the tie rod end off and the x2 19mm lower ball joint bolts off, I also recommend undoing the 12mm bolt for the brake line bracket to give you more wiggle room. After you do that, flip the spindle around and take a screw driver or punch and tap the seal out from the front.

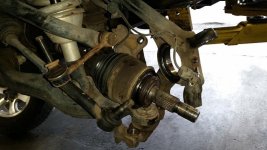
When you've got it torn down it should look something like this:
20150204_153224.jpg

I found a really big round object that fit perfectly on the inside of the seal to tap it in with a hammer, so pretty much anything that rests on the metal rim of the seal and you can tap on with a hammer should do well. Its a bit tricky to do with the spindle just floating about, but luckily it doesn't take much force to seat the seal. I took a steel brush and brushed off any surface rust and cleaned any rampant grease/debris I found on the spindle axle, brake shields, ect. When you've done all that, then just do the reverse of what you did to tear it down to put it all back together.

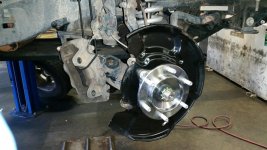
It should look roughly like this when you are done (sans hub cap):
20150204_171034.jpg


Post Note-

I'm really impressed with how Toyota sealed the hubs on these vehicles. I never bothered to really look that closely until today, but they really thought it out.

-x1 Single lip seal on the axle
-x1 Double lipped seal in the spindle (one lip actually meshes with the axle shaft AND the seal on the axle)
-O-Ring on the hub Assembly
-O-Ring on the ABS Sensor

There was grease (the driver's side seemed to leak a bit of grease) and light surface rust (from latent moisture I assume) in the spindle, but not as much evidence of water intrusion as I had expected (been throw good amounts of standing water and mud and I knew the bearings weren't entirely sealed units.) I would be surprised if a properly maintained hub & seal assemblies actually allowed water to force its way into the spindle. (I assume the rears are just as well sealed.

I also probably didn't need to replace the spindle seals on my vehicle as they were still in great shape (oh well, live and learn.) :fish:

 

Attachments

  • 20150204_152215.jpg
    20150204_152215.jpg
    78.5 KB · Views: 1,575
  • 20150204_153224.jpg
    20150204_153224.jpg
    57.1 KB · Views: 1,590
  • 20150204_152116.jpg
    20150204_152116.jpg
    66.6 KB · Views: 1,592
  • 20150204_171034.jpg
    20150204_171034.jpg
    65.2 KB · Views: 1,561
It was pretty slow today so I threw in the wheel bearing assemblies in before I went home today. Its pretty straight forward, it would have taken about half the time it did if I didn't decide to replace the spindle seals as well.

This isn't really meant to be a full write-up but more a brief over-view of how to do it. I believe there are some really good write-ups on the forum and I didn't think I needed to make a new one, so that's why it isn't normally as detailed as my official write-ups are.

The new vs. the old:
View attachment 145009

First thing is first get the wheel, brake caliper, and brake rotor off the hub. Then remove the axle nut (36mm), then unbolt the hub from the spindle (x4 17mm bolts, they will come off with the assembly so keep that in mind when loosening them), tap the axle out of the hub as you pull it away from the spindle. Installation is just the reverse of what you just did.

Should look something like this when you've got the hub off (you'll note I show a Allen bolt on the side, I highly recommend you remove the wheel speed sensor from the spindle before removing the hub just to be safe):
View attachment 145007

But wait! I spent money on new spindle seals, where do those go!? That's a bit more work to get to. While you have the hub out, go ahead and pop the tie rod end off and the x2 19mm lower ball joint bolts off, I also recommend undoing the 12mm bolt for the brake line bracket to give you more wiggle room. After you do that, flip the spindle around and take a screw driver or punch and tap the seal out from the front.

When you've got it torn down it should look something like this:
View attachment 145008

I found a really big round object that fit perfectly on the inside of the seal to tap it in with a hammer, so pretty much anything that rests on the metal rim of the seal and you can tap on with a hammer should do well. Its a bit tricky to do with the spindle just floating about, but luckily it doesn't take much force to seat the seal. I took a steel brush and brushed off any surface rust and cleaned any rampant grease/debris I found on the spindle axle, brake shields, ect. When you've done all that, then just do the reverse of what you did to tear it down to put it all back together.

It should look roughly like this when you are done (sans hub cap):
View attachment 145010


Post Note-

I'm really impressed with how Toyota sealed the hubs on these vehicles. I never bothered to really look that closely until today, but they really thought it out.

-x1 Single lip seal on the axle
-x1 Double lipped seal in the spindle (one lip actually meshes with the axle shaft AND the seal on the axle)
-O-Ring on the hub Assembly
-O-Ring on the ABS Sensor

There was grease (the driver's side seemed to leak a bit of grease) and light surface rust (from latent moisture I assume) in the spindle, but not as much evidence of water intrusion as I had expected (been throw good amounts of standing water and mud and I knew the bearings weren't entirely sealed units.) I would be surprised if a properly maintained hub & seal assemblies actually allowed water to force its way into the spindle. (I assume the rears are just as well sealed.

I also probably didn't need to replace the spindle seals on my vehicle as they were still in great shape (oh well, live and learn.) :fish:


Nice write-up. I have a lot of customers ask if they really need to replace that inner seal and I always tell them it is better to get the seal now, and replace it, than to take it all apart and realize you NEED to replace it. lol. I'm glad you are happy with it!
 
Small update.

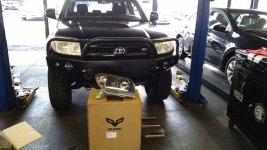
Bought a set of Black "Euro" style '06 Headlamps by Spyder on CarID.com and updated the front end of the 4Runner. I ended up getting the trim panels from my parts department (they ended up being about the same price as www.Partsouq.com, otherwise I probably would have ordered through them.) The only big hurdle ended up being that I blanked out on the fact that the '03-'05 head lamps use a 9006 low beam and the '06-'09 use an H11 as well as relocated the turn signals from the foglamps to the headlamp housing. Other than a small scramble to find a spare harness to cut up (eventually I just went to Kragen's and bought some nice Silvania ZXE H11 bulbs, self-sealing butt connectors, and 2 H11 harness repair kits) and cannibalizing the sockets from my old fog lamps to seal the turn signal holes it turned out great.

20150508_161014.jpg
Oddly enough the box does not say "Spyder" but "KHC," which leads me to believe Spyder buys them from KHC and resells them (which probably means all the "Euro" style '06-'09 Lights you see on EBay and such are the same brand most likely.) Good product though, had to trim one or two places on the plastic for the bulbs as they aren't perfect; but then again they're $200 a set vs. $300+ a light for factory so I am not complaining.

20150508_174015.jpg

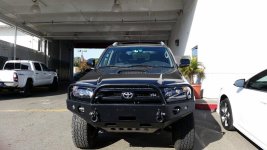
The finished product! Looks like a beast now! (My truck is ridiculously dirty...)

I'm thinking next is going to be a '06 Grill and/or a Satoshi mod, I haven't quite decided yet...
 

Attachments

  • 20150508_161014.jpg
    20150508_161014.jpg
    59.2 KB · Views: 4,095
  • 20150508_174015.jpg
    20150508_174015.jpg
    57.2 KB · Views: 4,131
Last edited:
Finally got my replacement dash pad (the previous one had been damaged in shipping so I sent it back) and installed it tonight. Need to wipe it down with some leather conditioner/perma plate as for some reason they don't come shiny and clean from the factory lately...

But I'm happy.
 
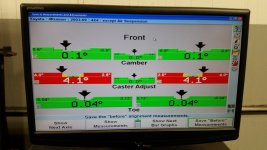
So a few weeks ago after I did my oil change (sent it in for a Balckstone oil analysis) and flipped the tires on the wheels when I rotated them I did a quick toe adjustment; the Caster was around 3.4 or something. Not bad, but honestly I felt I could use some more caster.

Fast forward to tonight after I cannibalized an old mirror for it's drop-in motor to fix my stepdad's LX470 power mirror I decided to bump up the caster to 4 degrees. LOTS of PB blaster was used to make sure the damn things wouldn't fight me this time and I spent a good half an hour or so adjusting the alignment tabs back to straight (all the cams were pointing down for the most part). After all that was done I spent the next hour or two re-adjusting the alignment and working with the slightly flattened cam lobes and such (I will need to weld in new, stronger alignment tabs and replace the current cam lobes in the future, they're getting to be non-salvageable...) to get it to the specs I wanted.

Long story short, I believe this is called a money shot:
20151212_183118.jpg

I'm very happy I managed to get the alignment where I wanted, I would have liked to get 4.2 on Caster and 0.0 on Camber (I like even numbers, it's a thing...) but this is pretty good. Oddly enough the steering wheel seems to recenter itself much better than before, odd what about .5 of caster did...
 

Attachments

  • 20151212_183118.jpg
    20151212_183118.jpg
    109 KB · Views: 6,060
My family went a bit overboard this year on me (I said not to spend too much money on me), genuine '06~'09 Taillamps and a lovely black rimmed sport style steering wheel and yes that is a Chocolate 1911!

184616d1451067653-5th-gen-xmas-2015-20151225_093759.jpg


So these will be going on the 4Runner soon.
 
The tails were such an improvement. I like that wheel too!

I wanted the piano black, but they got this really interesting black with very slight grain/wavy threads of grey that honestly looks way better than just plain black. Can't wait to get it on the 4Runner! I just noticed a crack in the passenger tail lamp, so we're sending it out tomorrow for replacement. I specifically mentioned they have to be Toyota parts because I have seen the aftermarket ones and they just aren't as bright as the Genuine Toyota parts.
 
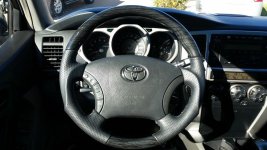
Installed the steering wheel today, was bored. Loving the marbled look, was afraid that the leather was too dark but it's actually about the same shade as the steering pad (the difference in reflection from plastic to leather doesn't lend well in pictures; but in person it's a hardly noticeable difference)

20151226_120423.jpg

Having the passenger side lens refunded by Amazon, it was damaged when I got it and had some debris in the lens. Which is very odd for a genuine "redbox" Toyota part, but it happens.
 

Attachments

  • 20151226_120423.jpg
    20151226_120423.jpg
    63.7 KB · Views: 3,996
I'm liking the steering wheel! Do you know where it came from? It looks like a perfect match for the woodgrain in my limited.
 
An update for the fairly underwhelming build thread (I'm just replying to my own thread at this point... how sad... lol)

Threw on the '06 taillamps a while back and am really happy with how they turned out, got off my butt and bought the clip pad for the driver's rear bumper corner so now it sits flush (busted the clip pad years ago and figured I'd have a full metal bumper by now...) Installed some Daystar D-Ring Isolators (glued the rubber washers together so I don't have to deal with a handful of loose ones when I take them off) and that's about it for mods I don't have pictures for.

Then there's this I was working on tonight:

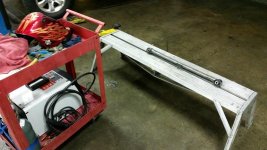
20160116_180823.jpg

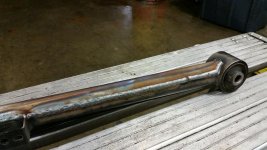
Not the best welds I have done, but not bad for not running a bead in a few years (you can tell where I went a bit too fast, it'll hold; but it ain't the prettiest thing in the world), really impressed with my little welder to be honest with you...

20160116_180846.jpg

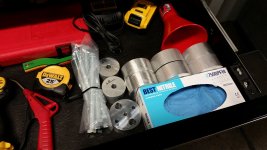
Any guesses what this is for?
20160116_180858.jpg
 

Attachments

  • 20160116_180823.jpg
    20160116_180823.jpg
    60.9 KB · Views: 1,208
  • 20160116_180846.jpg
    20160116_180846.jpg
    57.6 KB · Views: 3,512
  • 20160116_180858.jpg
    20160116_180858.jpg
    122.6 KB · Views: 1,122
Last edited:
Body lift? Lol

I'm still amazed how good that steering wheel looks.

Oh you're talking about the junk Aluminum in my drawer? I meant the gloves :girl:

Yeah, that's my 6061 1.5" body lift I'm gonna throw on the 4Runner when my new bushings come in from Partsouq.com, figured if I am gonna put the effort to lift the cab off the frame I should probably replace the 11year old body mount bushings, I know the first set at the radiator are probably junk and so is the one at the firewall from how the truck feels.

Have to give props to my friend (I have officially nicknamed his FJ "Da Blueberry") he didn't have a lathe at work (I was a bit too lazy to go to TechShop and cut them on the lathe myself so I pawned the work off on him), so he made all that on a mill; poor guy busted his butt. Guess the least I can do is install his lift kit on his FJ. :) I'll have to get back to you guys if the measurements on my steering spacer are correct (they should be, but I reverse engineered the part based on some quick measurements of the rag joint when I took it out the 4Runner a couple weekends ago since I can't get my Solidworks to work anymore :( )

Post Note-

I'll take a picture of the finished trailing arms on Monday, left them at the shop to dry after coating them in VHT Chassis paint. But I am happy how they came out, will have to install them on the 4Runner later.
 
Last edited:
The lower links were a huge upgrade for me when I installed them.

The ones I have pictured came off a 2014 FJ with about 20k on them (so the bushings are basically new compared to my 120k ones with dented tubes lol), the owner upgraded to MetalTech ones while I was installing his TC UCAs and realigning the vehicle; he didn't want them so he gave them to me.

Apparently the FJs and the 4Runners have the exact same length trailing arms (I always thought they were shorter). So I bought some mild steel angle stock and MIG welded it this evening to get some beefier trailing arms, for about $30 in steel & VHT paint I'd say it's a nice upgrade. Also got to play with my relatively new MIG Welder, so all good! :D
[MENTION=87687]LTDSC[/MENTION]

Yeah I love that steering wheel man, it looks beautiful! If you're on the fence about shelling out $300-ish for it, don't be; the quality feels OEM and very well done. It feels good in your hands and really improves the look of the vehicle.
 
Last edited:
That extra metal on them arms will help a lot. I have gouges on mine since doing this.

Need to change to poly bushings on mine, sitting on 120k.
 

Members online

Forum statistics

Threads
278,316
Messages
3,554,120
Members
248,016
Latest member
Advally Service

Trending content

Back
Top