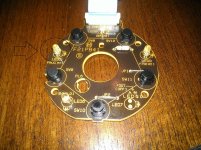
Frustrating. What about these LED's that are actually soldered on the board. The fan speed and temperature knob are out. I'm not looking to change colors just want to be able to see at night
Even if I do fix it would break a week later? Sounds like a pita. Should probably just get new board? Can you send me a link to the parts. Doing a Google search for 3mm round top LED's provides many options lol
Even if I do fix it would break a week later? Sounds like a pita. Should probably just get new board? Can you send me a link to the parts. Doing a Google search for 3mm round top LED's provides many options lol
Longer side is positive. When you look at the brown side of the board, you will see the arrow diagram. I always think "positive goes to negative" so positive > negative. And there ya go!
Desolder, remove, insert new LED, bend legs to hold in place, solder, trim legs, happy happy happy
Frustrating. What about these LED's that are actually soldered on the board. The fan speed and temperature knob are out. I'm not looking to change colors just want to be able to see at night
Those soldered LEDs are only the indicator arrows that light up when you select that particular function/speed on the knob.
If you are just talking about the backlighting for the knob itself, you can pick up replacement bulbs at the dealer or get some Neo bulbs (it takes 3 to replace all the HVAC knob backlighting).
Those soldered LEDs are only the indicator arrows that light up when you select that particular function/speed on the knob.
If you are just talking about the backlighting for the knob itself, you can pick up replacement bulbs at the dealer or get some Neo bulbs (it takes 3 to replace all the HVAC knob backlighting).
The thing is I have the limited with the dual zone. The right side temperature up/down selector is the only one out. So I figured it was the soldered LED's.
Been lurking a while but this is my first post. This forum is an awesome resource for everything T4R! I got inspired to do the LED color swap on my 2005 4Runner Sport V8. Using a lot of info from this forum and some extra tinkering, I've gotten the high brightness neo4's working at full brightness 12V with dimming control. They actually look pretty close to the factory brightness when compared to the factory radio backlight.
As many people found, the neo4 high brightness LED's don't work in the HVAC backlight as it only gets about 6.5-7 volts not 12v. For some reason all the Neo3’s that backlight the knobs and buttons get full 12v but not the backlight for the LCD display itself. I did some tinkering trying to get the Neo4 High brightness LED's working. Many car dimmers that I've seen in the past use a PWM (pulse width modulated) negative side Transistor or Mosfet to control Brightness. I took my Oscilloscope out to the truck and confirmed that it seams to operate that way on my t4r. So the Ground side where the Neo4's plug in is the actual source of the dimming and we just need a straight 12v source for the positive side of the neo4... Make sure to disconnect the positive side of the neo4 from the circuit board contact before you give it 12V otherwise all sorts of bad stuff could happen. I just completely un-wrapped the positive wire out of the neo4 plastic housing and left it sticking straight out the back. Here’s what it looks like:
You can see that on my 05 sport HVAC control, the inner side of the neo4 plugin (ie closer to center of the board) are the positive sides. This may be different for the Limited edition as it is fairly different from the HVAC console on the Sport edition. You need to figure out which side of the Neo4 is positive as they are polarity sensitive. You can figure out which is the positive side of the neo4 using a 9 volt battery or some such. I then soldered a wire from a 12v source to the leads that are now sticking out and are isolated from the circuit board. The 12v source I tracked down and decided to use was pin 14 on the thick ribbon cable that goes from the small board where the main wiring harness plugs in to the board that runs the display.
Here’s a pic:
There are a few other 12v lines that turn on at different times ie always/acc/on etc. Pin 14 turns on at the same time as the factory display did… The High Brightness Neo4’s at 12v give a good level of brightness and give a pretty even backlight when given full power unlike the regular neo4’s. All in all I am very happy with the results. Here’s a picture of my HVAC display half way through the upgrade:
The left side of the display is backlit by a regular neo4 running stock ie just direct swap of the factory bulb. The right side of the display is backlit by a high brightness Neo4 running at 12v. The difference is quite noticeable and actually turns out to be a pretty straight forward upgrade. There are a few things that could go wrong if you’re not comfortable with electronics and hook things up wrong or don’t isolate the LED positive side from the circuit board etc. I hope I have given enough information on the process that I did and have not forgotten any crucial bits.
Next I’ll move on to the dash and steering etc. which all sound fairly straight forward given all the information available here. I solder surface mount parts all the time and feel comfortable doing the chip LED swap... Thanks to all previous posters on this subject for the wealth of information here and hopefully this will in turn help people get a brighter and dimmable HVAC display working on their T4R’s.
I just soldered new LED's to the gauge cluster and I go to test it out by screwing cluster into the harness (half reassembled) and I got nothing. No power to entire cluster. Not just light but odometer doesn't show anything. Thoughts? I feel like I'm missing something....




 Ho ho ho


