DIY: Interior LED swap (cluster, HVAC, switches, window, *steering wheel)

S-one, i have limited too and there are total of 36 leds. I didn't have enough so i had to order more.

Darkie3495, i just wanted to say thanks for all your help. The fork is pretty nifty. One comment when using the fork, I would tape the bottom of the fork to prevent contact from metal shaft.

jerrysc99, no problem. can you take a pics of the board? like to see the difference between the sport/SR5 and the limited.

Whats funny is that i wrapped the contact point of the fork that touches the gauge faces with electrical tape but not the prongs. good idea. thanks!!
 
jerrysc99, no problem. can you take a pics of the board? like to see the difference between the sport/SR5 and the limited.

Whats funny is that i wrapped the contact point of the fork that touches the gauge faces with electrical tape but not the prongs. good idea. thanks!!
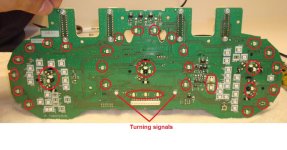
Sure no problem, i'll take a pic when I receive the leds and re-open the gauge. Oh and by the way, there is another way to get to the leds instead of removing the black face gauge. I had the hardest time trying to remove the black face gauge and was afraid of damaging it so I did it this way. I'm curios to know how you successfully remove the black face gauage without bending it getting it damage. First you have to remove the needles off course. Than flip it over, remove two screws, than seperate the board from the face.
 
thats a great write up. i may print this off and try it some day. like others have said maybe after the warr expires?

too bad i dont still live in WA. if youre ever in CO and need a place to crash and someone to snowboard with...maybe we can help each other out eh. :driving:
 
Sure no problem, i'll take a pic when I receive the leds and re-open the gauge. Oh and by the way, there is another way to get to the leds instead of removing the black face gauge. I had the hardest time trying to remove the black face gauge and was afraid of damaging it so I did it this way. I'm curios to know how you successfully remove the black face gauage without bending it getting it damage. First you have to remove the needles off course. Than flip it over, remove two screws, than seperate the board from the face.

interesting....you might have to take pictures of that. it would be great to see all the differences between the 2 clusters and better ways of doing things.

too bad i dont still live in WA. if youre ever in CO and need a place to crash and someone to snowboard with...maybe we can help each other out eh. :driving:

i'll see you Feb for my annual snowboarding trip :bigok:
 
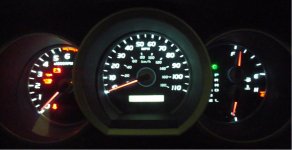
Darkie per your request, here is the picture of the 4runner limited board and I finally got it done! Thanks for all your quick responses. The picture is grainy but looks a lot better in the car.
 

Attachments

  • limited board.jpg
    limited board.jpg
    84 KB · Views: 4,283
  • gauge.jpg
    gauge.jpg
    54.8 KB · Views: 4,284
Last edited:
Darkie per your request, here is the picture of the 4runner limited board and I finally got it done! Thanks for all your quick responses. The picture is grainy but looks a lot better in the car.

Thanks!! Great job! looks really good! Let me know how the switches and HVAC goes.

Just noticed you changed the needle color as well. at least i know you can change the color of the dot without affecting the overall needle color significantly.
 
Last edited:
Thanks!! Great job! looks really good! Let me know how the switches and HVAC goes.

Just noticed you changed the needle color as well. at least i know you can change the color of the dot without affecting the overall needle color significantly.
Thanks. I will post once I'm done with switches and HVAC.
 
darkie3495-

Thanks for putting together the guide. I used it a couple of days ago to change out my instrument lights. The whole process went pretty smoothly, and I am very happy with the results. I still can't find a good reason why Toyota went with the amber/orange lights originally. The white dash lights look 10x better, in my opinion.

For anyone else thinking about performing this mod, I would definitely recommend it.

Here's a tip if you screw up (like I did) and rotate your needles when you are pulling them off of the instrument panel. I had used blue tape to mark the location of my needles before I attempted to remove them. When I was trying to remove the needles using the fork method, I found it difficult to get the needles to come off. I was able to get them off, but in the process, I rotated the needles to get a better angle with the fork. I thought that I was screwed, but then I remembered that the gauges zero themselves when you turn the key to accessory. After I swapped out all of the LEDs, I put the instrument cluster back together (less the needles), and installed it in the 4Runner. I put the key in, went to acc, and everything lit up just fine. I pulled the cluster out, and CAREFULLY put the needles back on (using the marks I had made on the blue tape as guides). I re-assembled the cluster, installed it in the 4Runner, and went to acc again. Everything lined up fine. I gave it a test drive the next day, and all of the needles were working fine.

Thanks again for the write up and the pics.
 

I put the instrument cluster back together (less the needles), and installed it in the 4Runner. I put the key in, went to acc, and everything lit up just fine. I pulled the cluster out, and CAREFULLY put the needles back on (using the marks I had made on the blue tape as guides). I re-assembled the cluster, installed it in the 4Runner, and went to acc again. Everything lined up fine. I gave it a test drive the next day, and all of the needles were working fine.

That's a great tip!!! you're def welcome. Glad it went smoothly. Post pics when you get a chance. :cheers:
 
Hi, this is my first post but i've been reading the forum for a while now...let me start by saying this write-up and all the info. found on this board are incredible resources...so thanks! I hope to be contributing soon.

I'm planning on tackling this led conversion this weekend and had a few questions I couldn't answer after using the 'search' feature several times...

1)Earlier in this post, the OP stated that he used 3mm leds. This is what I have in hand, but started to second guess if I could use 5mm leds??? Are these too large for the climate control panel or would they work? Is there any advantage to 5mm over 3mm in terms of light output?

2)For the indicator lights on the climate control (the little 'arrows' that show the selected function) - how do you replace these and what size leds are required?? I found a post stating that a 5mm works but not too much other information. I'm assuming it's as simple as replacing the existing LEDs.

I'll be sure to post photos of the disassembled climate control unit and LED replacement procedures.

Thanks in advance for any help!
 
Hi, this is my first post but i've been reading the forum for a while now...let me start by saying this write-up and all the info. found on this board are incredible resources...so thanks! I hope to be contributing soon.

I'm planning on tackling this led conversion this weekend and had a few questions I couldn't answer after using the 'search' feature several times...

1)Earlier in this post, the OP stated that he used 3mm leds. This is what I have in hand, but started to second guess if I could use 5mm leds??? Are these too large for the climate control panel or would they work? Is there any advantage to 5mm over 3mm in terms of light output?

2)For the indicator lights on the climate control (the little 'arrows' that show the selected function) - how do you replace these and what size leds are required?? I found a post stating that a 5mm works but not too much other information. I'm assuming it's as simple as replacing the existing LEDs.

I'll be sure to post photos of the disassembled climate control unit and LED replacement procedures.

Thanks in advance for any help!

Hi-

I'm sure that someone else will post more info, but here's what I can help you with....

1) I thought the same thing about the 5mm LEDs as the 3mm LEDs need to be aimed correctly in order to light up the entire control evenly (I still can't get mine quite the way that I want them...). I figured, if I had a 5mm LED, it would be better.....long story short, it won't fit into the opening for the bulb holder. I found that one out the hard way.

2) I'm pretty sure that the little arrows are on the circuit board inside of the climate controls. I ended up leaving mine the stock orange color, and with the other parts of the controls white, it looks pretty good to me. I don't know if you can change the arrow colors or not.

Another tip, if you want, when you pull apart the speedo/tach/etc, you can check the color of the light while it is soldered on the circuit board. I taped two AA batteries together, and used alligator clips with sewing pins to light up each LED on the board individually. This allowed me to confirm what LED I was replacing. I also was able to check that the LED worked after I soldered on the replacement.

Good luck. I'm definitely glad that I did this mod.
 
First off :welcome:

1)Earlier in this post, the OP stated that he used 3mm leds. This is what I have in hand, but started to second guess if I could use 5mm leds??? Are these too large for the climate control panel or would they work? Is there any advantage to 5mm over 3mm in terms of light output?
Like Propman07 mentioned the bulb holder that lights up the climate control backlighting is fairly narrow and the diameter of the 3mm leds fit perfectly. 5mm might work for the short bulb holders but there's only a few of those so not really worth it.

2)For the indicator lights on the climate control (the little 'arrows' that show the selected function) - how do you replace these and what size leds are required?? I found a post stating that a 5mm works but not too much other information. I'm assuming it's as simple as replacing the existing LEDs.
You can change them. Not sure if 5mm LEDs would work. I know that the 3mm works just fine. didn't measure the clearance for the buttons. You'll have to take apart the controls and pull the round PCB boards. the LED's are soldered directly to the board so just remove orange and solder your color of choice.

Good luck!!! Be sure to post pics and provide any tips you might find as you go along.
 
Thanks for the tips! The 3mm leds worked great. The taped batteries were a great idea, it made figuring out the which side of the LED was the cathode much easier! I still have several switches to finish which I'll get to this week. I'll withhold the photos until I get the finished product....

I had also found a mod that some guys were doing with their LCD screens. Basically, you remove the polarization film that sits on top of the LCD glass and replace it w/ reverse polarization film. This makes the LCD screen background very dark and the digits (normally black) appear white. I took some pics of the mod which i'll post w/ the rest of the projects pics. It's a very simple thing to do, just nerve wracking dealing w/ the pins on the lcd screens.

Thanks again, the interior looks very high quality now due to the improved lighting and I feel like I have a new truck!!
 
Quick questions re: dash leds...

So I hopped in the truck this morning (swapped out the LEDs in the gauge cluster yesterday) and after 20 mins of driving, one of the LEDs 'flickers'. It just so happens to be the temp gauge LED. This is the first one I replaced and I'm guessing I probably damaged the LED or have a bad solder joint. I have spare LEDs so I'll probably just swap it out but wanted to get someone's opinion to help w/ the troubleshooting....:thanks:

All the other lights function perfectly.
 

Members online

Forum statistics

Threads
278,316
Messages
3,554,124
Members
248,016
Latest member
Advally Service

Trending content

Back
Top