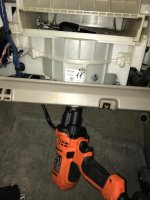
DIY: Replace Servo Sub-Assy

Alright so myself and [MENTION=91393]papabeach[/MENTION] followed this thread yesterday and installed my new servos. Here are some thoughts/recommendations:

-Bought both pieces off ebay for a total of $236 shipped
-Test the two new ones before you go through the hassle of removing the old ones and installing the new ones
-Drilling a hole makes accessing the one screw 1000x easier
-The angle is awkward, so we had to drill in 3" on the side of the air filter cabin to access the screw
-Do NOT strip that screw, it will make your life miserable
-When you put the lower servo in first, make sure you go ahead and put the screw in the slot and line that one up first, it will make remounting the assembly much easier

Results:
-Hot and cold air are fine
-Defrost is fine
-No buzzing or obnoxious noise
-When selecting the option to blow air to your feet, it still blows out of the head option
- [MENTION=91393]papabeach[/MENTION] is a genius
-Thank you to the original thread owner for the details

Hope this helps!


nyF1KGv.jpg

XC3mqOh.jpg

Gqjy4Vf.jpg

vIJ40cc.jpg
 
Signed up just so I could add to this thread

The original post and this thread are awesome and were key to success with this repair. I signed up to the forum just so I could add my two cents regarding replacement of the "air mix servo". I was a little confused by the descriptions of drilling into the side of the air box. Since I did my repair, but prior to this post, someone else posted pictures of the air box. A picture really is worth a thousand words!

I would just add that the 8 Pc Right Angle Screwdriver Set by Pittsburgh from Harbor Freight made removing and replacing the bottom two screws fairly easy. I also purchased a 90 degree angle drill attachment from Harbor Freight (about $30, item #69337 3/8" Angle Drill Attachment with Keyless Chuck) to help with the drilling.

Two tips: 1) Unclip the wiring from the blower fan and unscrew the three bolts holding the fan in place to access from below. 2) Set the air inflow on the dash to recirculate to slide the accordion door open vertically to see what you're doing.

I drilled further back in the box to provide a straight shot to that top screw which is not visible. I used about a 10" long Phillips screwdriver (#2 I think) and, once it felt seated in the screw, applied pressure to keep it from stripping the screw. As suggested by someone else, I did not replace that top screw. If I need to replace it later, I'll have to either find a long magnetic tip screwdriver or maybe use some light glue to hold the screw to the screwdriver while I get the screw positioned. Covered the hole in the air box with duct tape on both sides.

Hope this helps the next person!
 

Attachments

  • IMG_1240.jpg
    IMG_1240.jpg
    132 KB · Views: 2,966
Last edited:
Good thread on fixing the servo motors on the passenger side. My problem is the servo motor on the driver side, down near the gas pedal. I can see it trying to work the arm when the AC is on but not really moving the door. It will try and try while I'm driving and the sound from the servo is noticeable even with music on. Going to take a look at it this weekend and see if it's really the motor or if the blend door there is broken and the servo just can't move it.

$131 for a new servo from McGeorge Toyota - Servo - Toyota (87106-35170) | Toyota Parts
 
Last edited:
Good thread on fixing the servo motors on the passenger side. My problem is the servo motor on the driver side, down near the gas pedal. I can see it trying to work the arm when the AC is on but not really moving the door. It will try and try while I'm driving and the sound from the servo is noticeable even with music on. Going to take a look at it this weekend and see if it's really the motor or if the blend door there is broken and the servo just can't move it.

$131 for a new servo from McGeorge Toyota - Servo - Toyota (87106-35170) | Toyota Parts

Did you wind up replacing the driver’s side servo? I have a noise coming from the driver’s side but so far, I’ve only been able to find writeups on the passenger side.
 
Did you wind up replacing the driver’s side servo? I have a noise coming from the driver’s side but so far, I’ve only been able to find writeups on the passenger side.

No, I've left it alone. It makes noise every now and then but it still works fine. Too much hassle to pull it out and fix/replace it.
 
Thanks. I found the servo and it’s definitely stuck. My mechanic bought a replacement for me (the truck was in for a bunch of other things) but I’ll install it when I get a minute. It’s right out in the open and looks like a pretty easy job, unlike the passenger side.


Sent from my iPhone using Tapatalk
 
This is the most horrible job on a 4runner (maybe on every car). I have been putting off going anywhere near this until today.

My issue is the air con works perfect for all the car, but if I want heat it's only on the driver's side. Passenger side and the back vents blow cold air. I thought the issue was the bottom servo (airmix) and had purchased one many months ago and never put it on.

I had previously had a look and noticed the left screw was missing, either it worked its way out or someone had been at the system previously. To get to the really hard screw on the right of the servo I heated a chisel and melted a hole in the cabin filter slot. This worked and along with a scope I was able to remove the screw and got the servo out. I put the new servo in but unfortunately it didn't solve the problem, still no heat for the passengers.

Kinda well peeved at this stage, skinned knuckles and sweating like crazy... tip.. don't do this job on a 90 degree plus day. I figure it must be the top servo (for mode) and when I looked there is also a screw missing and the other two are loose. So someone has already had their hands at this and just didn't bother putting it back together properly. Not sure if I should put the money into buying the top servo just in case something else is the issue.

Any suggestions?

A big thanks to the op and his picture guide and also the tip about putting a hole in the filter slot it really made the job somewhat easier.
 
Strange. My driver’s side servo only had 3 of the 4 screws also. I’m the original owner so either it worked its way out on its own or was never there to begin with.


Sent from my iPhone using Tapatalk
 
Great write up and many thanks! Found it easier to use a 90deg angel grinder with a tungsten carbide burr to make the hole. All my screws were there but they were a little angry to come out... patience grasshopper.
 
Just did this today. Super simple once you drill out the inside of the blower to access the 2 screws. Took me about 2 hours taking my time.
 
Many thanks for the excellent instruction

I did it today for all three sevros. Left (one), right (two). I have all three failed and very ennoying like horse racing.

- 87106-35170 SERVO SUB-ASSY, DAMPER(FOR BLOWER) LEFT driver side
- 87106-35120 SERVO SUB-ASSY, DAMPER(FOR MODE) RIGHT TOP Pass. side
- 87106-35180 SERVO SUB-ASSY, DAMPER(FOR AIRMIX) RIGHT BOTTOM Pass. side
- Bought all three OEM for $270 from Ebay
- Total install time two hours
- I use solder welding to drill the hole, easy and fast and re-tape after.

Here are some picture for the left sevro (driver side)

9oWo6O2.jpg

kIBoeY0.jpg

I3un3Wr.jpg

ym6KhoR.jpg
 
Last edited:
Many thanks for the excellent instruction

I did it today for all three sevros. Left (one), right (two). I have all three failed and very ennoying like horse racing.

- 87106-35170 SERVO SUB-ASSY, DAMPER(FOR BLOWER) LEFT driver side
- 87106-35120 SERVO SUB-ASSY, DAMPER(FOR MODE) RIGHT TOP Pass. side
- 87106-35180 SERVO SUB-ASSY, DAMPER(FOR AIRMIX) RIGHT BOTTOM Pass. side
- Bought all three OEM for $270 from Ebay
- Total install time two hours
- I use solder welding to drill the hole, easy and fast and re-tape after.

Here are some picture for the left sevro (driver side)

7Jg53j62heAXHasS7


HaDdu3ATRLJcYyfB7


LaDTsLEw552uuVJq9

Great work dude! I have one making a little clicking noise every once in a while, so I might need to get to this eventually.

The forum is weird for embedding pics, but should be able to copy the stuff below and it will display your pics here embedded in your post. To get embedding to work, I left clicked on the links, then left clicked the photo, then right click when it full sizes the image and chose copy image address, then wrapped that address in the tags. I use imgur for photo hosting, makes it a bit easier to embed them into the forum. Kind of a hassle with the extra step, but I have found google photos to be a bit finicky with embedding here. I have a short bit written up on what I do if that interests you here: [url]https://www.toyota-4runner.org/3549755-post34683.html[/url]

[HTML][IMG]https://lh3.googleusercontent.com/pw/ACtC-3cN-hdCC1rAV8fhxvdURVTpSn4jNCOiTLOiO8utrU--oK8wE5KqgZLdWg4ybz3EC3bG2sUF4fB9PiqC8ECa8CHlKFrqZh95-dhpYasc-cwnVf2V6uAVnHegy4SmaJzfp4nH8WAYjFEBNFBCTcuZPEOqLw=w1210-h907-no?authuser=0

ACtC-3fNT8NM5eZPs9K2ovBamKnkB2N1JaULEe1scw2m3GOWXIW4uBvom33w7_YeYtbDlh5THzEGhIe_WPuBz7eVLoKE8XEKdtleI6lksibXerV0_piqgD3aB-gl89zqCh6zgBXfLE26mSOMPG9TaWHb1_4iTQ=w681-h907-no


ACtC-3ebepgxFjP6efD7neIRVMzG93CIFzEBD-8Ra3wsYV8e-eB-tALnZH1euhsIfAzFn-5uysmbRmiKTjAnltuhQAhEl2utDXTWmncblrhCr0NarZE33OE_730_k63uRpBUsFIg2gMrRK0xH1yp0ykpe2KtIA=w681-h907-no
[/HTML]
 
Last edited:
First off, many many thanks to the OP for this, and for those who contributed additional ideas. I did the 2 servos on the passenger side today, and drilling the hole made this very doable and not such a terrible job. I have the correct air temp flowing again and from all vents (depending on where I set things) - and it's so nice to drive again without the noise!

As for removing the entire assembly, no. There are only a "few" bolts holding it in place, but it would be an unholy PITA to remove that entire assembly w/o completely disassembling the dash. Cut a hole where the cabin filter is and be done with it.
 
Just wanted to say thanks to OP and everyone that provided tips on removing the pass. top servo: 87106-35120. The recommendation of drilling the hole saved quite a bit of time. I also left out that hard to reach bolt and don't see any negative effects currently.

I did manage to get a nasty cut but the A/C functions correctly now!

I do have the bad servo assy, if someone wants to attempt a fix and reuse.
PM me and we'll work something out on getting it to you.
 
Excellent thread. I just got myself a 2005 SR5 sport, V8 4WD 4Runner in pretty decent shape with only 149k. It's my second 4th gen 4runner. This model does not have dual climate control.

The only major issue I've had so far is with the A/C blowing ice cold only while in LO temperature setting. In any other temperature setting but Lo the blend door opens up all the way and hot air comes out. There is no clicking and the servo arms move with ease.

After digging through many forum threads, I've replaced the cabin temperature sensor, climate control module on the dash , and today after reading through this thread, I tackled the blend door actuator. Unfortunately, everything operates just like before. I'm back at square one.

What else could be causing this condition? I'm completely stumped and have no clue what else to even check.

Any ideas would be appreciated.
 
Update

Just an update for anyone having a similar issue. After chasing this problem, replacing the cabin temperature sensor and the blend door servo. My next checklist item was the ac amplifier. I took my dash apart to check the connections and part number. I also followed the air temp sensor wiring from the sensor to the ac amplifier and found one of the wires had snapped off pretty far along.

Low and behold I reconnected it and problem solved.
 

Members online

No members online now.

Forum statistics

Threads
278,307
Messages
3,554,050
Members
248,016
Latest member
Advally Service

Trending content

Back
Top