Rear Differential Breather Mod For Dummies

Alternative Location For Breather Snorkel

I've seen installations where the ARB snorkel is installed INSIDE the cabin, in the jack compartment; and obviously mounted in the engine bay. But I really liked the installations where the hoses came through the Fuel Cap compartment, but they could not use the snorkel.

I really did not want to run the hose all the to the engine compartment as I knew I would have it close to something that would melt the crap out of it. I also wanted to have the Air Locker hose to have the same connection/routing as the Diff...

So here is how I did it.

You can buy little vacuum hose adapters from AutoZone... $4. They connect the Air Locker Hose and the ARB hose PERFECTLY, but I used a couple of ZIP ties to secure them anyway.

VHA.jpg


Removed the mud flap and the wheel-well liner. I think there were 8 clips and 4 screws. Ran the two ARB hoses right alongside the metal fuel line.

You can see in this picture how the hoses/zip-ties actually "hold up" the snorkel. I used some 3M double sided to hold the snorkel in place while the JB Weld cured. Couple more ZIP-ties, and done!

breather.jpg


Only other thing needed besides the ARB kit was the vacuum hose adapters and the JB weld. There is PLENTY of left over hose from the kit. I think it was a pretty clean install, so I wanted to share with yall. Let me know what you think...
 
Last edited:
Thanks, [MENTION=120701]Cymon[/MENTION], for the initial write-up!

Wound up doing this several weeks ago on my SR5 with the ARB kit.

Picked up the kit after seeing it on the shelf at my Toyota dealership when going in for my 5k service. They cut me a deal on it and I was sold.

I installed the kit while installing my Budbuilt skids. Everything went together well. I ran several feet of hose down through the engine bay, pulled it towards the rear diff, then started ty-wrapping everything from the differential forward.

I've probably gone 4000 miles since installation, including a few days' worth of wheeling.

Last week, just to see if there were any obvious leaks, I removed the hose from the filter fitting in the engine bay and blew into the hose. I was able to blow a bit of air into the system (presumably from the headspace in the differential and the volume of the hose). Pressure seemed to rise and then escaped from the hose once I released the air.
 
ARB Differential Breather Pictures

A picture from the install process at the top of the differential housing and the final installed result:

IMG_3127.jpg


IMG_1845.jpg
 
Finally got around to installing the arb kit. Great write up Cymon, made it super easy! Only issues were getting those self tapping screws in and using too much torque on my drill. I have three extra holes in there now [emoji846]

Sent from my Pixel using Tapatalk
 
Last edited:
Diff Breather

The ARB Breather Kit. Is that universal fitment for all vehicles, or do you have to order a specific part number to accommodate the individual vehicle, year, etc.? Thanks in advance for the response(s)!
 
The ARB Breather Kit. Is that universal fitment for all vehicles, or do you have to order a specific part number to accommodate the individual vehicle, year, etc.? Thanks in advance for the response(s)!


It's a universal kit. The fittings that are included have the same thread as the OEM check valve that needs to be replaced on the 5th Gen (I assume you have for posting in this thread).

For the electronic locker, you need a reducer for the smaller hose.


AFK and enjoying my 4R TPE
 
Let me start this by saying that I have learned a lot from this forum and found its members to be very helpful (when asked the correct way). I decided to do this write-up for the non-mechanically inclined, “I have never worked on my car before” 4runner owner, which I was before today. Yes I used a kit, yes I could have saved money doing it with the parts that are found on some of the mod links I’ve listed below, but being a modification virgin I wanted to make sure it was done right, with the right pieces the first time.

Background:
I have never worked on a car before. I am handy with tools, and do build things, but have not done much more then change flat tires before on my cars. I did put my 1987 Ford Escort’s air intake manifold back together with just duct tape when I was stranded in College Park after a football game and it got me home (but that’s another story). As many of you know being a part of this forum starts to fuel an addiction and I was starting to get the itch to make the vehicle “mine”. So after reading the posts about the rear differential when submerged and experiencing more flooded streets then I’ve ever seen now living in South Florida I figured this is one that I could try. After doing the research I know I most likely don’t need this mod, but I’d rather be safe then sorry, and most trails in Florida seem to have water in/around them in some fashion. I am the type of person who would try and avoid water crossings if possible, but still I want to be and the vehicle to be prepared if there are no other options.

Acknowledgements:

I could not have done this mod without the wonderful write-ups and information provided by [MENTION=96409]Canazes9[/MENTION], @Okki, [MENTION=103267]Saker[/MENTION], [MENTION=3442]Boyds4Runner[/MENTION], [MENTION=115572]DesertCanyons[/MENTION], and [MENTION=129593]MTN4RNR[/MENTION] on the threads below along with their build threads. (There were also many other helpful contributions, too many to continue listing here)

Previous Threads & Links Used To Complete Mod:
“Rear Differential Complete”
http://www.toyota-4runner.org/5th-gen-t4rs/150158-rear-diff-breather-mod-complete.html

“Breather Mod- All Tied Into One”
http://www.toyota-4runner.org/5th-gen-t4rs/114057-breather-mod-all-tied-into-one.html

You Tube ARB Install (edit: when the installer is talking torque specs he is means 30in/lbs of torque not 30ft/lbs).
https://www.youtube.com/watch?v=v5FDbks-R1g

Equipment Used:
ARB Breather Install Kit
Phillips Screwdriver
14 mm or adjustable wrench
Cordless Drill (if mounting with self-tapping screws included in kit)
Pocket Knife/Utility Knife

Time:
1 – 2 Hours (Depends on if you have a 3.5 year old helper or not)

Without further adieu, the Breather Mod for Dummies!

Thank you so much for this thread. I am brand new to all of this and can feel my addiction growing daily. I spent ages 17-35 learning first aid/medicine/biology so I can take a human being apart and put them back together but sadly I know NOTHING about vehicles. I want to learn so badly tho. Thank you for this kind of post it really helps!

-Johnny
 
Thanks for posting all of this. Any tips for attaching the filter bracket? When I tried using the self tapping screws, the bracket loosely jiggles around. I was thinking of perhaps using an epoxy of sorts to affix it.
 
Thanks for posting all of this. Any tips for attaching the filter bracket? When I tried using the self tapping screws, the bracket loosely jiggles around. I was thinking of perhaps using an epoxy of sorts to affix it.

That would likely work, or maybe just some silicon on the back around the screws. I had one screw that was a little loose just as you stated but I haven't had any issues for the past 1.5 years it's been installed.
 
I think it was a pretty clean install, so I wanted to share with yall. Let me know what you think...

I just went this route with the standard Toyota fitting/breather and fuel line method (AKA the cheap way). It's a short and convenient route to take, and you can easily route the breather line along the fuel filler pipe. I posted pictures in the "What did you do" thread yesterday: http://www.toyota-4runner.org/5th-g...u-do-your-5th-gen-today-1885.html#post2820721
 
Awesome Write-up. Brand new 4Runner owner and this is easily across the board one of the first things to do and this thread has overwhelmingly gave enough info. Awesome job everyone.
 
Cross-posting ... if anyone wants to run two lines from the engine bay to the rear diff and e-locker, see my post in this thread for details how I used the line in the ARB kit. I cut it in half and with careful routing, there was enough slack to reach both the diff and e-locker.
 
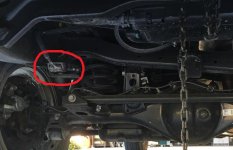
When I was doing my diff breather mod, I noticed this wire connector harness (circled in the photo). My immediate thought was, "Why am I only addressing the diff breathers when this connector is at about the same height?" After a brief search for "water electrical" it seems some people believe these connections are already water-resistant (or possibly "proof").

Is there a consolidated list of mods to perform to reduce risk for water crossings? I'm not looking to do anything as serious as this guy, but I figure I can tackle things one by one starting from the ground and moving upward.
 

Attachments

  • whatisthat.jpg
    whatisthat.jpg
    69.1 KB · Views: 1,269
When I was doing my diff breather mod, I noticed this wire connector harness (circled in the photo). My immediate thought was, "Why am I only addressing the diff breathers when this connector is at about the same height?" After a brief search for "water electrical" it seems some people believe these connections are already water-resistant (or possibly "proof").

[MENTION=139396]darenwelsh[/MENTION],

Let's not hijack [MENTION=120701]Cymon[/MENTION] 's thread here, Doing so I will keep the answer short.
Those connections are watertight.
No consolidated thread on water crossings that I am aware of....


Sorry [MENTION=120701]Cymon[/MENTION]! :zoom::zoom:
 
Diff Breather Mod Death

Just did the diff breather mod over the weekend. After parking at my work garage this morning, I noticed a weird smell (melted plastic). I remembered that I hadn't made sure my connections over the heat shield under the driver's side door / fender was tight. So...pretty sure I had melted my line, I popped the hood and sure enough the melted hose was free-floating in my engine compartment.

So, I'm going to approach the re-install using [MENTION=153412]theShaytoon[/MENTION] 's method utilizing the back left wheel well. I did a quick dirty diagram of my previous approach and the new method, and added some JB weld to my Amazon cart:

https://www.amazon.com/J-B-Weld-8276-KwikWeld-Reinforced/dp/B0006O1ICY/ref=sr_1_1?ie=UTF8&qid=1523370497&sr=8-1&keywords=jb+weld

1w93OMW.png


I have enough remaining line from the ARB kit to complete the mod. Unfortunately, I'll probably have to wait until the weekend as I street park and don't feel like getting run over this week. But I'll update when I finish everything up.

Especially excited to pull the dead line out in my work parking lot...the shame...
 
When I was doing my diff breather mod, I noticed this wire connector harness (circled in the photo). My immediate thought was, "Why am I only addressing the diff breathers when this connector is at about the same height?" After a brief search for "water electrical" it seems some people believe these connections are already water-resistant (or possibly "proof").

Is there a consolidated list of mods to perform to reduce risk for water crossings? I'm not looking to do anything as serious as this guy, but I figure I can tackle things one by one starting from the ground and moving upward.

use dielectric grease in any electrical connections you are worried about. for normal use you don't need to go crazy with it, but it's a good thing to do for any connections you work with as you go
 
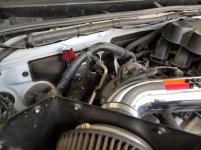
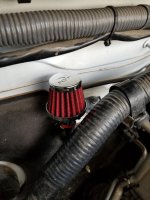
Routed mine to engine bay behind the K&N CAI. Topped off w/ mini K&N filter because I think it looks good matched w/ the CAI.

Think this mod takes the cake for most zip ties used in one mod...
 

Attachments

  • Rear Diff Breather.jpg
    Rear Diff Breather.jpg
    132.9 KB · Views: 952
  • 20180724_201819.jpg
    20180724_201819.jpg
    129.3 KB · Views: 917
Last edited:

Members online

Forum statistics

Threads
278,314
Messages
3,554,099
Members
248,016
Latest member
Advally Service

Trending content

Back
Top