0xfded's Build Thread: Unit III

Power Block

I was thinking about how to wire in the projector kit and decided to update my accessory power setup first. The old set-up was just a four fuse block on top of the stock fuse box:
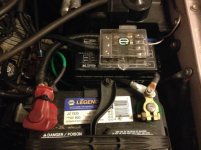
IMG_0739.jpg

Besides being limited to four low power circuits, of which two were already in use for the stereo amps, it made it hard to get into the stock fuse box.

In addition, there was a separate fuse box on the fender wall beside the battery for the Big 3 battery -> alternator line. I wanted that gone so that I could put the projector motor control and ballast there.

I was looking at Blue Sea boxes, and found this unit:

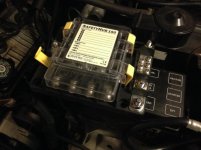
Blue Sea SafetyHub 150

What I like about this thing is that it has four high power circuits, up to 200A. All of the other Blue Sea boxes I looked at tended to sit around 30A limits per circuit. So not only is this perfect for replacing the battery -> alternator fuse, it'll be good for a future inverter install, and maybe other stuff.

Next part was mounting it. Because I want access to the stock box, I didn't want any permanent mounting. I'd love a set-up like Ripcord's sweet install, but the evap canisters are in the way on my '98. So I started staring at this thing on the side of the stock fuse box:
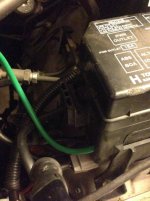
IMG_0740.jpg

Ever wonder what that is? It's a mounting point! Not sure what for, but it's slotted and perfect for mounting a riser.

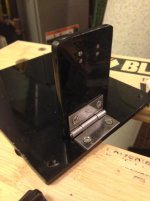
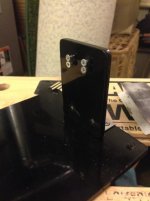
So, I nabbed a sheet of black acrylic and some appropriately sized screws, and made a mount:
IMG_0742.jpg
IMG_0741.jpg

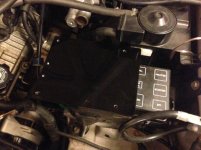
The screws slot into the mount on the fuse box. They're tight enough that it stays snugly in place, but I'm going to add a faster through the middle just to be safe. It slots right in and sits on top of the stock fuse box, and the hinge lets it tilt up for stock fuse access:
IMG_0744.jpg
IMG_0745.jpg

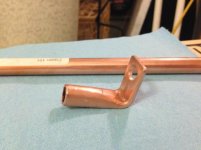
To run the line from the high power circuit to the alternator, I needed an appropriately sized right-angle lug. Apparently these are only made out of unicorn-horn in far away lands, so I watched a tutorial or two, got some appropriate copper tube, and made my own:

IMG_0743.jpg
 

Attachments

  • IMG_0739.jpg
    IMG_0739.jpg
    43.1 KB · Views: 877
  • IMG_0740.jpg
    IMG_0740.jpg
    43.5 KB · Views: 844
  • IMG_0741.jpg
    IMG_0741.jpg
    34.2 KB · Views: 825
  • IMG_0742.jpg
    IMG_0742.jpg
    29.5 KB · Views: 836
  • IMG_0744.jpg
    IMG_0744.jpg
    43.4 KB · Views: 833
  • IMG_0743.jpg
    IMG_0743.jpg
    32.9 KB · Views: 851
  • IMG_0745.jpg
    IMG_0745.jpg
    36.6 KB · Views: 865
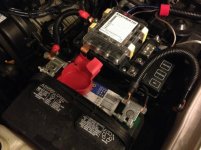
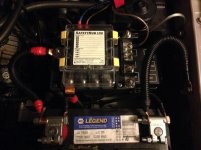
Cleaned up the cable situation a bit more with a shorter chassis ground and a pair of new battery terminals, and it all came together rather nicely:

IMG_0746.jpg

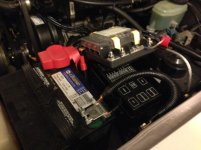
And if I need to get to a stock fuse (because I've burnt another one out doing something wrong with an LED light or something), I just lift it up:

IMG_0748.jpg

I need to figure out a fastener next, but for the time being it's just tied down with a zap strap to keep it secure. Going to get the projectors hooked up first.

Edit: man, my camera really does suck. And/or I'm terrible at using it.
 

Attachments

  • IMG_0746.jpg
    IMG_0746.jpg
    46.2 KB · Views: 844
  • IMG_0748.jpg
    IMG_0748.jpg
    41.1 KB · Views: 845
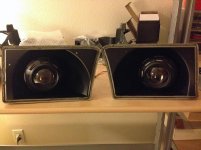
Got the projectors installed tonight.

Everything painted up and put together but not yet baked:

IMG_0749.jpg

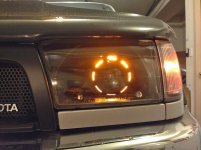
Fast forward to tonight: baked, sealed, and installed.

IMG_0757.jpg

The halo is on constant amber when the corner lights are on. The way it's wired up, it'll be easy to change my mind if I do. Didn't take any pictures during the wiring install, but ended up being fairly neat except for needing to extend the wire to the passenger side ballast. If anyone is doing this themselves and want some pictures of the ballast and motor control install, I can snap a few.

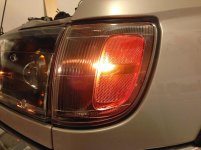
While all of this was going on, I also blacked out my stock corner lights:

IMG_0756.jpg

I did it without opening the lenses, using D Farms' genius suggestion to chemically remove the aluminum foil with Purple Power, which took about $7 and a day of waiting. The lenses are still a bit foggy from moisture, but I think they'll dry up fine. New LED bulbs in the mail for them to offset the black-out and match the halos.

Think I just have some aim adjustment and wire cleanup to do now. I'm also thinking of blacking out that panel below the light, but we'll see. I have plans in motion for the bumper first.
 

Attachments

  • IMG_0749.jpg
    IMG_0749.jpg
    61.1 KB · Views: 788
  • IMG_0757.jpg
    IMG_0757.jpg
    64.7 KB · Views: 1,574
  • IMG_0756.jpg
    IMG_0756.jpg
    64.7 KB · Views: 816
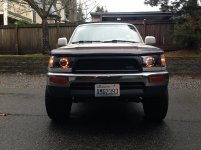
Was asked for a full front picture:

IMG_0759.jpg

The dim corners bug me, as does the chrome bumper, but their days are numbered.
 

Attachments

  • IMG_0759.jpg
    IMG_0759.jpg
    89.4 KB · Views: 798
Great looking build. The pull out support from the drawer is a seriously great idea. I have a drawer that I just put in, but need a solution for supporting body weight up behind the front seats. Never thought about using an external set of rollers!

Projectors look clean as hell too! Good work!
 
Road Trip

Just back from a trip to and through BC. Added a thousand miles, around 500 of which were full winter conditions. Over 220k now.

This was the first winter outing on the Cooper Discoverer AT3s, and they performed excellently. The only time I lost grip on snow and ice was when I was trying to kick it out, or on some heavy washboard (and even there, they gripped as soon as the whole truck stopped bouncing). I recommend them unreservedly for someone who wants an all-season that can handle proper snow and ice for a week or three a year.

I did feel a little disgruntled with the suspension components, though. Lots of bounce and jostle when going over icy roads, and my tense moments all occurred due to that. I don't think I'm going to change them, but better shock absorption is going to be on my mind if I do.

This was also the first long outing with the SC, and no problems there either. Still no noticeable ping. The cooler thermostat is also working fine, engine temp never got above 183. Going to keep sitting on the cooler IK22 spark plugs.

Rear gate arms also need replacing. Between the cold weather and the weight from the sound-proofing, the old ones weren't cutting it.

Otherwise, pretty pleased with how a 220k vehicle is holding up.
 
Oh, and the projectors held up great despite all that bump and jostle. The OEM housings don't appear to have lost their alignment at all. Just need to sort out the highbeam indicator now.
 
USB Power and Battery

Last camping outing was marred by my kindle running out of juice. Really roughing it, I know. That set this idea in motion.

I wanted three things:
  1. A tidy USB charging solution.
  2. One that didn't require the engine idling, but also couldn't drain the main battery.
  3. Ignition-indepdendent power for a future project.

Which led to this:

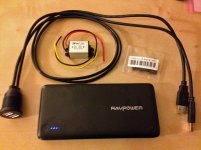
IMG_0769.jpg

RAVPower 3-Port 26800mAh External Battery Pack
Rerii 3ft Dual USB Extension Panel
DROK 5V 3A/15W Power Supply

The battery pack is perfect for a couple of reasons: enough capacity for a week without recharging, charge-through, automatic activation, and two high power (2.1A and 2.4A) ports, one of which is wired up for device charging while the other is reserved for a Raspberry Pi project.

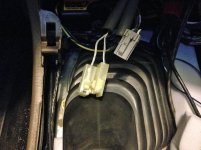
I decided to replace my never-used cigarette lighter, since a) that provides ignition-switched power, and b) it's already fuse protected. The old plug got the snip (grey is switched positive, white is ground):

IMG_0771.jpg

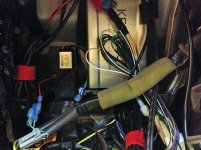
And the DROK fit easily beside my speaker amp using a velcro backing:

IMG_0772.jpg

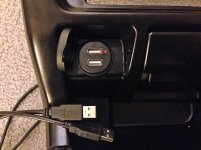
The port itself straightforwardly replaces the cigarette lighter.

IMG_0770.jpg

I like this port. Everything feels solid, the cover is snug, and the plugs are just long enough for where I'm mounting the battery pack, which cuts down on loose wire. I marked one port as the 2.1A charging port, since I would never remember otherwise. The other is tied in to the 1.0A port.

The battery pack itself is mounted in the center console, as depicted in this amazing, high-contrast photo:

IMG_0777.jpg

I put it here because I wanted to be able to check the battery level using the blue indicator lights, and access it for external charging if necessary. A hole was marked out with silver Sharpie and dremeled out for the USB ports:

IMG_0774.jpg

It's a little large, which is irritating. Next time I pull the console apart, I'm going to make a gasket to seal it snugly.

The output from the DROK was soldered up to a USB micro B plug blank to connect to the battery pack. Connecting 18ga wire to such tiny solder pads in a visually pleasing fashion is beyond my current soldering skill level, so I took no pictures. But it works like a charm and looks neat on the outside, thanks to the provided plug casing.

Apart from that, all that remained was running the wires and plugging everything together. Now I just have to listen for interference noise on the speakers, and watch for puffs of magic smoke that tell me I did something wrong.
 

Attachments

  • IMG_0769.jpg
    IMG_0769.jpg
    63.8 KB · Views: 1,797
  • IMG_0770.jpg
    IMG_0770.jpg
    70.8 KB · Views: 7,108
  • IMG_0771.jpg
    IMG_0771.jpg
    71.7 KB · Views: 1,204
  • IMG_0772.jpg
    IMG_0772.jpg
    87.9 KB · Views: 1,201
  • IMG_0777.jpg
    IMG_0777.jpg
    61.8 KB · Views: 1,193
  • IMG_0774.jpg
    IMG_0774.jpg
    80 KB · Views: 1,227
Might I suggest this power supply. No soldering for the mini usb needed.

MASH HERE
True story: I actually bought that one first. But, I later realized I need to tap off the 5V power for something I'm adding later, so getting the bare wire version ended up being cleaner for that. Also gave me a little more say in how long the line from converter to battery would be, to keep it tidy.

But that one would be much better for anyone who doesn't want to fuss around.
 
Where did you get those aluminium pieces for your drawer? I scored some veneer ply for cheap and cant keep them from splintering. Decided to just cut it and cover it with a metal trim would like to stain/poly it and show a little of the wood texture.
Really digging this build by the way. I see some things I might borrow and use for my rig.
 
Where did you get those aluminium pieces for your drawer? I scored some veneer ply for cheap and cant keep them from splintering. Decided to just cut it and cover it with a metal trim would like to stain/poly it and show a little of the wood texture.
Really digging this build by the way. I see some things I might borrow and use for my rig.
I stumbled on the aluminum at Home Depot--they had a little section of flat and angle stock aluminum and steel, just the right sizes. You might check there if you have a local store.

Failing that, I got some hits for "aluminum angle stock" on Amazon, so you could check if there's a good size there. I'd worry that it'd get bent in shipping, but they might have that figured out.
 
The ones at home depot where too thick.. I ended up pulling out my cheap skilsaw and it left little to no chipouts.
 
I just stumbled across your thread, and it kept me from working for the past hour! lol

Tons of great ideas in here, and thanks for taking the time to post links to where you purchased things. That's pretty cool of you.

Keep up with the build, and all your cool ideas!
 
New Battery

Old battery was starting to lose charge after only two years, so I wanted to sort that out before it became an issue. Don't like starting issues.

Read through a bunch of threads here and elsewhere, and the constant advice seemed to be "shop based on warranty first, CCA second", to which I tacked on "local" since my usual supplier (ie. Amazon) won't warranty a battery.

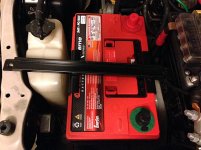
I liked what I was reading about the DieHard Platinums, up until the "they don't make them anymore" part. But I gather they were basically the same EnerSys battery as the Odysseys, which they do still make, and warranty for 48mo. So I ended up with an Odyssey 34R-PC1500, courtesy of a local battery retailer that will be seeing me again if anything fails to perform for the next four years.

IMG_0793.jpg

Old battery was a Group 35, so I had to make a new bracket for it. Bit of Home Depot c-channel and angle steel sorted that out. I was sorely tempted to pick up a cheap MIG welder for it, but I honestly don't have enough projects in mind to warrant having it around. Ended up using an epoxy instead, going to keep an eye on it and see how it holds up.

Besides that, new bumpers ready to go on, just waiting for the right time to pull off the old ones and drag some buddies over to help lift the new hardware.
 

Attachments

  • IMG_0793.jpg
    IMG_0793.jpg
    81.9 KB · Views: 5,890

Members online

Forum statistics

Threads
278,310
Messages
3,554,078
Members
248,016
Latest member
Advally Service

Trending content

Back
Top