0xfded's Build Thread: Unit III

Busy week, but managed to get a bit more done.

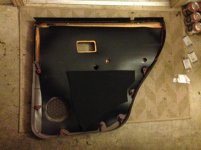
Rear gate and rear doors are now damped with sound barriers installed:
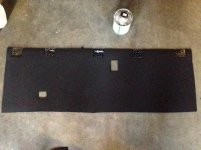
IMG_0652.jpg
IMG_0654.jpg

The doors were a pain in the ass, partly because I was also updating the speakers when I was in there. Replaced with Infinity Reference 5032cf's, to match the 6030cs pair I have in the front.
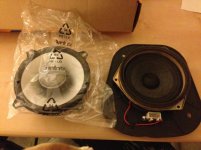
IMG_0653.jpg

There's a pop whenever I change songs on the rear driver side speaker, though. Going to see if it's just something breaking itself in, or a lasting issue. They sound fine otherwise, but (as others have mentioned) the rears don't make much difference. I honestly would have a hard time telling the difference from the factory speakers. I gather it's more important at higher volumes.

Got some updated measurements to post too. Coming right up...

 

Attachments

  • IMG_0652.jpg
    IMG_0652.jpg
    41.2 KB · Views: 1,525
  • IMG_0654.jpg
    IMG_0654.jpg
    38.3 KB · Views: 1,551
  • IMG_0653.jpg
    IMG_0653.jpg
    39.7 KB · Views: 1,555
Did another test run with a few more pieces done:

This is:
  • Full floor complete, with damping tiles and nearly full coverage with MLV on CCF.
  • Roof complete, with damping tiles and full coverage with melamine foam where it won't impede the sunroof.
  • Damping tiles on front doors from previous job.
  • Kickpanels, B-pillar, and rear quarterpanels damped and with MLV on CCF where possible.
  • (New) Rear doors complete, with damping tiles and MLV/CCF damping.
  • (New) Lift gate complete, with damping tiles and MLV/CCF damping.
Short Version
So, based on the sound readings, noise has gone UP since the last test, and sits nearly at the same level as the baseline. Which means one of a few different things:
  1. My testing methodology sucks and isn't controlling for something.
  2. My sound meter sucks.
  3. The sound proofing has done very little, and any benefit is subjective.
logSPL Readings

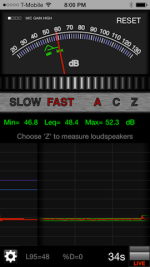
idle.png
Cold idle, ~48.4 dB (down from 55.8)
Now I know this one isn't a one-to-one comparison, because it wasn't as cold as the baseline. The fan clutch had disengaged and that brings down the noise level by a lot. So don't read anything into this reduction. I'll have to get another reading.

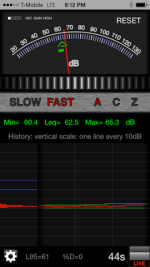
street_45mph.png
45mph street, ~62.5 dB (down from 63.7)

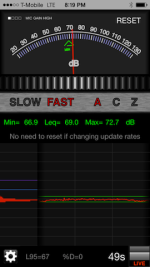
highway_70mph.png
70mph highway, ~69.0 dB (down from 69.8)
Note: this was in and around considerably more traffic than the baseline.

Thoughts
Honestly, I was hoping for something a lot more conclusive than this. The main takeaway is that the cabin seems subjectively quieter, but logSPL says it's reading about the same noise pressure. Was I holding the iPhone differently enough to change the reading? Was nearby traffic a factor? Or did treating the rear doors and rear gate really result in a noise increase?

Sort of a bummer to have something so inconclusive.

Will do another round after I finish the front doors, which still need a sound barrier. Still have a few square feet of melamine foam that I'm going to pack into the front console too.
 

Attachments

  • idle.png
    idle.png
    74.6 KB · Views: 1,514
  • street_45mph.png
    street_45mph.png
    74.5 KB · Views: 1,470
  • highway_70mph.png
    highway_70mph.png
    74.8 KB · Views: 1,500
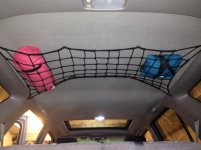
While I was working on the cargo area, I had an idea for a little mod: a bit of cargo net storage on the roof.

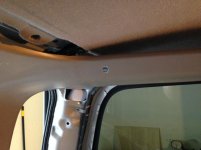
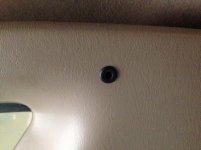
Mounted four hardpoints into the body sheet metal. These won't hold a ton of weight, but they won't be asked to. Simple job, just drilled the holes, tapped them, and used a rubber grommet to make each of them sealed and pretty:

IMG_0659.jpg
IMG_0660.jpg
IMG_0661.jpg

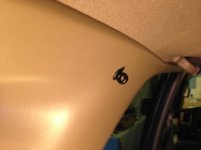
Then, to keep things tight, I put a couple of hook screws into the headliner clips. As anyone who has removed the headliner knows, these clips are the most robust and hardest mounting points on the entire vehicle, evidently capable of withstanding metric tons of force. So they're fine for the limited application I had in mind:

IMG_0665.jpg

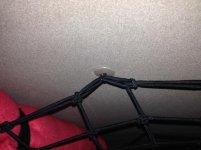
Ta-da, with the net in place:

IMG_0663.jpg

Only for keeping light stuff, like sleeping bags, towels, rain shells, and so on. You don't want anything heavy or solid up there anyway--if you were in a head-on, it would turn into a projectile aimed at the back of your head.

Figure it'll be perfect for hanging a lantern and stashing clothes while camping too.
 

Attachments

  • IMG_0659.jpg
    IMG_0659.jpg
    28.7 KB · Views: 1,533
  • IMG_0660.jpg
    IMG_0660.jpg
    32.4 KB · Views: 1,514
  • IMG_0661.jpg
    IMG_0661.jpg
    19.6 KB · Views: 1,519
  • IMG_0665.jpg
    IMG_0665.jpg
    39.2 KB · Views: 1,532
  • IMG_0663.jpg
    IMG_0663.jpg
    37.8 KB · Views: 9,046
Last edited:
what net is that? Been thinking of doing the same and bought a elastic net but it was too large.
It's this one. The size is pretty much perfect. It's stretched taut, but with plenty of stretch left in it. I didn't use the hooks it came with (stored them for future camping use), and just used some smaller S-hooks instead (after hitting them with some black paint.)

I'd prefer a finer mesh size, like this too-large one, but didn't see any that were going to be the right fit.
 
Sweet build! Your "MkI custom Arduino based OBD2 Sensor Unit with on-windshield HUD" sounds pretty awesome, do you have any photos of that or how you set it up?

Thanks!
 
Sweet build! Your "MkI custom Arduino based OBD2 Sensor Unit with on-windshield HUD" sounds pretty awesome, do you have any photos of that or how you set it up?

Thanks!
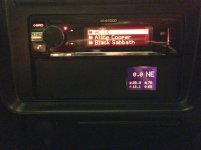
It's neat, was a fun little project. This is the little output panel below my HU:

IMG_0668.jpg

In reading order, it's:
  • Short term MPG (last mile)
  • Compass direction
  • Long term MPG (last 300 miles)
  • Engine temp
  • Voltage
  • Intake temp.
The MPG is obviously off since it's calculated from estimates of airflow, and I like being lied to enough that I haven't properly calibrated it yet. If there's any CEL codes, they replace the instantaneous MPG until they're cleared.

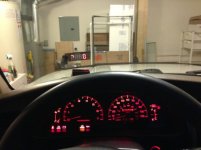
This is the HUD:

IMG_0666.jpg

It only displays the speed, and then the compass direction (the little inverted L to the left of the speed, which indicates NE.)

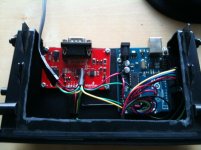
The main worky bits are an Arduino Uno and a Sparkfun OBD2 to TTL board:

IMG_0392.jpg

It's neat, but it has a few problems:
  • The TFT dash screen is too dim to be seen on sunny days. Also, glare is an issue.
  • The HUD LED only has trouble in full sunlight, but mainly because the unlit white segments confuse things.
  • The TFT screen color doesn't quite match the rest of my dash, which makes me crazy.
  • The MPG is about 10-15% too optimistic, and I'm not sure if that's just because my AFR assumption is not generally true, or if it's something else.
  • The compass occasionally needs recalibration due to the local magnetic properties of the vehicle changing (been stable for around a year, though.)
  • User input (ex: clearing codes or calibrating the compass) is all done via a serial console app, and is arcane as fudge.
So I'm building the MkII out of a Raspberry Pi, with a larger touchscreen since I can't find a suitable OLED. Also going to add sensors for boost and road temperature, as well as a tilt calibrated compass (which will give me tilt sensors too.) Slow going on that, other projects eating up time.

Be happy to help out anyone attempting a similar project.
 

Attachments

  • IMG_0668.jpg
    IMG_0668.jpg
    30.8 KB · Views: 1,060
  • IMG_0666.jpg
    IMG_0666.jpg
    30.5 KB · Views: 1,032
  • IMG_0392.jpg
    IMG_0392.jpg
    40.2 KB · Views: 2,200
This is absolutely my favorite build in the entire forum. You have so many ideas that I want to try and do myself. Keep up the amazing work!
 
This is absolutely my favorite build in the entire forum. You have so many ideas that I want to try and do myself. Keep up the amazing work!
Appreciate the props. :)

If I can help you try any of them, let me know. I try to keep track of all the parts (and Amazon links) I use in my notes.
 
Well, just ordered a Kenwood KAC-M1804 4-channel amp. More car audio work this weekend.

I think I'm going to run new 16ga speaker wire just for the hell of it. When I was doing the rears, I was honestly not terribly impressed by the gauge of the factory wiring. Seemed like it was 20ga at best. Thought I was going to break it by bending it. Maybe that's good enough, but ehhhh.

Besides, Monday is a day off, so what the hell.
 
Appreciate the props. :)


If I can help you try any of them, let me know. I try to keep track of all the parts (and Amazon links) I use in my notes.


I want to do the LED's in the cup holder which is a piece of cake. I also want to do the switch for the rear window which is also simple. And finally I want to do the roof net which has me worried as to where you put the bolts in the sheet metal for the four corners of the net.
 
It's neat, was a fun little project. This is the little output panel below my HU:

In reading order, it's:
  • Short term MPG (last mile)
  • Compass direction
  • Long term MPG (last 300 miles)
  • Engine temp
  • Voltage
  • Intake temp.
The MPG is obviously off since it's calculated from estimates of airflow, and I like being lied to enough that I haven't properly calibrated it yet. If there's any CEL codes, they replace the instantaneous MPG until they're cleared.

This is the HUD:


It only displays the speed, and then the compass direction (the little inverted L to the left of the speed, which indicates NE.)

The main worky bits are an Arduino Uno and a Sparkfun OBD2 to TTL board:


It's neat, but it has a few problems:
  • The TFT dash screen is too dim to be seen on sunny days. Also, glare is an issue.
  • The HUD LED only has trouble in full sunlight, but mainly because the unlit white segments confuse things.
  • The TFT screen color doesn't quite match the rest of my dash, which makes me crazy.
  • The MPG is about 10-15% too optimistic, and I'm not sure if that's just because my AFR assumption is not generally true, or if it's something else.
  • The compass occasionally needs recalibration due to the local magnetic properties of the vehicle changing (been stable for around a year, though.)
  • User input (ex: clearing codes or calibrating the compass) is all done via a serial console app, and is arcane as fudge.
So I'm building the MkII out of a Raspberry Pi, with a larger touchscreen since I can't find a suitable OLED. Also going to add sensors for boost and road temperature, as well as a tilt calibrated compass (which will give me tilt sensors too.) Slow going on that, other projects eating up time.

Be happy to help out anyone attempting a similar project.

That's really awesome, thanks for sharing, i think i'll try something like that. I have a raspberry pi 2 thats not doing anything.
 
I want to do the LED's in the cup holder which is a piece of cake. I also want to do the switch for the rear window which is also simple. And finally I want to do the roof net which has me worried as to where you put the bolts in the sheet metal for the four corners of the net.
Dang, looks like RadioShack doesn't list the LEDs I used anymore, so I'm no help there. Shouldn't be too hard to find one with a threaded body, which makes mounting them trivial.

I think I posted the switch parts I used, but in case I didn't, they are:

Switch (any any momentary DT switch will do)
Housing (to match above switch)

And then some .25" quick disconnects from RadioShack to connect the wiring to the switch. If you use them, you really won't need the three-wire plug that I ended up using.
 
Dang, looks like RadioShack doesn't list the LEDs I used anymore, so I'm no help there. Shouldn't be too hard to find one with a threaded body, which makes mounting them trivial.


I think I posted the switch parts I used, but in case I didn't, they are:


Switch (any any momentary DT switch will do)

Housing (to match above switch)


And then some .25" quick disconnects from RadioShack to connect the wiring to the switch. If you use them, you really won't need the three-wire plug that I ended up using.


Awesome thanks so much! I am just wondering where you put the bolts in for the four corners of your roof net. That would be my first project to do.
 
That's really awesome, thanks for sharing, i think i'll try something like that. I have a raspberry pi 2 thats not doing anything.
Sure thing. I'll be posting progress with the MkII as it moves along, and I'll be happy to share part #'s and source code.
 
Awesome thanks so much! I am just wondering where you put the bolts in for the four corners of your roof net. That would be my first project to do.
Plenty of space up there to choose from. I popped the panels off at the top and checked for areas which were clear (of any holes, clips, or other stuff), marked them with a sharpie, then pulled the panel off to drill. There's a ridge on the back of the panel that lines up to the bottom of the headliner, so you just line up your sharpie mark and drill right below that ridge.

I drilled and tapped the holes in the body through those holes in the panels, so there was no question they would line up and the bolts would come through straight.

I'm not sure if you have a sunroof, or if the headliner is different without one, but there's a raised area in my headliner that I more or less kept everything inside of.

The net is going to stretch to pretty much any spot you decide to drill, so it's pretty much just a matter of where you think there's room. A few inches give or take isn't going to make a big difference.
 
Plenty of space up there to choose from. I popped the panels off at the top and checked for areas which were clear (of any holes, clips, or other stuff), marked them with a sharpie, then pulled the panel off to drill. There's a ridge on the back of the panel that lines up to the bottom of the headliner, so you just line up your sharpie mark and drill right below that ridge.


I drilled and tapped the holes in the body through those holes in the panels, so there was no question they would line up and the bolts would come through straight.


I'm not sure if you have a sunroof, or if the headliner is different without one, but there's a raised area in my headliner that I more or less kept everything inside of.


The net is going to stretch to pretty much any spot you decide to drill, so it's pretty much just a matter of where you think there's room. A few inches give or take isn't going to make a big difference.


Thank you again for all you help!
 

Members online

No members online now.

Forum statistics

Threads
278,310
Messages
3,554,078
Members
248,016
Latest member
Advally Service

Trending content

Back
Top