Sound Deadener Project - Spray Dead, Fat Mat

Rock_Rat

Senior Member
Time to get this thread going for all of those who requested it a while back. Here goes:

Initial Purchases

Carpet from Stock Interiors.com
  • Item Description - 5247 '96-'02 Molded Carpet Complete Kit
  • Color: 827 -Grey Plush Cut Pile
  • Backing: MassBack
  • Total with Shipping:$437.85

2 Gallons of SD1 Liquid Sound Deadener Kit

50 Sq Ft x 80mil thick self-adhesive Rattle Trap Sound Deadener with install kit

Total cost for complete interior project rounded up is approx: $788

I also have some Dynamat which I may not use (not included in this installation thread.
 

Attachments
  • Deadener_6.jpg
    Deadener_6.jpg
    87 KB · Views: 4,498
Last edited:
Register to hide this ad
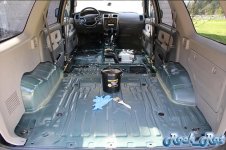
Initial Steps;

  • Remove seats and old carpet
  • Vacuum and wipe clean with rag and water
  • Protect all electrical connectors with foil or masking tape
  • Label Ziploc bags with Sharpie and place all hardware in bags

Lessons Learned: None so far
 

Attachments

  • Deadener_1.jpg
    Deadener_1.jpg
    66.6 KB · Views: 5,204
  • Deadener_2.jpg
    Deadener_2.jpg
    91 KB · Views: 4,896
  • Deadener_4.jpg
    Deadener_4.jpg
    95.2 KB · Views: 5,003
Last edited:
Add Spray Dead

  • Read the MSDS for any safety and health concerns
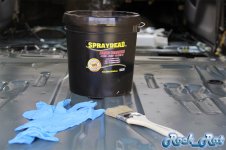
  • Using gloves provided and the small brush apply spray dead

The consistency of the product is similar to cake frosting. It goes on practically odorless and extremely effortless. The product is 100% water soluble.

(For those who plan on taking your T4R for a swim - something to consider)

Drying time - begins to dry immediately after application.

Lessons Learned - I live in the NW so it's hard not to work on projects when it's raining. But...hold off for good weather it will dry much faster.

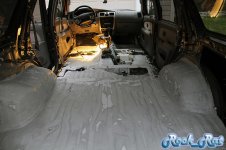
You'll notice the 500W light up front trying to get it to dry.
 

Attachments

  • Deadener_3.jpg
    Deadener_3.jpg
    75.1 KB · Views: 4,502
Apply a Second Coat

After the first coat was dry, I decided to apply the second coat.

Lessons Learned - Don't be afraid to apply liberal amounts.

Options: You may want to apply it to your doors and your roof. That's an option I would rather use the Fat Mat or Dynamat on.

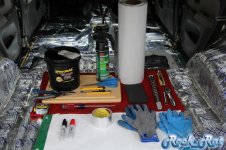
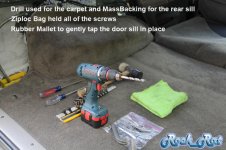
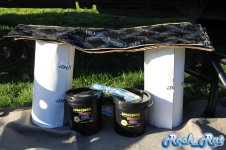
Once Dry it was time to begin my Fat Mat layer. The photo below consists of most of the tools I used for this project.
 

Attachments

  • Deadener_7.jpg
    Deadener_7.jpg
    94.7 KB · Views: 4,618
Adding the Tape

Rather than purchase the Dynamat seam tape I decided to use some 3M 425 Aluminum Foil Tape for the seams. Probably not necessary.
Link: http://www.uline.com/Product/Detail...gclid=CJTwq9vglMUCFcGGaQodYTgAwg&gclsrc=aw.ds

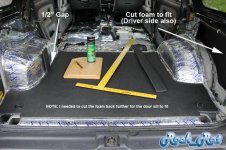
Adding the 1/2" Closed Cell Foam
  • Use white paper to layout your floor pattern
  • Place paper on top of the foam and
  • Use a T-Square and sharp box cutter to cut out the foam
  • I used 3m 90 Spray Adhesive on both surfaces

NOTE: Ensure you cut at least a 1/2" away from the wheel wells to tuck the foam along the sides

Lessons Learned: Cut back quite a bit for the rear door sill or else you won't be able to install it.
 

Attachments

  • Deadener_8.jpg
    Deadener_8.jpg
    101.4 KB · Views: 5,497
  • Deadener_9.jpg
    Deadener_9.jpg
    75.8 KB · Views: 4,597
Last edited:
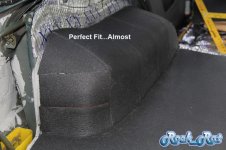
OK Time for the Carpet

Abide by the rule: Measure TWICE cut once!

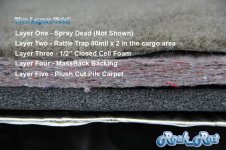
A word about the carpet from Stock Interiors. I love it! It is so much more robust than the OEM carpet. The color was off a tad bit (slightly darker) but not too noticeable. It was also molded almost perfectly to specs. What I like about the rear cargo area is the use of the MassBack on the entire back. It was a bit of a pain cutting that back to install the rear sill but it shows their quality. It shipped in two or three boxes and I laid it open in the garage and let it "relax" a month before installing it.

Photo's show the layers and the rear carpet install.
 

Attachments

  • Deadener_10.jpg
    Deadener_10.jpg
    94.5 KB · Views: 4,471
  • Deadener_11.jpg
    Deadener_11.jpg
    85.6 KB · Views: 4,347
Last edited:
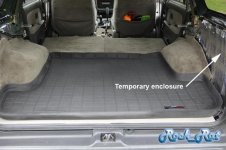
(Almost) Finished project with Carpet Installed

  • Carpet cut and installed
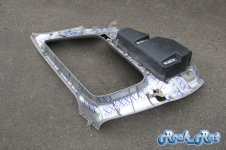
  • Finishing up Fat Mat on all interior sidewall panels
  • Temporarily closed off the side wall holes
  • Will work on doors next when I have my Inverter system drawn out to spec.

You'll notice I have temporarily sealed off the rear quarter panel area with Fat Mat and Duct Tape.

I'm trying to finish up a few other projects at the same time and I'm going to be working with [MENTION=102597]IBallEngineer[/MENTION] with a solid robust inverter system. There's the potential of using that available space on both sides.

A word of advise for anyone beginning this project:
PRIORITIZE your projects accordingly:
  • Engine (TB/WP/MAF/Plugs/Oil/New Radiator/etc...)
  • Transmission (Tranny Cooler/Fluids)
  • Suspension (LBJ's/OTRE/ITRE/13WL Mod with Big Tires)

As tempting as it is...any other mod is non-essential and can always wait.

Enjoy and fire away with the questions...
 

Attachments

  • Deadener_13.jpg
    Deadener_13.jpg
    67.4 KB · Views: 4,535
  • Deadener_14.jpg
    Deadener_14.jpg
    94.1 KB · Views: 4,182
but i laid 100 sq ft everywhere!
so question. did you do the back hatch as well as the roof?

I haven't done anything on the doors, the roof, or the rear hatch yet. I may not do the roof. I'm not sure if the time invested, especially with a moon roof, is really worth the results of the effort. I will do the doors and complete all of the interior panels. I think I will do the rear cargo hatch later on. I hesitate to add any Spray Dead on any vertical surfaces just in case it cracks and ends up dropping off. I will only go with the adhesive material.

There's a huge noticeable reduction in the dB and relative noise in the entire vehicle. Later on I'll take my video camera and Macbook APP and record the dB meter readings at highway speeds in the front and rear at cruising around 2500 RPM and then kick in the throttle a bit with the Airaid, Deck Plate, and also the SC noise. Unfortunately, I didn't take any benchmarks before I began the project.
 
(Almost) Finished project with Carpet Installed

  • Carpet cut and installed
  • Finishing up Fat Mat on all interior sidewall panels
  • Temporarily closed off the side wall holes
  • Will work on doors next when I have my Inverter system drawn out to spec.

You'll notice I have temporarily sealed off the rear quarter panel area with Fat Mat and Duct Tape.

I'm trying to finish up a few other projects at the same time and I'm going to be working with [MENTION=102597]IBallEngineer[/MENTION] with a solid robust inverter system. There's the potential of using that available space on both sides.

A word of advise for anyone beginning this project:
PRIORITIZE your projects accordingly:
  • Engine (TB/WP/MAF/Plugs/Oil/New Radiator/etc...)
  • Transmission (Tranny Cooler/Fluids)
  • Suspension (LBJ's/OTRE/ITRE/13WL Mod with Big Tires)

As tempting as it is...any other mod is non-essential and can always wait.

Enjoy and fire away with the questions...

We look forward to all of it!

:drummer:
 
I love your very detailed pictures and writeups! I used a combination Dynamat + Fatmat + Mass-loaded Vinyl in my '14 Mustang, but I couldn't justify spending that much amount of money for my Rattle Trap, and by Rattle Trap, I meant my 4Runner, not the product!

I used the infamous Peel 'N Seal with aluminum HVAC tape for my 4Runner. Front doors and rear cargo floor, I haven't done the main cab floors and rear passenger doors yet. Might add some Frost King Insulation as well around the transmission tunnel - we'll see! I just needed some small reduction in road noise while not steering away too far from my budget which is currently being prioritized for maintenance.
 
This is in depth! Nice work. I want to quiet my ride down quite a bit, but I'm not so sure about dumping that amount of cash into it would sit well with the wife. :yield:

Does anyone have any suggestions for a easier "day" project that could help turn down the road decibels in our trucks? Enough so that doing the project seems reasonably worth it?

I AM sincerely interested in decibel level readouts once you have the opportunity to get those. I would attempt to get a baseline read for you in my truck (admittedly, it would be different due to all sorts of variables, but it might be useful for a relative comparison). I would just have to figure out a program or app that I could use to get that reading. All I can say is that, for now, the road and wind noise are considerable when on the highway. I'd love to quiet that down with a reasonable (by reasonable, I mean reasonably low) monetary and time investment.
 
I love your very detailed pictures and writeups! ... I couldn't justify spending that much amount of money for my Rattle Trap, and by Rattle Trap, I meant my 4Runner, not the product!

I just needed some small reduction in road noise while not steering away too far from my budget which is currently being prioritized for maintenance.

Thanks! Just trying to give back to the good community! I understand the maintenance priorities! All of mine are complete now except the rear brake shoes and adding my Wheelers Off Road Stainless Steel brake lines.

My initial project consisted of just replacing the carpet and then it grew from there as you can see. (I've had the carpet since November, but since then I replaced LBJ's, radiator, TB/WP, etc.) My only justification for going "overboard" on the project is, I'm the original owner (waited for it to come across the pond from Toyota's Tahara plant at Tahara, Aichi, Japan) and I plan on keeping it. I figured I might as well do it right.
 
Recommend just completing the aft cargo area

This is in depth! Nice work. I want to quiet my ride down quite a bit, but I'm not so sure about dumping that amount of cash into it would sit well with the wife. :yield:

Does anyone have any suggestions for a easier "day" project that could help turn down the road decibels in our trucks? Enough so that doing the project seems reasonably worth it?

Thank you! You can get away with one gallon of Spray Dead and 50 feet of Fat Mat 80mil or similar product like Dynamat etc... Keep in mind I did my entire T4R from front to back and also replaced the carpet. Remove your rear cargo area carpet and the rear seats (backs only) and you still have a DD with your work in progress. You can tackle most of the noise for under $100

I AM sincerely interested in decibel level readouts once you have the opportunity to get those. I would attempt to get a baseline read for you in my truck (admittedly, it would be different due to all sorts of variables, but it might be useful for a relative comparison). I would just have to figure out a program or app that I could use to get that reading. All I can say is that, for now, the road and wind noise are considerable when on the highway. I'd love to quiet that down with a reasonable (by reasonable, I mean reasonably low) monetary and time investment.


I'll let you know which APP I'm going to download and install. My plan is to install it on either my Mac Book Air or iPad and set up a go-pro or video camera and record it in different operating parameters. My only regret is I didn't do any bench marking.
 
Last edited:
Thanks! Just trying to give back to the good community! I understand the maintenance priorities! All of mine are complete now except the rear brake shoes and adding my Wheelers Off Road Stainless Steel brake lines.

My initial project consisted of just replacing the carpet and then it grew from there as you can see. (I've had the carpet since November, but since then I replaced LBJ's, radiator, TB/WP, etc.) My only justification for going "overboard" on the project is, I'm the original owner (waited for it to come across the pond from Toyota's Tahara plant at Tahara, Aichi, Japan) and I plan on keeping it. I figured I might as well do it right.

I've got a long list of OEM parts and aftermarket replacements (including the stainless steel brake lines and most of what you mentioned up there) that I was about to order for my 'summer project', but it appears that the valve cover leak gave way when my mother was driving my 4Runner back at home. Keeping the cash for a rainy day.. might need a JDM engine, hopefully not!

I'm the FIFTH owner.. honestly speaking, you are the first person that I have come across in this forum that bought a 3rd gen 4Runner brand new. Must be a great feeling. :D
 
Heyo, great write up! I've sorta considered doing this, but I'm curious, how much weight do you think all of this adds? I've never done anything with sound deadening at all so I'm clueless haha
 
Maybe 50 lbs.


My 100 sq ft of mat only weighed 39 lbs. then add some foam or other types of material. It's not much weight really
 
This is in depth! Nice work. I want to quiet my ride down quite a bit, but I'm not so sure about dumping that amount of cash into it would sit well with the wife. :yield:

Does anyone have any suggestions for a easier "day" project that could help turn down the road decibels in our trucks? Enough so that doing the project seems reasonably worth it?

I AM sincerely interested in decibel level readouts once you have the opportunity to get those. I would attempt to get a baseline read for you in my truck (admittedly, it would be different due to all sorts of variables, but it might be useful for a relative comparison). I would just have to figure out a program or app that I could use to get that reading. All I can say is that, for now, the road and wind noise are considerable when on the highway. I'd love to quiet that down with a reasonable (by reasonable, I mean reasonably low) monetary and time investment.

Just did the [MENTION=65614]Antman[/MENTION] peel & seel on all doors & cargo area , easy to work with & CHEAP 2rolls did all ! Noticeably quieter , down the line will do the rock_rat route ! :flypig:
 
Just did the [MENTION=65614]Antman[/MENTION] peel & seel on all doors & cargo area , easy to work with & CHEAP 2rolls did all ! Noticeably quieter , down the line will do the rock_rat route ! :flypig:

Do tell more about this peel and seel? Link?
 

Members online

Forum statistics

Threads
278,316
Messages
3,554,120
Members
248,016
Latest member
Advally Service

Trending content

Back
Top