Sound Deadener Project - Spray Dead, Fat Mat

Careful with that stuff. Being asphalt based it'll start to melt and smell when it gets real hot. Learned that one the hard way.

I've had it in there for over a year through one of the hottest summers I can remember - 100+ temps for days.
No smell and nothing melted- really happy with it.
 
Also realize this, I've seen threads on car audio forums measuring the density of different sound deadening materials and the peel and seal is much less dense than any of the butyl based sound deadeners, if you want a decent cheap deadener, get Fat Mat.

Also, the closed cell foam that Rock Rat laid down absorbs much more of the road noise that you're trying to quiet down than any amount of butyl deadener will.

Sound deadener is only meant to dampen the vibration of the panel it's placed on and eliminate any resonance. Without a layer of closed cell foam, you won't notice a drastic reduction in actual road and wind noise. Home carpet padding also works wonders underneath the carpet.

If you only want a minor project, my recommendation is, butyl sound deadener in all 4 doors and the hatch, you don't have to completely cover the door, just add small patches of deadener until you can tap on each panel and get a nice solid dead thud. Also do carpet padding or closed cell foam in at least the footwells and under the cargo area carpet. If you want to take out the front seats and get under there too that's good.
 
Sound Deadener Project - Update

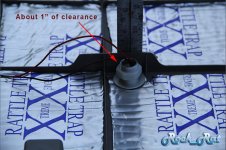
I still haven't completed the doors or installed all of my interior panels. I did however, install the fat mat on the rear hatch when I replaced my wiper motor. I chose not to add any closed cell foam there only because it's a very sensitive area with the tight tolerances with the window and the wiper motor.

Mind you, the interior panel is still off as I'm experimenting with some lighting and DC wiring ideas.

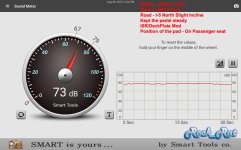
I recently read about a week ago where someone had performed a dB test after their install and can't recall who it was. Anyway, I decided to check out the dB's today on my way home. The APP I'm using is Sound Meter by Smart Tools

Parameters

  • I placed the Samsung Tablet on my passenger seat
  • Highway speeds between 69 and 76 mph
  • Kept my foot on the gas as steady as possible (Occasional pedal to the metal to pass) The meter jumped a bit.
  • RPM's around 2000-2700
  • Mods - Deck Plate and ISR (Bit noisy)
  • Supercharger is not installed (Nose cone getting replaced)

I wish I had a baseline to measure this against. If someone with a similar setup and NO Deadener wants to install the APP and contribute to this thread, that would be great.
 

Attachments

  • dB Deadener.jpg
    dB Deadener.jpg
    79.4 KB · Views: 1,190
I recently read about a week ago where someone had performed a dB test after their install and can't recall who it was. Anyway, I decided to check out the dB's today on my way home. The APP I'm using is Sound Meter by Smart Tools.
Might've been me. Shame I don't have a Samsung tablet, I'd absolutely grab it and give you a reading for comparison.

I think you have done something smarter than me by placing the tablet on the seat for the test--consistent placement! I've been holding my iPhone around ear height in the center of the cabin, so there's some variation there.

I'm going to try to finish my install this weekend (just the sound barrier on the front doors to do) and get another set of readings.
 
I've had it in there for over a year through one of the hottest summers I can remember - 100+ temps for days.
No smell and nothing melted- really happy with it.

That's good to hear. Sometimes it works and sometimes it doesn't and when it doesn't it gets nasty real fast. We see 100+ for 45-60 days straight or more every summer so it's not something I'm willing to chance.
 
I don't have a measurement on mine and I didn't do nearly as much as you but I do have a product that survives 120+ ousode Temps for a couple months at a time. Second skin audio. It's similar to dynamat only cheaper and thicker than the premium stuff. Sometimes they have a sale on b stock so messed up edges, wrinkles, etc etc. Picked up 90 sq feet shipped for $230.

c0181a30a52c1de45d1c95f45a6045f7.jpg


I didn't lay edge to edge unless the hammer sound told me to. Once I had a solid noise in the roof, floor, doors, tailgate, and sides I was good with it.
 
Might've been me. Shame I don't have a Samsung tablet, I'd absolutely grab it and give you a reading for comparison.

I think you have done something smarter than me by placing the tablet on the seat for the test--consistent placement! I've been holding my iPhone around ear height in the center of the cabin, so there's some variation there.

I'm going to try to finish my install this weekend (just the sound barrier on the front doors to do) and get another set of readings.

Yes it was your thread I was reading. Just subscribed. I would be interested in seeing what the dB levels are in the rear cargo area. Perhaps I'll keep one seat down and have my wife do the screen captures. I'm also tempted to reinstall my intake silencer. Either I've grown used to the pedal response and it's grown on me or I just don't see it anymore. I think the silence v. pedal response is a better option.

I was also driving on I-5 which is pretty noisy anyway until you hit those nice long runs of new blacktop. Might take a break this weekend.
 
So what did you do for your doors? And [MENTION=104905]wake_rider[/MENTION] I've got a thread on using the stuff you put down before laminate flooring and it's amazing, I can barely here my starter anymore. http://www.toyota-4runner.org/3rd-gen-t4rs/204400-sound-deadening-broke-people.html

I haven't touched the doors yet. The only reason I did the rear hatch is because I had to replace the wiper motor. If I start on the doors right now, I'll be upgrading my speakers, adding courtesy lights, running wire...etc... You see where there is going? It never ends! The cockpit is next. Gimme about a year before I begin the stereo upgrade and do the door panels.
 
I haven't touched the doors yet. The only reason I did the rear hatch is because I had to replace the wiper motor. If I start on the doors right now, I'll be upgrading my speakers, adding courtesy lights, running wire...etc... You see where there is going? It never ends! The cockpit is next. Gimme about a year before I begin the stereo upgrade and do the door panels.

I know where you're coming from. It takes every fiber of my being for me not to buy more sound deadening material so I just HAVE to buy new speakers.
 
[MENTION=116467]Rock_Rat[/MENTION].

I want more info on this inverter system.

Feel free to PM with details, if you don't want to let the cat out of the bag yet.


Also, on the Peel N' Seal.

I'm using it.

Works great.

Does get a little tacky in the heat, but still sticky as hell. I plan on adding aluminum tape to the seams/edges just to be safe.

No smell at all, and it's been close to 100 for the last month and a half, and my truck sits in the same spot, and is black.
 
[MENTION=76419]Doc2012[/MENTION]

Had too many other priorities on my list; Bumper, sliders, skids, TBU, TB/WP, radiator, LBJ O/ITRE, FIPG etc...Lot of engine, transmission, and suspension preventive maintenance.

The inverter is on hold for a bit (back burner) until I get all of my DC wiring schematics drawn out. Planning on all of my future and present demands off of a dual battery set up. I will eventually do the big 3 first before winter gets here. Still looking at the xantrex prosine 2000 inverter/charger. Will use the bluesea add a battery dual circuit system. Not sure how I'll install the second battery yet. I'll run with two red tops or one yellow deep cycle.

Once my "house" demands are mapped out I'll build my own wiring harness with all mostly OEM connectors, heat shrink, tin plated copper etc. This is the fun stuff!! That's going to take some time.

I'm pretty meticulous so I'll keep you posted on the progress.

Glad to know the peel and seal is working good for you. Good idea with the aluminum tape. I used a 3m brand that worked pretty good.
 
Sound Deadener Project Update - Closed cell foam

Short Update to the Project

1 - Here is some information on the closed Cell Foam that I failed to include in the beginning of this thread:

Vendor
Purchased from Cascade Tool and Foam
Hillsboro Oregon, Closed cell foam for FOD (Foreign Object Damage) Compliance from Cascade Tool & Foam Supply
  • Cost - About $300 split with another friend
  • Type - 2-lb density cross-linked PE (XPE) closed cell foam
  • Size - 1/2" x 60" x 100'

Obviously I didn't use all of it.

Rear Interior Panel progress
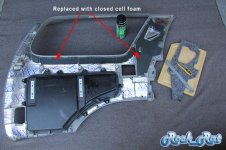
  1. Right rear interior quarter panel - complete. Needs installation
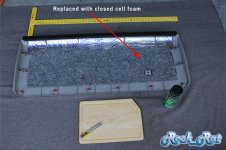
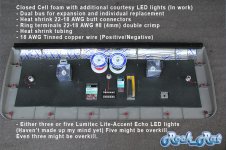
  2. Rear lift gate interior panel - Sound Deadener complete after replacing my wiper motor. Additional lighting and wiring in work.

I'm not sure how many lights, if any, I want to use on my rear interior lift gate panel. Still thinking through it before I cut any holes.

For those inquiring minds, there's about 1" of wiggle room between the panel and the shell. One day I'll put all this in a build thread.
 

Attachments

  • Right rear interior panel_1.jpg
    Right rear interior panel_1.jpg
    99.7 KB · Views: 1,135
  • Lift gate interior panel_1.jpg
    Lift gate interior panel_1.jpg
    99 KB · Views: 1,152
  • Lift gate interior panel_2.jpg
    Lift gate interior panel_2.jpg
    105 KB · Views: 1,146
  • Lift gate interior panel_3.jpg
    Lift gate interior panel_3.jpg
    91.9 KB · Views: 1,094
What I did for lighting in the rear.

Just a suggestion.

Next I did some lighting in the rear.

I went to Walmart, and got two packages of those little LED strips for 20 bucks. Not bad, considering they light up the rear like day light.

The first pic is how I wired them. I twisted like wires together, and then added a little solder to make sure they didn't move. I wanted to keep the on/off/door function, and this is what I came up with. The others are just the lights.


u6avezy3.jpg


eju3udeq.jpg


gyhyqyry.jpg


bu9eda5y.jpg
 
Sound Deadener Update - Closed Cell Foam

Some Lessons Learned on the closed Cell foam

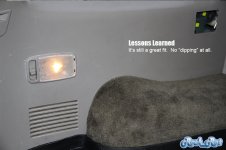
I finally installed one of my lights (just the dome) this past weekend and was ready to finally put my interior back together.

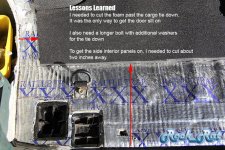
If you're using any closed cell foam you'll need to cut it back far enough to get the rear sill installed. The problem is, the expansion clips will be stressed out too much and may "pop" up.

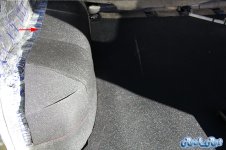
You also need to cut back about two inches from your quarter panels to get the interior panels installed. Once installed they have a great fit. Really snug and clean.

One other last item, which I haven't done yet is to raise the interior tie downs about a 1/2" or more. Just get a longer bolt and a few washers to stack it up.

Aside from that, the rear cargo area finished up nicely. The lift gate interior panel is still off until I decide which lights I'm going to use.
 

Attachments

  • Sound Deadener_1.jpg
    Sound Deadener_1.jpg
    137.9 KB · Views: 996
  • Sound Deadener_2.jpg
    Sound Deadener_2.jpg
    136.5 KB · Views: 1,096
  • Sound Deadener_3.jpg
    Sound Deadener_3.jpg
    80 KB · Views: 1,018

Members online

Forum statistics

Threads
278,316
Messages
3,554,120
Members
248,016
Latest member
Advally Service

Trending content

Back
Top